Have you, yet - gathered up all your 35mm slides and digitized them, yet? ... If so, what process did you use?
Dec 6, 2017 11:53:48 #

Chris T wrote:
Not bad, Richard ... that top one, of the motorcyclist ... has a painted look ... how'd you get that? ... PP?
That's probably the light, and the film used, when I shot the originals. Minimal PPing on the digital copies.
Dec 6, 2017 12:14:56 #

A few years ago, I bought a Canon CanoScan 9000F (~$150). It is a flat bed scanner with adaptors for film scans. It comes with frames to hold 35mm film (2 strips of 4 frames) and slides (4 slides). The software is excellent for fading, grain and backlight correction. Without the adaptor, it is excellent for scanning photo prints.
The driver software can be used in auto detect mode, which is only good for casual copies - for email or social media sharing.
If you really want to restore and save your stuff, you need to set up the parameters manually. This is not difficult, and generally, one setup is good for all film that shares film type and age.
In manual mode, you set:
1. Degree of dust, sharpness, fading, grain and backlight correction.
2. Specify negative or positive film.
3. Choose DPI resolution. Note that enlargement of an image is inversely proportional to perceived resolution. That is, if you scan a 35mm slide (24mm x 36mm, or roughly 1"x1.5") at 1200DPI, and enlarge the image to 4"x6", the perceived resolution will be 300DPI. If you want to enlarge more, or if you want to do serious editing or restoration (as with Adobe software) , you will need to scan at higher DPI.
I scanned slides that are about 60 yrs old, and was quite happy with the results. Mostly I used 2400DPI, but for the ones I intended to print and frame, I used 4800DPI.
I scanned film 100+ yrs old. For some of this, I used 9600DPI because I really needed to do some detailed repair work with Photoshop.
I also scanned prints that were even older, but DPI is useful only up to the quality of the print. But even with newspaper clippings, the results were way better that I had thought possible.
Bear in mind that increased DPI equates to increased scan time and file size: 4 slides @ 4800DPI will take 30-45 minutes, and 35MB per image.
Also, be prepared to equip with emulsion cleaner, lint free cloth, and cotton gloves (for handling without finger smudge).
Dec 6, 2017 12:31:19 #
RichardTaylor wrote:
That's probably the light, and the film used, when I shot the originals. Minimal PPing on the digital copies.
Which film did you use, Richard?
Dec 6, 2017 12:48:53 #
mdougc wrote:
A few years ago, I bought a Canon CanoScan 9000F (... (show quote)
Good tips, there, Doug ... and thanks for the recommendation on that scanner ... 35MB per slide, huh? ... Well - don't THAT beat all!!!!
Dec 6, 2017 13:04:21 #
Chris T wrote:
Which film did you use, Richard?
Would have been something quite fast (for the day). Maybe daylight high sped Ektachrome. It was long ago.
Dec 6, 2017 13:18:37 #
RichardTaylor wrote:
Would have been something quite fast (for the day). Maybe daylight high sped Ektachrome. It was long ago.
And I'll bet you thought 160 ASA was pretty damned fast, at the time, huh, Richard?
Now, that 51,200 ISO is the norm ... and a push to 3.2M is possible with at least - one DSLR ....
Dec 6, 2017 14:54:41 #
Chris T wrote:
And I'll bet you thought 160 ASA was pretty damned fast, at the time, huh, Richard?
Now, that 51,200 ISO is the norm ... and a push to 3.2M is possible with at least - one DSLR ....
Now, that 51,200 ISO is the norm ... and a push to 3.2M is possible with at least - one DSLR ....
I had used faster B&W film, TRI-X, in my real early days.
In 2006 when I purchased my first DSLR, a Canon 350D (Canon Rebel Digital XT ), I thought ISO 1600 and an image stabilised (VR) lens was heaven.
Dec 6, 2017 15:02:38 #
RichardTaylor wrote:
I had used faster B&W film, TRI-X, in my real early days.
In 2006 when I purchased my first DSLR, a Canon 350D (Canon Rebel Digital XT ), I thought ISO 1600 and an image stabilised (VR) lens was heaven.
In 2006 when I purchased my first DSLR, a Canon 350D (Canon Rebel Digital XT ), I thought ISO 1600 and an image stabilised (VR) lens was heaven.
I'll bet you did, Richard ....
Ooooh, isn't that quaint!!!
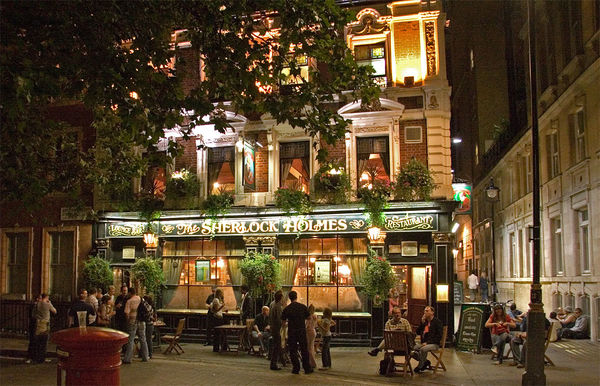
A restaurant with an outside patio, called Sherlock Holmes !!!! .... and all decked out for Christmas!!!!!
A Merry One to You, too, my friend ....
Dec 6, 2017 15:14:06 #
Chris T wrote:
I'll bet you did, Richard ....
Ooooh, isn't that quaint!!!
A restaurant with an outside patio, called Sherlock Holmes !!!! .... and all decked out for Christmas!!!!!
A Merry One to You, too, my friend ....
Ooooh, isn't that quaint!!!
A restaurant with an outside patio, called Sherlock Holmes !!!! .... and all decked out for Christmas!!!!!
A Merry One to You, too, my friend ....
Thanks - Seasons greetings to you and your family.
It's a London pub, in Whitehall area, and the image was shot in september (on a saturday night).
Notice the drinkers sitting in the laneway - we couldn't believe it.
Dec 6, 2017 15:31:16 #

Chris T wrote:
Still, a tedious process, huh, Bill?
A bit, but worth it.
Dec 6, 2017 17:44:07 #
RichardTaylor wrote:
Thanks - Seasons greetings to you and your family.
It's a London pub, in Whitehall area, and the image was shot in september (on a saturday night).
Notice the drinkers sitting in the laneway - we couldn't believe it.
It's a London pub, in Whitehall area, and the image was shot in september (on a saturday night).
Notice the drinkers sitting in the laneway - we couldn't believe it.
Oh, I see ... London, is it? ... Whitehall? ... never got out that way, much ...
I was pretty much in West and Southwest London ...
Yes ... a lady's sitting in a chair in the road - isn't she?
Merry Christmas to you and your lot, and all, Richard ...

Dec 6, 2017 19:09:07 #

Chris T wrote:
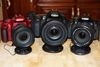
Re-shoot them, scan them, or did you use one of these "feeders" ???
What option are you considering?
Dec 6, 2017 19:49:56 #
Longshadow wrote:
A bit, but worth it.
Yup, most definitely, Bill ....

Dec 6, 2017 19:54:06 #
Gene51 wrote:
What option are you considering?
Dunno, Gene ... maybe get one of those CanoScan 9000F scanners with provisions for scanning slides .... got a better idea, Gene?
Jan 3, 2018 07:57:39 #
I used a 100mm macro lens and made a photo of each one. I used a gizmo that I attached to the camera that had a holder for a single slide -- I found it on the internet. I also used a light table behind it so that I got consistent light. It took about 30 seconds per slide. Cost was about $50 -- about 20 for the slide holder plus about $30 for the light table. You have to be very sure the light table has uniform light -- many of the less expensive ones do not. (it took me 2 tries to find one that works).
This is fast -- the most time consuming aspect is cleaning the slides -- dust gets on them even if they were properly stored.
There is a dedicated, modified, carousel system that is used by professionals that works essentially the same way but cost about $3500.
This is fast -- the most time consuming aspect is cleaning the slides -- dust gets on them even if they were properly stored.
There is a dedicated, modified, carousel system that is used by professionals that works essentially the same way but cost about $3500.
If you want to reply, then register here. Registration is free and your account is created instantly, so you can post right away.