What causes this?
Oct 15, 2017 11:43:54 #

Cookie223 wrote:
I'm definitely pleased with the improvements of th... (show quote)
The blue tint is a white balance error. If you record JPEGs at the camera, use a white balance target of some sort, and do a custom white balance in each new lighting situation. Outdoors, if clouds are rolling by, the color temperature can go from 5500K sunlight to 7500K cloudy to 9000K skylight in the shade. (Higher temperatures are BLUER.) Your camera does have presets for Daylight, Flash, Fluorescent lamps, Incandescent lamps, Cloudy, Shade, and possibly more situations. HOWEVER, the best possible white balance (therefore, color balance) is achieved in relation to a target.
https://www.bhphotovideo.com/c/buy/White-Balance-Accessories/ci/20410/N/4063534577?sts=cat
https://www.adorama.com/searchsite/default.aspx?searchinfo=white+balance+%26+color+calibration
Of course, every digital camera has an "Automatic White Balance" mode. Most of them are okay in daylight, but the warmer the color of artificial light gets, the more inaccurate AWB becomes. Nikon and Canon AWB are both pretty bad in household incandescent lighting, and worse if you're using household LED or CFL lamps. Oddly, THE BEST AWB is built into the Apple iPhone. It's very accurate.
IF you record and post-process raw files, using appropriate software on a computer with a decent, fully calibrated and custom ICC profiled monitor, you can alter the white balance to get exactly the look you want. You can also do fun things such as recovering highlight and shadow details that would be blown out or plugged up in JPEGs coming from the camera.
When you say your pictures "come out a little darker than I wanted," I assume you are referring to PRINTS. To get prints that closely match what you see on your monitor, you must:
A) Use a monitor of sufficient quality that it can be calibrated. You need it to display at least 100% of the sRGB color space (gamut).
B) Calibrate AND PROFILE your monitor, using a hardware plus software calibration kit. X-RITE and DataColor make them.
C) Use the labs (or your) printer/paper/ink profile as a proofing profile in your post-processing software's color management setup.
One more important piece of advice: Read your camera manual from cover to cover, about six times. I'm very serious when I say that's how long it takes most folks to TRULY UNDERSTAND what their cameras can do. (If you've ever heard the acronym, SPQ3R (survey, preview, question, read, review, report...) you know what I mean.) In between reads, go practice photography and apply what you've learned. That's the way I first learned advanced photography back in 1968. Cameras have become WAY more sophisticated since then. They contain several computers with dedicated operating systems and firmware, so they can be told to do all sorts of things we never dreamed of during the film era.
Oct 15, 2017 12:40:19 #

I started out in digital years ago with an EOS XT. I didn't like auto white balance results, so I now usually set my camera for the existing conditions. It became a habit, I never tried auto on my newer cameras. For all we know, the "auto" is changing to compensate for things it shouldn't.
Oct 15, 2017 12:54:02 #

Cookie223 wrote:
Thanks for the kind words Ralph.
Forgive my limited experience, but until I get better at this how do you correct under exposure?
Forgive my limited experience, but until I get better at this how do you correct under exposure?
Increase the size of your aperture (lower the aperture number) or increase your actual ISO. Either may require corresponding changes to keep the “exposure triangle” in balance. Google “exposure triangle” or refer to Bryan Peterson’s book.
Oct 15, 2017 13:28:38 #
TheShoe
Loc: Lacey, WA
If I remember correctly, White Balance is one of those settings that is ignored when shooting Raw, so it must be corrected in PP. It stands to reason that the camera's processing must guess the correct WB when not shooting Raw. Sometimes it gets it right; others, not. WB is always one of the first things I check and adjust when processing my images. Here is an example of a one-click adjustment, no fine tuning, of the first picture using DxO OpticsPro 11.
Oct 15, 2017 13:40:16 #
TheShoe wrote:
White Balance is one of those settings that is ignored when shooting Raw
I thought so too but learned differently
Oct 15, 2017 13:43:29 #

On my Canon it is not ignored but is captured as the WB set. It is also displayed that way on the screen on the back to when the embedded JPEG is displayed. If I shoot at 2500 Kelvin vs 8000 Kelvin the difference is very notable as displayed on the rear of the camera. The Canon also applies the active Picture Style to the rear display image. I usually shoot with he Faithful Picture Style when I shoot and in RAW. I will use Auto WB or set it close to what conditions I am shooting. I can change it as much as I want in PP but it will start out as shot.
Best,
Todd Ferguson
Best,
Todd Ferguson
TheShoe wrote:
If I remember correctly, White Balance is one of those settings that is ignored when shooting Raw, so it must be corrected in PP. It stands to reason that the camera's processing must guess the correct WB when not shooting Raw. Sometimes it gets it right; others, not. WB is always one of the first things I check and adjust when processing my images. Here is an example of a one-click adjustment, no fine tuning, of the first picture using DxO OpticsPro 11.
Oct 15, 2017 13:54:59 #
TheShoe wrote:
If I remember correctly, White Balance is one of those settings that is ignored when shooting Raw, so it must be corrected in PP. It stands to reason that the camera's processing must guess the correct WB when not shooting Raw. Sometimes it gets it right; others, not. WB is always one of the first things I check and adjust when processing my images. Here is an example of a one-click adjustment, no fine tuning, of the first picture using DxO OpticsPro 11.
*With the right post-processing software and settings* the white balance of your camera DOES transfer to the initial view of an image when you open it for post-processing.
In other words, If I open a raw image in my camera manufacturer's software, or if I set the Camera Calibration in Lightroom to the same Picture Style I set at the camera, the software will correctly interpret the EXIF data from the JPEG preview stuffed inside the raw file wrapper. It will display the image using very close to the same parameters as the camera used (or would have used) for a JPEG saved there. That INCLUDES application of the white balance set in the camera.
THAT'S why I always recommend folks get the WB as close to right as possible at the camera. If you perform a Custom White Balance at the camera, you can make minor tweaks in post-production, because the initial view of the image will be close to perfect (ASSUMING you have a properly calibrated and profiled monitor). This is most helpful when you are in an environment where the light is unchanging. It is also most helpful to those who plan to record JPEGs and do NO post-processing.
If you're not using a ColorChecker Passport and its subsequent workflow, including a proper white balance target in a test exposure of each new scene, at the camera, can be used to achieve "click white balance" in post-production. Record raw images, and the click balance tool will get you very accurate white balance, using this method.
Oct 15, 2017 14:21:41 #

Oct 15, 2017 14:43:20 #
If those first two are an improvement for you, either take a class, get your eyes checked or give up.
Oct 15, 2017 14:53:52 #

Cookie223 wrote:
I'm definitely pleased with the improvements of the pictures I've recently taken. these improvements are all due to you're excellent advice.
But I'm noticing that some (not many have a blue tint to them, and I don't have any idea what's causing it.
But I'm noticing that some (not many have a blue tint to them, and I don't have any idea what's causing it.
I'd like to share with you a good way to deal with the white balance (WB) issue after the fact in case you don't set a custom WB upfront, or even if you do and it doesn't turn out as you desire. I am by no means a post-processing wizard but I stumbled onto this little trick. On any picture that has some white in it, if any of the colors don't seem quite right, this little trick works wonders while maintaining vibrancy in most cases.
If you use a post processing program that has "levels" that's where the trick is performed. I use Photoshop Elements most of the time and have several versions from 2 through 12. It's also in Photoshop, probably Lightroom which I also have but don't recall using for this. If you do not use such a program, you should get one and there are free ones like Gimp and others. In Elements under "Enhance" there's "Adjust Lighting," then "Levels." Once the Levels box is open you will see three dropper on the right. Click on the clear one, far right. Now you may want to experiment some but I usually put the dropper on the lightest part of the white in a scene and click on it to see what I get. If it's what I want, I stop there and "save as" giving this adjusted file a little different name so as to not overwrite my original. If clicking on the whitest part of the white doesn't give me what I want, I hit the "reset" button, then that same dropper again and click on a little darker shade of the white in the scene, and repeat that with other parts of the white until I get what I want in the both the white and the other colors. Often the very lightest parts of the white in a scene will be too bright because it's so white that the highlights are blown out which makes it brighter than white and doesn't bring about the right adjustments in the other colors. Clicking on different shades, resetting, choosing the white dropper again and repeating the sampling on the other shades will almost always give you a pleasing outcome.
These droppers left to right are for sampling black, grey, and white. You can achieve about the same thing is you can find a neutral grey spot in the scene and sample it with the grey dropper, or if you have true black and use the black dropper. These droppers can to be used to adjust a scene if you choose to include a white card, a grey card, or a black card in the scene rather than a color passport so in post processing you can use them on one of those three shades to adjust your images and I find it more useful to use the white dropper because if the whites aren't right, the other colors usually aren't accurate either, especially skin tones. Now, this may not be how the droppers are intended to be used but to me it's the quickest way to get what you want when you know your monitor is set right to show you the true colors the camera is capturing.
As noted, your picture is too blue, then Haydon's, to me, and it might be a difference in monitor calibrations among all the different monitors, has a bit too much green, and then TheShoe's has too much yellowish, muddy, and dumbed down the vibrancy of the other colors, especially the skin tones. Here's the results I got using this dropper method that is the most pleasing on my monitor. Based on their monitors, others may see something different. I used the white dropper and sampled right in the middle of the 4 where the vertical and horizontal lines in the 4 cross. Play with it a little bit and click on different parts of the white and try to look for a spot where some of the highlights are preserved. You may lose some highlights but this method will usually give you the most pleasing outcome and occasionally let you save some highlights that might otherwise be lost in processing if you work at getting another color just right.

Oct 15, 2017 15:27:57 #

Cookie, when using Auto White Balance for the exposures, one of the things I've noticed over the years of doing digital photography is that the photos are biased by the colors present in the scene. This seems independent of the camera used or settings adjustments. Some settings will exacerbate the issue. Some will get it close, but not quite exact. Take a photo on a sunny day looking down a long stretch of road and you'll find the image is a bit blue biased. That's from the sky. Take a photo in a tree-lined park and you'll find the image is a bit green/blue biased. This is a combination of the foliage and the sky. Some cameras may be better at balancing this, but I've not seen many that hit it. As such, I do an image specific white balance on every image I process. That will render the colors as true to life as possible. With your permission, I'd be happy to process a couple of yours and repost them here.
Sure one can dial in a custom white balance setting that will accommodate that photo down the road or the photo in the park. But the setting will be correct for only that one particular scene and may not work for the next. In the examples you posted. It's difficult to say based on not knowing the conditions of the weather, that is clouds in the sky, atmospheric haze, etc. Even the direction you are pointed with respect to the sun can change the bias of the colors captured. I've done a number of experiments in an effort to determine the best settings, but finally resolved to use Auto and take care of the white balance in processing.
Though the setting I use now requires this processing step, It's more advanced than the issue you've presented here.
--Bob
Cookie223 wrote:
I'm definitely pleased with the improvements of th... (show quote)
Oct 15, 2017 15:38:40 #

Cookie223 wrote:
I'm definitely pleased with the improvements of th... (show quote)
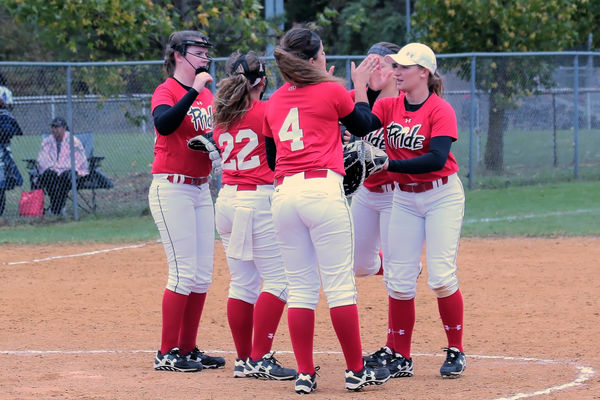
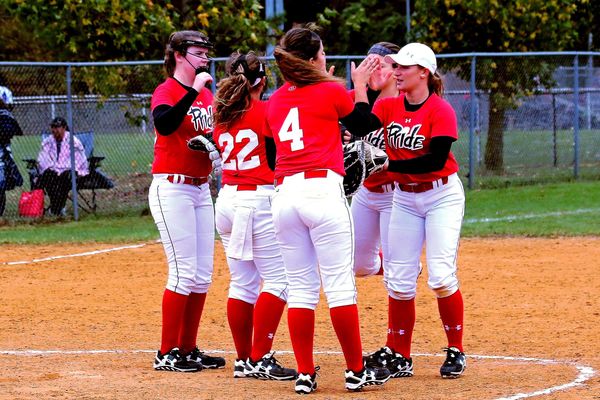
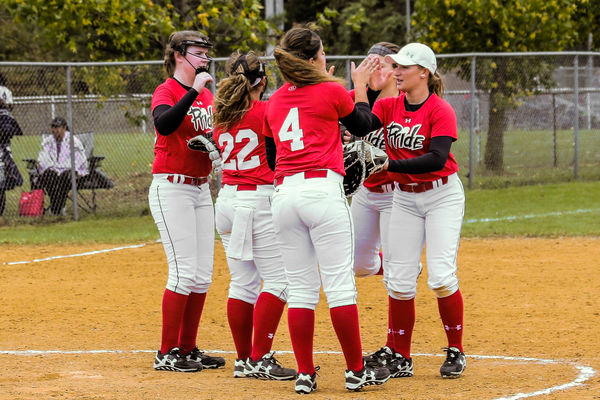
If you are shooting in RAW try setting your white balance to "Auto". You will be able to set it where you want in postprocessing if you don't like the way it looks. This is especially helpful if you are shooting in a situation where the light may be changing. At some of my granddaughter's softball games the light would go from being sunny to being overcase as clouds moved in and out and if you have the white balance set for sunny, shots taken when clouds move over can have a bluish cast as if you shot them in shade. This may be what happened in your examples where you got the bluish cast.
Oct 15, 2017 15:53:33 #
Cookie223 wrote:
I'm definitely pleased with the improvements of th... (show quote)
Here's a better idea. Shoot in RAW, auto white balance and process in lightroom. This way if it's off one move of a slider fixes it. So easy even a caveman can do it. Why complicate it so badly that you can't fix it. Seems no one here can. Here it is as good as can be. Those white baseball pants are great for showing reflected light; that's where the red casting in parts of the pants comes from.
The photo was actually over exposed by almost 1.5 stops. There are also a bundle of stray colors all over this photo. Are you using a cheap kit lens?
Stop trying to process in the camera and shoot RAW and do post processing where it should be done; on the computer; that's what software is for.
Oct 15, 2017 15:56:27 #

whitewolfowner wrote:
Good result with the editing whitewolfowner!Here's a better idea. Shoot in RAW, auto white ba... (show quote)
Oct 15, 2017 16:38:26 #
amfoto1
Loc: San Jose, Calif. USA
Cookie223 wrote:
I have B&W UV filters on all my lenses, shouldn’t they help? Or am I confusing myself with a different issue/using a UV.
Those filters effects are almost completely negated with a digital camera. Much film was overly sensitive to UV light, which caused a blue cast in images that the filters corrected. But digital cameras are not sensitive to UV, essentially have the filtration built in. No need for the filter (some people use them thinking that a thin piece of glass offers a bit of "protection"... but lens caps and lens hoods do a much better job of that).
It is a white balance issue (probably due to partial overcast.... shade or overcast tends to be bluish, especially when other parts of the sky are clear) and should be pretty easy to correct the blue cast in those images, in post-processing. Especially if shot RAW (CR2 in Canon), it's super easy to fix white balance. But even JPEGs can be corrected pretty easily.
If you want to reply, then register here. Registration is free and your account is created instantly, so you can post right away.