Put your photos for learning/critique here.
Jul 5, 2017 22:09:38 #

E.L.. Shapiro wrote:
Oh- I did that edit on my phone! It looked great on the small screen but too dark on my computer. So here's another version. Just to show how you can adjust the tonality and still retain detail.
Don't see the other version. Not sure if it came through.
Jul 5, 2017 22:23:48 #

Computer crash! I REPLACED the original edit with a lighter one. Thanks for the heads up.
Jul 5, 2017 22:56:30 #
BK!
Nice to hear about Tim's resourcefulness! When a guy always runs the extra mile to please the clients he's more than halfway there on the path to to success in wedding photography. Learning the technical stuff is important too but having the initiative to get those unique angles, create something really special and get that extra measure of customer satisfaction, is a talent in itself. KUDOS TO TIM! ...and nice of you to tell us about it!
Nice to hear about Tim's resourcefulness! When a guy always runs the extra mile to please the clients he's more than halfway there on the path to to success in wedding photography. Learning the technical stuff is important too but having the initiative to get those unique angles, create something really special and get that extra measure of customer satisfaction, is a talent in itself. KUDOS TO TIM! ...and nice of you to tell us about it!
Jul 6, 2017 09:35:40 #
Ed, I worked in pro labs while in College. I'm not really familiar with the term print down either. Is it the same as burning? I know that we would get a lot of orders, using different terms for the same services, depending on where in the country the items came from. By the time the orders got to me, everything was worded with what we used at our lab. The people receiving the orders and rolls of film would "translate" the requests for us, so we could just plug away at our tasks.
Jul 6, 2017 10:19:50 #
jaysnave wrote:
Thanks Ed & Bob.
Everyone ... lets see some of your detail shots & how you accomplish them. Do you use a macro lens? Modifiers? I saw a great image recently where they used a snoot on the rings controlling light on the rings, but darkness around them. I have a couple of pieces of acrylic sheets that I may use as a reflective surface.
Everyone ... lets see some of your detail shots & how you accomplish them. Do you use a macro lens? Modifiers? I saw a great image recently where they used a snoot on the rings controlling light on the rings, but darkness around them. I have a couple of pieces of acrylic sheets that I may use as a reflective surface.
I will see what I can find after a bit. It takes me a while to find them in my online back ups, then download them and upload them on here. I still think there is some kind of weird compression going on, or maybe "downrezzing"
Jul 6, 2017 12:03:34 #
Good day, Gang!
Sorry about the confusing terminology! Don't forget, I am an old guy who spent too many years in an old fashioned darkroom/color lab and what's worse I come from Brooklyn- so I talk funny as well. I think I have inhaled too much chemical fumes too! So let me translate.
I have been shooting digital for a long time now but I still, in certain cases, refer back to FILM technology in the nomenclature when I teach or write . We have more exacting post production image control nowadays but there are still many similarities in modern day editing and printing than there are differences- it's just easier and more convenient to incorporate finite adjustments in a computer driven digital system than it was in the old analog/silver/chemical/enlarger era. Again, all of this applies to prints AND screen images as well.
I terms of dynamic range or tonal range, wedding photography has always been somewhat of a challenge especially with traditional formal attire. We are oftentimes dealing with WHITE and light pastel bridal and bridesmaids gowns and BLACK or midnight blue suits or tuxedos. For those of us who like to do some dramatic lighting or low key portraits, we want to have detail in both the highlights as well as the darkest shadows. Images with burned out or washed out highlights or inky jet black shadows lack realism and depth. Back in the day, most black and white and color negatives films that were traditionally recommended and used for wedding photography were intended for making traditional reflection prints and therefore had a characteristic curve that easily accommodated a wide range of tones provided they were exposed and processed properly. It's harder to get a full range of tones on and matte or semi-luster paper that it is on a glossy paper or a trans-illuminated screen image.
Many experienced wedding and portrait photographers found that slight overexposure of color negative films yielded prints rich color saturation and pleasing contrasts along with good shadow detail. Exposure wise, the method was to expose for the shadows and PRINT DOWN (giving more all over general exposure for the printing paper) for the highlights. Because theses films had a great deal of LATITUDE we could overexpose a bit to make sure there was plenty of shadow detail and them bring out the highlight detail in printing simply by exposing the printing paper enough to show good highlight detail. The tonal range of the fil allows us to HOLD the shadow detail even when we exposed the paper for the highlights. This exposure for the paper was ALL OVER whereas BURNING IN was/is additional exposure added to local areas of the print. It was routine in custom printing to slight burn in the bridal gown for a bit more detail or areas that needed toning down. The opposite control function was/is DODGING or holding back exposure for darker local areas to further preserve shadow detail.
Whether you make prints or not, all of theses controls are still available to us on most photo editing software systems and plug-ins. Of course, we do not want to purposely overexpose a digital file because, like we used to do with transparency (slide) films, we need to expose for the highlights and make sure we remain withing the dynamic range of our cameras' sensor. The method is, when we are providing the studio or flash lighting, to expose for the highlight and the middle tones and provide enough fill light to bring up the shadows. When we are working with natural light, we find softer light to accommodate the tonal range of our camera systems or provide reflector or flash fill in to preserve the shadows.
Sometimes, however, no matter how careful we are, because we are oftentimes working on the fly, we find there is a deficit in highlight or shadow detail. This can happen when we make prints or there issues(hot spots) show up on a screen or projected image as well. So we can still burn and dodge to accentuate or calm down areas or simply control the brightness and contrasts of our image so in effect we are PRINTING down, either on the entire image or local areas. Back in the film era there were only one or two CONTRAST levels of color printing paper. Sometimes different brands had slightly more or less contrasts- some yielded warmer flesh tomes and some were cooler and more suited to commercial work, Now we can adjust the color and contrast as well as the saturation according to out own tastes- exactly as we want them.
Another though from the olden days. We used to have to expose very carefully and provide even negatives for the lab. If out negatives were "clan", that is well exposed, with ratios well controlled we could buy MACHINE PRINTS from the lab. Theses print were produced on automatic machines, rather than enlargers, where by the general exposed for the paper could be controlled but there was no burning or dodging. High quality prints were quite possible in this method as long as the negative was pretty perfect. On the other hand, sloppy shooting would require custom prints, mostly to correct problems and inconsistencies. Of course, custom prints were more costly to produce. Many high volume studios based there prices on using machine prints- proofs were usually machine made as well.
So...personally, I got in the habit of exposing and lighting carefully. Although I always custom printed my own album prints and wall portraits, I could make my proofs on the machine or buy the from a lab at reasonable prices. Since my negatives were easy to print and did not need too much local correction, final printing was fast and easy- time is money in the darkroom and so it is, nowadays, at the computer desk. In digital production, my workflow is fast and requires very little manipulation. I try to avoid having to do multi-layered complex. corrections. I don't mind doing all kinds of corrective shenanigans for a special effect or a blooper file where I made a mistake (I hate when that happens but it happens!), but not as a routine thing. I just want to do a crop- brightness- contrast- saturation and the odd burn or dodge and go on the the next image. It's crazy to spend more time on the computer than on the entire wedding shoot! Pleas forgive me- I never spent too man hours working over a "hot stove"...for me wit was working over a "hot" enlarger...really messed up my posture. I prefer a nice computer in an air conditioned office. I'm getting one of those newfangled rigs so I can stand up or sit down at my desk!
I hope this helps. Kindest regards, Ed
Sorry about the confusing terminology! Don't forget, I am an old guy who spent too many years in an old fashioned darkroom/color lab and what's worse I come from Brooklyn- so I talk funny as well. I think I have inhaled too much chemical fumes too!
So let me translate.I have been shooting digital for a long time now but I still, in certain cases, refer back to FILM technology in the nomenclature when I teach or write . We have more exacting post production image control nowadays but there are still many similarities in modern day editing and printing than there are differences- it's just easier and more convenient to incorporate finite adjustments in a computer driven digital system than it was in the old analog/silver/chemical/enlarger era. Again, all of this applies to prints AND screen images as well.
I terms of dynamic range or tonal range, wedding photography has always been somewhat of a challenge especially with traditional formal attire. We are oftentimes dealing with WHITE and light pastel bridal and bridesmaids gowns and BLACK or midnight blue suits or tuxedos. For those of us who like to do some dramatic lighting or low key portraits, we want to have detail in both the highlights as well as the darkest shadows. Images with burned out or washed out highlights or inky jet black shadows lack realism and depth. Back in the day, most black and white and color negatives films that were traditionally recommended and used for wedding photography were intended for making traditional reflection prints and therefore had a characteristic curve that easily accommodated a wide range of tones provided they were exposed and processed properly. It's harder to get a full range of tones on and matte or semi-luster paper that it is on a glossy paper or a trans-illuminated screen image.
Many experienced wedding and portrait photographers found that slight overexposure of color negative films yielded prints rich color saturation and pleasing contrasts along with good shadow detail. Exposure wise, the method was to expose for the shadows and PRINT DOWN (giving more all over general exposure for the printing paper) for the highlights. Because theses films had a great deal of LATITUDE we could overexpose a bit to make sure there was plenty of shadow detail and them bring out the highlight detail in printing simply by exposing the printing paper enough to show good highlight detail. The tonal range of the fil allows us to HOLD the shadow detail even when we exposed the paper for the highlights. This exposure for the paper was ALL OVER whereas BURNING IN was/is additional exposure added to local areas of the print. It was routine in custom printing to slight burn in the bridal gown for a bit more detail or areas that needed toning down. The opposite control function was/is DODGING or holding back exposure for darker local areas to further preserve shadow detail.
Whether you make prints or not, all of theses controls are still available to us on most photo editing software systems and plug-ins. Of course, we do not want to purposely overexpose a digital file because, like we used to do with transparency (slide) films, we need to expose for the highlights and make sure we remain withing the dynamic range of our cameras' sensor. The method is, when we are providing the studio or flash lighting, to expose for the highlight and the middle tones and provide enough fill light to bring up the shadows. When we are working with natural light, we find softer light to accommodate the tonal range of our camera systems or provide reflector or flash fill in to preserve the shadows.
Sometimes, however, no matter how careful we are, because we are oftentimes working on the fly, we find there is a deficit in highlight or shadow detail. This can happen when we make prints or there issues(hot spots) show up on a screen or projected image as well. So we can still burn and dodge to accentuate or calm down areas or simply control the brightness and contrasts of our image so in effect we are PRINTING down, either on the entire image or local areas. Back in the film era there were only one or two CONTRAST levels of color printing paper. Sometimes different brands had slightly more or less contrasts- some yielded warmer flesh tomes and some were cooler and more suited to commercial work, Now we can adjust the color and contrast as well as the saturation according to out own tastes- exactly as we want them.
Another though from the olden days. We used to have to expose very carefully and provide even negatives for the lab. If out negatives were "clan", that is well exposed, with ratios well controlled we could buy MACHINE PRINTS from the lab. Theses print were produced on automatic machines, rather than enlargers, where by the general exposed for the paper could be controlled but there was no burning or dodging. High quality prints were quite possible in this method as long as the negative was pretty perfect. On the other hand, sloppy shooting would require custom prints, mostly to correct problems and inconsistencies. Of course, custom prints were more costly to produce. Many high volume studios based there prices on using machine prints- proofs were usually machine made as well.
So...personally, I got in the habit of exposing and lighting carefully. Although I always custom printed my own album prints and wall portraits, I could make my proofs on the machine or buy the from a lab at reasonable prices. Since my negatives were easy to print and did not need too much local correction, final printing was fast and easy- time is money in the darkroom and so it is, nowadays, at the computer desk. In digital production, my workflow is fast and requires very little manipulation. I try to avoid having to do multi-layered complex. corrections. I don't mind doing all kinds of corrective shenanigans for a special effect or a blooper file where I made a mistake (I hate when that happens but it happens!), but not as a routine thing. I just want to do a crop- brightness- contrast- saturation and the odd burn or dodge and go on the the next image. It's crazy to spend more time on the computer than on the entire wedding shoot! Pleas forgive me- I never spent too man hours working over a "hot stove"...for me wit was working over a "hot" enlarger...really messed up my posture. I prefer a nice computer in an air conditioned office. I'm getting one of those newfangled rigs so I can stand up or sit down at my desk!
I hope this helps. Kindest regards, Ed
Jul 6, 2017 13:36:42 #
Gotcha. I would get instructions like +1 or -2 or something like that. Never called it print down, but it sounds the same. Others (the guys who I always aspired to be) would be doing things with exposing the paper multiple times, changing the filters between each time.
More times than not, I was relegated to developing the film. It wasn't until towards the end of my illustrious career that I started doing any actual printing, except with my darkroom stuff at home.
More times than not, I was relegated to developing the film. It wasn't until towards the end of my illustrious career that I started doing any actual printing, except with my darkroom stuff at home.
Jul 7, 2017 08:25:31 #
jaysnave wrote:
Everyone ... lets see some of your detail shots & how you accomplish them. Do you use a macro lens? Modifiers? I saw a great image recently where they used a snoot on the rings controlling light on the rings, but darkness around them. I have a couple of pieces of acrylic sheets that I may use as a reflective surface.
Everyone ... lets see some of your detail shots & how you accomplish them. Do you use a macro lens? Modifiers? I saw a great image recently where they used a snoot on the rings controlling light on the rings, but darkness around them. I have a couple of pieces of acrylic sheets that I may use as a reflective surface.
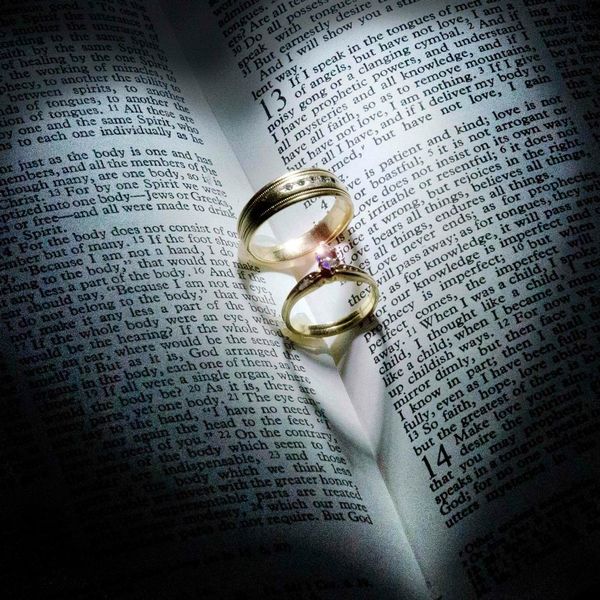
Jay, this is one of my favorites. It's actually a shot that I took of "she who must be obeyed's" and my rings for a display at a bridal show.
Dental wax was used to hold them in place. I can't find it right now, but I have a version with the wax cloned out. You don't really see it unless you are looking for it, though.
Verse is the one used in most weddings from Corinthian's Shot in a fairly bright (my living room) room, manual settings made the ambient light 4 stops under, so it was about pitch black. Used a snoot about 45 degrees above the bible with a snoot to concentrate the light to make the heart shadows. I have done this shot with rings together as well, but I like the double heart effect with them separate.
After the shot, I just burned in the shape of a heart. I get asked how I got a heart shaped shadow, but it's just photoshop. Of course, if I want to be mean, and I often am......I will describe a really complicated setup with barn doors, all kinds of home made things, several lights etc.... but really, it's just burning.
For her ring, they always turn out blah, so I add lens flair on a separate layer in photoshop, and mess with it until I get what seems semi convincing.
As I find more detail shots, I will also post them. This just happens to be one that I used on my web page for a while, and because it is actually a photo of "our" rings, it's one of my favorites. I have a 12x12 matted photo hung on my wall.
The only negative comment that I've gotten about it is that 13 (the verse) is in there, and that's "unlucky" Well, it's the verse, and I've somehow kept "she who must be obeyed" happy for almost 32 years, so.... I guess I'll keep that part in.
Anyway, other than the wax (which the fixed version is in a file somewhere) Let me know your thoughts.
Jul 7, 2017 10:09:08 #
Nice composition! SUPER EDIT.
Check out my post on detail shots. Tells how to get more gold in your gold rings.
Check out my post on detail shots. Tells how to get more gold in your gold rings.
Jul 7, 2017 11:08:52 #
bkyser wrote:
Jay, this is one of my favorites. It's actually a... (show quote)
My thoughts are I really like it and thanks for sharing. I learned several things from your post.
1. I have been close to buying a snoot and now know that it is as good as done.
2. I need to practice with wax
3. Blah rings are something I would like to improve on. Thanks for the flare tip.
4. Burning shapes is an interesting idea. Another purchase for me though. Maybe time to get that Wacom tablet.
Tell folks that 13 is only unlucky if you are part of the Knights Templar
Ed, I saw your post on detail shots. Like most of your posts I like to read them 2 or 3 times before responding. I will do that and I am sure I will have some questions.
Jul 7, 2017 12:03:21 #
jaysnave wrote:
My thoughts are I really like it and thanks for sh... (show quote)
Actually, I do have a snoot now, but the one used for that was that cheap foam from a craft store, taped into a tube shape, and rubber banded on my SB-600
Glad you found it useful.
As for Ed's post, I'm sure we aren't the only ones, but I print them off and read them over a few times. I'm an avid reader, but somehow paper works better for me than trying to "get it" when I read it online. Probably the same reason that I gave my Kindle to my daughter, couldn't stand it, went back to good old fashioned books.
Jul 7, 2017 12:49:11 #
I'm much the same, print them off stick in a binder read. Keep them coming Ed. Soon you'll have that book written 😀
Jul 11, 2017 15:48:51 #
Wow, Lots of great information!!
My computer not usable for a couple weeks, topped off 3 used HardDrives and bought another, now I have to download All this info to catch up! May need another drive :)
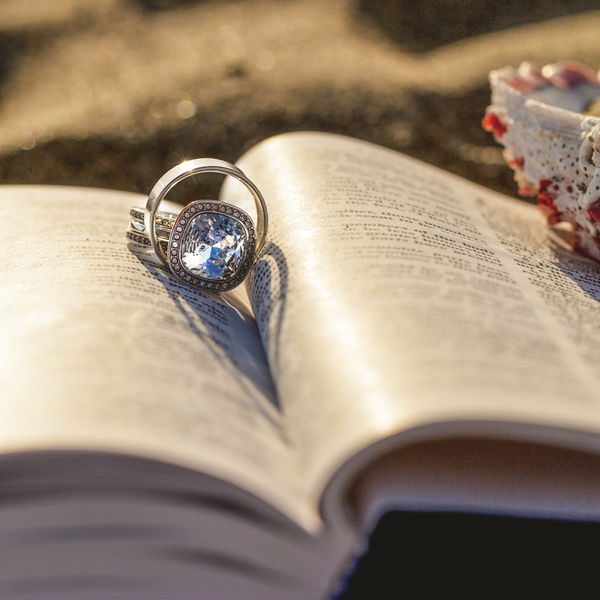
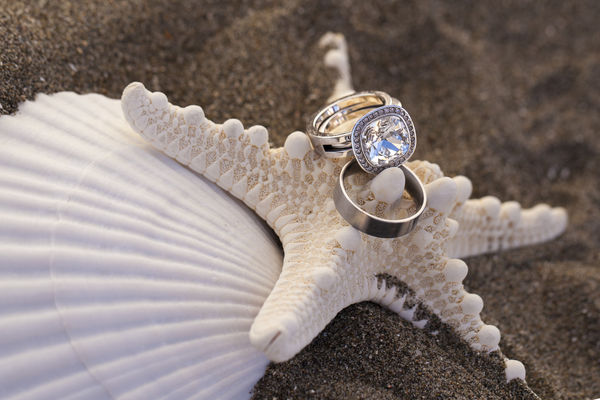
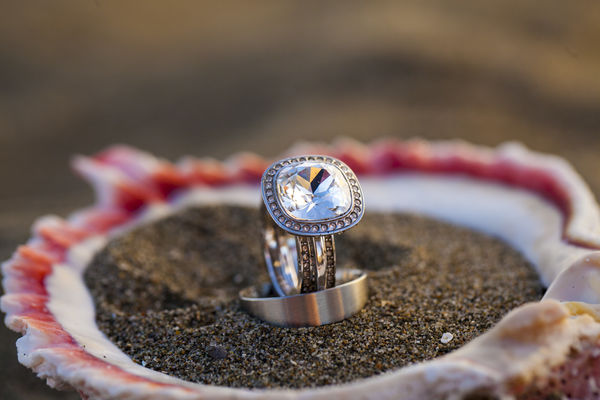
Love that ringshot Bkyser! I have one here that is similar... It was really a happy accident. On the beach, Bible opened to same verse, Used a shoot thru umbrella - laid on ground to help knock down the harsh light, and 1 bare flash of center.
(100 macro lens)... right as I was about to take the shot, the wind blew the pages, rings went flying (they sink fast in sand!)-
So I used a random page, rings kept falling, but then I saw this pattern, And liked it for the shot.
A lot of the white in the diamond was from the umbrella, where the blue was the sky, I tried turning it several times to get the best reflection.
My computer not usable for a couple weeks, topped off 3 used HardDrives and bought another, now I have to download All this info to catch up! May need another drive :)
Love that ringshot Bkyser! I have one here that is similar... It was really a happy accident. On the beach, Bible opened to same verse, Used a shoot thru umbrella - laid on ground to help knock down the harsh light, and 1 bare flash of center.
(100 macro lens)... right as I was about to take the shot, the wind blew the pages, rings went flying (they sink fast in sand!)-
So I used a random page, rings kept falling, but then I saw this pattern, And liked it for the shot.
A lot of the white in the diamond was from the umbrella, where the blue was the sky, I tried turning it several times to get the best reflection.
Jul 11, 2017 15:57:17 #
Jul 11, 2017 16:08:37 #
Tim Stapp wrote:
I can only imagine the sheer panic when the rings went into the sand.
Yes!! Had to have help finding them! I did the rest of the shots in a shell, you wouldn't believe how quick they sink! and how deep!
I was already stressed and everything was behind schedule.. No one knew why I was so sweaty! (he was just taking pics of the rings).
Here is a couple more...
If you want to reply, then register here. Registration is free and your account is created instantly, so you can post right away.