Blown Out Highlights
Mar 29, 2017 11:51:56 #
Personally I spot meter the dark area - take the shot and then spot meter the light area and take a second shot. Put them together later with PS.
Mar 29, 2017 12:02:46 #
K7DJJ
Loc: Spring Hill, FL
This video is the best info I have seen on your problem. Your question starts at about 20 minutes.
Mar 29, 2017 12:16:26 #
boberic wrote:
As in many things in life, sometimes you just have to compromise. Which is more important? The subject or the background? In High contrast situations a perfect exposure may not be possible. Maybe metering off a grey card may help. But always remember- perfection is the enemy of good. Here's an example. I wanted to highlight the fall colors. So I had to let the water be blown out. It was a choice, that I had to make. Expose for the water or the trees?
Your scene looks like a good candidate for HDR.
Mar 29, 2017 12:18:57 #
How about using a graduated ND filter? It may take a little longer, but patience is said to be virtue.
Mar 29, 2017 12:42:01 #
Your landscape description example could be resolved by several ways, some already suggested here.
1. Another way is to take two or three different exposures - from your tripod.
2. Use of a graduated neutral density filter - either from your tripod or hand held. It is not difficult to use the neutral density graduated filter - especially when other ways are not available or don't work.
1. Another way is to take two or three different exposures - from your tripod.
2. Use of a graduated neutral density filter - either from your tripod or hand held. It is not difficult to use the neutral density graduated filter - especially when other ways are not available or don't work.
Mar 29, 2017 12:45:17 #
Expose for the highlights, and mask the darks in Photo Shop. It is almost like working with film, but the computer is easier.....
Mar 29, 2017 12:59:09 #
K7DJJ
Loc: Spring Hill, FL
K7DJJ wrote:
This video is the best info I have seen on your problem. Your question starts at about 20 minutes.
https://youtu.be/58G-ttOw6PM
Mar 29, 2017 12:59:12 #

I spent a good bit of time determining the performance characteristics of my camera's sensor. Then using some advanced ETTR/EBTR exposure techniques, I've little to no problem with blown highlights and detail in shadows. Ex. of many http://www.uglyhedgehog.com/t-438348-1.html
--Bob
--Bob
HankR wrote:
When shooting outdoors with very light (bright sky... (show quote)
Mar 29, 2017 13:19:34 #

Mar 29, 2017 14:58:02 #
amfoto1
Loc: San Jose, Calif. USA
HankR wrote:
When shooting outdoors with very light (bright sky... (show quote)
First... is your computer monitor calibrated?
If not, it is almost certainly causing you to massively under-expose your images. The vast majority of computer monitors are way, way too bright for proper image exposure evaluation. Even "graphics quality" monitors.
For example, when I first got mine, when I calibrated it with my Datacolor Spyder I had to dial the brightness setting way down to "20". It goes up to "100", so this might be "20%", if the brightness level adjustment is truly linear. (I forget what it was defaulting to, just that it was way too bright....). Occasional re-calibration is necessary because monitor brightness (and color rendition) change over time, with use. They gradually lose brightness. Now about 6 or 7 years old, I'm setting my monitor brightness to "50", to get the same level as I did with "20", when it was new. I re-calibrate every 60 days.
So your first step should be to insure you are actually seeing a reasonably accurate representation of image exposure (and color!) on your computer.
You also shouldn't trust the image playback on your camera for evaluation. The small monitor on the back of your camera can't be calibrated and is viewed in all sorts of ambient light conditions... both of which make it unreliable to make these judgments about your image. Instead look at the histograms of the images you think are overexposed, and see if the display is heavily biased to the right hand side of the histogram. If not, you aren't actually getting overexposure. The ideal for most scenes would be that the histogram just barely reaches the RH side, very little "overflows".
Enabling the "blinkies" on your camera or "highlight clipping warnings" built into many post-processing software programs also would give you more accurate info about overexposure. This is just a warning though, not as informative as the histogram.
-2 stops of Exposure Calibration is a huge amount. While it's possible your camera's meter is inaccurate and needs to be adjusted, that sort of thing is extremely rare with modern cameras and quality control.
I would normally only expect to need - 2 stops of E.C. in the most extreme situations... where the subject and scene are unusually dark (a black bear in a coal mine)... +2 E.C. would be the other extreme (a bride in a white gown in a snow scene).
In fact, my default settings with my Canon are just the opposite... slightly over-exposed. I don't have a 5DIV (yet, I do plan to upgrade to one from my 5DII... eventually). But all Canon cameras I've used have tended to underexpose in a lot of situations. Whenever I'm using any auto exposure mode, I tend to use +1/3 or +2/3 exposure compensation with them. In really flat light, I might not use any E.C. In morning and evening sunlight, I use +1/3. In midday when the sun is high and shadows are deep, I usually use +2/3. (These are my "base" settings... I usually still dial in additional + or - E.C. when subject/scene tonality are brighter or darker than "average".
I also usually use +2/3 with very high ISO shots... avoiding underexposure as much as possible. I want to be "pulling down" exposure a little in post-processing, rather than "pushing it up". This is because any time you increase exposure in post, you greatly amplify image noise along with it. To keep noise to a minimum, I "err toward overexposure".
"ETTR" or "expose to the right" such as I'm using is a common practice among digital photographers. This is because some slight overexposure very often makes for the best images. Very much the opposite of what you're doing.
Even with a properly calibrated computer monitor, images can still appear to have "clipped highlights". But this doesn't mean they actually are or that the clipping is "incorrect" or a bad thing.
In fact, a print made from the same image often will actually show plenty of highlight detail (as well as more shadow detail than you can see on your monitor). Here is an example that was very specially post-processed to recover highlight detail (and open up shadows slightly)...

You likely can't see it at Internet resolution and sizes, but in the above image there is plenty of detail in the white fence and shaded side of the rider's white shirt. There are some "blown highlights" on the sunlit side of his shirt, but not as much in the final print as it appears on my calibrated computer monitor. But some "blown highlights" are actually what you'd see with your eye, too.
Here's another example...

A dark horse against a bright background! Here you can bet that the "blinkies" will be flashing and the histogram would indicate lots of overexposure because of that white fence in the background. But, so what? There are "blown out highlights" on the chrome pieces of the bit and bridle too. Those are to be expected... and IMO actually are "correct" when partly blown out!
Both the above were shot with +1/3 stop Exposure Compensation (on Canon cameras). A dark horse like the above I might more typically have dialed some -2/3 stop E.C., to be sure detail wasn't lost in shadows... But in this case there was a white wall right beside me that was bouncing lots of fill light onto the subject and nicely "opening up" the shadows. Both the above would have been ruined and unusable if I'd dialed in -2 full stops of E.C. on any of my Canon cameras!
Another thing that can cause problems is the metering pattern you have set. Usually, for most scenes, Canon's Evaluative metering works quite well. Though it reads the entire scene, this metering mode puts extra emphasis on the area immediately around the active AF point(s). It assumes what you are having the camera focus upon is your primary subject and what you're trying to exposure accurately. I use Evaluative on my Canon most of the time and it works well. Center Weighted is sort of an "old school" method of metering that also reads the entire scene, but with some extra emphasis on the central area (which might be fine, so long as you always center your subject). Spot Metering reduces the area being metered to a very small percentage of the scene (typically 1.5 to 3.5% on Canon, depending upon the specific camera).... and can work great in some circumstances... but requires more careful E.C. adjustment when using any form of auto exposure and subjects are anything other than "average" tonality. Partial is the fourth pattern offered, and is sort of like a bigger "spot"... maybe 15 to 25% of the scene, but again it varies depending upon the particular camera. I probably use this mode and Center Weighted the least.... Spot occasionally (and carefully) and Evaluative the most. It does take some practice with any of them to learn how they work and be better able to control whichever you choose to use.
My most accurate means of determining exposure is a separate, handheld incident light meter. This measures the light falling onto the subject, instead of what's being reflected off of it (the way any camera's TTL meter has to measure it). Because of this, little or no "E.C." is needed. An incident reading is in no way effected by subject tonality that varies from "average", the way a reflective reading is. My incident meter reads in 1/10 stops, very precise. But, it's largely limited to use when setting exposure fully manually on the camera. Or, sometimes as a double-check of the settings the camera is suggesting (or using, in any of the auto exposure modes). While I use this separate meter and fully manual exposure settings whenever I can, it's just not always possible... such as with subjects moving in and out of shade or any other rapidly changing lighting conditions. So it's important to know how to use the camera's metering system effectively, too.
Again, I strongly suspect you're actually doing your images no favor dialing in heavy, minus E.C. like you say you are. Most likely you're basing your judgment upon incorrect information about the image from an uncalibrated computer monitor or by not using correctly using the exposure evaluation tools on the camera itself (i.e., histogram instead of the image playback). There's a very remote possibility that something is wrong with your camera... but I'd look at other, far more likely possibilities first.
You mention specifically overexposure of sky, clouds and reflections. To control those particular issues to some extent, try using a quality, multi-coated Circular Polarizing filter. On the lens you mention, a 77mm B+W F-Pro HT "high transmissive" Kaesemann that sells for about $85 (B&H Photo, NYC) would be a very good choice. There are other, similar quality such as Hoya HD3, Marumi EXUS, Helipan SH-PMCand others... but they typically cost more. I hear a lot of good things about a new brand too: Breakthrough filters, which cost close to the same as the B+W mentioned.
Also be sure to use your lens hood (though it can be a little inconvenient when using a C-Pol filter... typically the hood has to be removed temporarily any time you want to adjust the filter).
An ND or "Neutral Density" filter will have little effect. It reduces brightness evenly across the entire image, which the camera will want to "correct" by using larger aperture, slower shutter and/or a higher ISO. An ND also t won't reduce reflections or do very much to change the contrast between sky and clouds, the way a C-Pol will. For still photography, fairly strong ND filters (round, screw-in) are usually used to be able to use extra long shutter speeds that will create deliberate blur of moving objects, or to allow use of extra large apertures for shallow depth of field effects.
Graduated ND filters are available to help balance an overly bright sky with the rest of a scene... But to be usable the type of these that are needed are over-size, rectangular that slide into a filter holder, allowing the transition line between clear and filtered to be adjusted to the scene (not round, screw-in). These filters are bulky, not all that accurate with many or most scenes and usually get in the way of using a lens hood, so I've gotten out of the habit of using them. (Instead I just use multi-exposure or multi-processing techniques in post-processing... which works better than the filters ever did and is easy once it's learned.)
Finally, don't panic about some blown out highlights. There are bound to be some in sunlit scenes. Unless you are going for some special effect, it often is best render them in images much as we expect to see them with our eyes. Plus, with digital images highlights are a lot more recoverable than you might think, in post-processing.
Hope this helps!
Mar 29, 2017 14:59:59 #
An old statement used by Ansel Adams way back when, is to expose for the shadows, and print(finish) for the highlights. A lot easier with digital programs than it was in the darkroom. Try it.
Mar 29, 2017 15:13:34 #
Mar 29, 2017 15:26:44 #
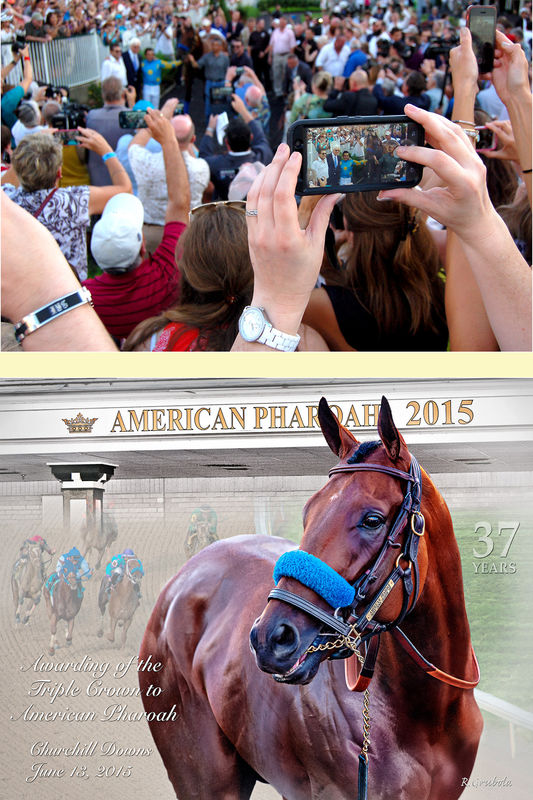
Speaking of horse shots...
I was fortunate to be in the right place at the right time to shoot American Pharaoh in 2015.
The top pic was my only view till the crowd parted briefly and I was able to get a good shot with my good camera and lens for the second pic and made this layout.
I was fortunate to be in the right place at the right time to shoot American Pharaoh in 2015.
The top pic was my only view till the crowd parted briefly and I was able to get a good shot with my good camera and lens for the second pic and made this layout.
Mar 29, 2017 15:47:16 #
amfoto1
Loc: San Jose, Calif. USA
Fotoartist wrote:
Speaking of horse shots...
I was fortunate to be in the right place at the right time to shoot American Pharaoh in 2015.
The top pic was my only view till the crowd parted briefly and I was able to get a good shot with my good camera and lens for the second pic and made this layout.
I was fortunate to be in the right place at the right time to shoot American Pharaoh in 2015.
The top pic was my only view till the crowd parted briefly and I was able to get a good shot with my good camera and lens for the second pic and made this layout.
Great shots!
The top photo is all-too-common, these days. (Remember when people actually looked at things... rather than only viewing the world as their damn phone "sees" it?
 )
)The bottom image, the horse's pose is near perfect and expressive. Lighting is great, too. I'm guessing you had to drop out a busy background and/or crowd.... were probably very lucky to even get any shot at all. Nicely handled!
It's often difficult to get a horse nicely posed in isolation against a nice background. But especially so, a famous and popular beast that instantly draws a crowd anywhere it goes.
Race tracks are one of the few equestrian venues I haven't ever shot... I really want to do that sometime.
Mar 29, 2017 15:58:55 #
Yeh, I dropped out the background. He was there in the paddock as the top photo shows surrounded by people and handlers. The stall with his name was in the background too. (It's going to stay there.)
If you want to reply, then register here. Registration is free and your account is created instantly, so you can post right away.