Photographing yellow interior wall in HDR
Jun 19, 2016 10:59:19 #

The first issue I can theorize from your post is using HDR. That will decrease your ability to obtain accurate colour immensely. Some type of flash, actually multiple lights be they studio strobes or speedlights. The next thing I can recommend is a good light meter, such as a Sekonic L-758dr, calibrate it to your camera, profile it for your post processing. Then, practice a lot with your complete setup. This all has to work like an orchestra under your direction.
--Bob
--Bob
rrg6481 wrote:
I am a real estate photographer seeking info on ho... (show quote)
Jun 19, 2016 11:10:23 #

rmalarz wrote:
The first issue I can theorize from your post is using HDR. That will decrease your ability to obtain accurate colour immensely. Some type of flash, actually multiple lights be they studio strobes or speedlights. The next thing I can recommend is a good light meter, such as a Sekonic L-758dr, calibrate it to your camera, profile it for your post processing. Then, practice a lot with your complete setup. This all has to work like an orchestra under your direction.
--Bob
--Bob
It is relatively easy to obtain decent color with HDR if you know the tonemapping controls. Most people overcook HDR both by too much saturation and too much microcontrast, not to mention overly aggressive tonemapping.
Jun 19, 2016 11:41:02 #
zigipha wrote:
Maybe I screwed up. When he said that he shot the whole thing in HDR, I assumed that he was using the in camera feature. My bad.The op clearly said he is using sw programs for the hdr, not the in-camera feature
Jun 19, 2016 13:56:29 #
tainkc wrote:
Maybe I screwed up. When he said that he shot the whole thing in HDR, I assumed that he was using the in camera feature. My bad.
In-camera HDR is a pale shadow of what is possible with bracketing and combination in a dedicated software program, which doesn't mean that in-camera is bad, only limited.
Jun 19, 2016 14:17:07 #
rrg6481 wrote:
I am a real estate photographer seeking info on ho... (show quote)
Capture raw and use color checker. Correct in LR / ACR or PS. May need to selectively adjust colors using adjustment layers in PS.
Jun 19, 2016 14:52:58 #

rrg6481 wrote:
I am a real estate photographer seeking info on ho... (show quote)
Several years ago, (in the 90's???) ,I read an article about a similar problem inside a store.
I don't remember too much but do recall the photographer's choice was to film a daylight shot for the window background and go back at night with a bunch of lighting for the insides. Then merge both to finish off with the best of everything.
Jun 19, 2016 15:33:43 #
kymarto wrote:
Oh, I agree 100%, but I was thinking in terms of "Time is Money". I guess that I also kind of spoiled since I had to learn real fast how to shoot good Jpegs straight out of the camera and at the time, Sony was the only game in town that had a decent in camera HDR feature. I think Olympus or Pentax had that feature, but was not nearly as good. I know that neither Canon nor Nikon had that feature on any of their equipment at the time. I do know that no matter what, it can be very difficult to get that perfect shot which is required in real estate photography due to the lighting.In-camera HDR is a pale shadow of what is possible with bracketing and combination in a dedicated software program, which doesn't mean that in-camera is bad, only limited.
Jun 19, 2016 16:12:14 #

GENorkus wrote:
Several years ago, (in the 90's???) ,I read an article about a similar problem inside a store.
I don't remember too much but do recall the photographer's choice was to film a daylight shot for the window background and go back at night with a bunch of lighting for the insides. Then merge both to finish off with the best of everything.
I don't remember too much but do recall the photographer's choice was to film a daylight shot for the window background and go back at night with a bunch of lighting for the insides. Then merge both to finish off with the best of everything.
I've done that, with a view camera and B&W film. Major pain but the results were worth it, back in the days before Photoshop and computers. It also helps to do what the movie production companies do - hang black out cloth on the outside of the windows to control window light, then shoot an exposure correct for the window, which will make the room dark if not black, then open each image in photoshop as a layer, and use layer styles to "blend if" using the sliders to control what is allowed to punch through.
Jun 19, 2016 18:07:00 #

If color casts caused by lighting is a problem, then a Scott Kelby procedure in Photoshop could help. It involves setting the black, white, and midtone eyedroppers in Adjustments/Curves to fixed RGB values: black 10 to 20 for each, white to 240 to 245 each, midtone to 126 to 130 each. Then in an obscure place put a self-manfactured white & black card (like over a plain rug that you can clone out on OS). That way you will have a target of what must be black and white. But this procedure if the several illumination sources dominate just parts of a room. In this procedure do not rely on things that could be black or white, but only look like it. Blown out highlights look white but are not really. Likewise with dark shadows. But it is worth a try and the cards can always be Photoshoped out.
Jun 19, 2016 21:40:44 #
John_F wrote:
If color casts caused by lighting is a problem, th... (show quote)
If onlookers don't already own a editing program or looking for another, check out this webinar first.
http://www.youtube.com/watch?v=IfOXLmaE7ds
Jun 20, 2016 00:52:56 #
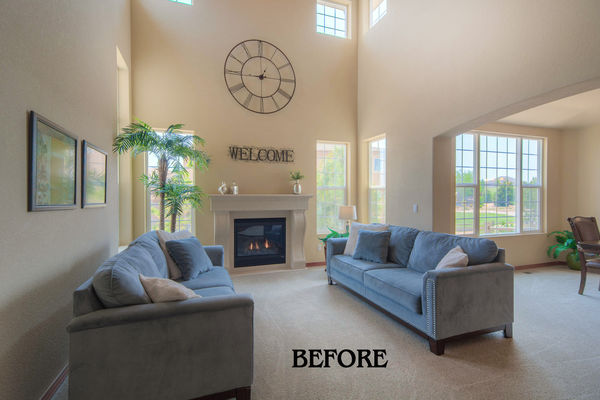
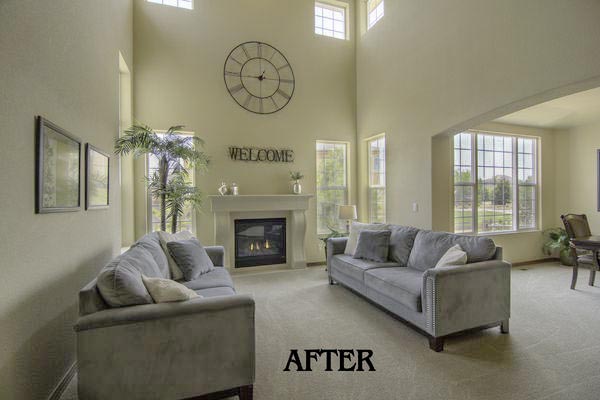
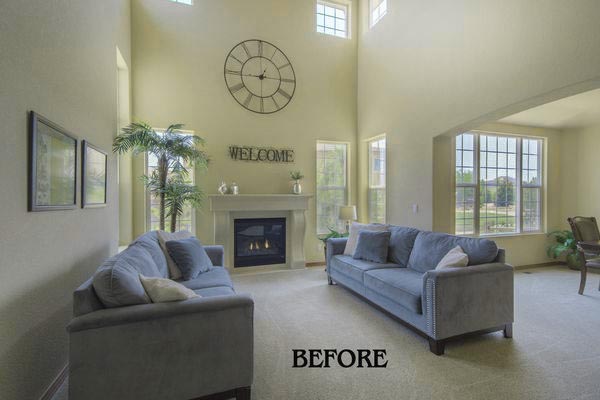
OK...now that I have waited for some responses it is clear to me that I have a lot to learn yet about processing. Thanks to you all for your advice and suggestions. In the interest of time I have chosen to simply reprocess one of the rooms using Fusion Natural in Photomatix as Gene51 suggested. Thanks for that Gene. I did not figure out how to get there from LR CC but went directly to it in Photomatix, created a preset and can now use it on all of the rooms in the house if the client approves. Attached is a before and after photo to show the difference. Fusion Natural nailed it. One thing for sure is that the "before" photo is not exhibiting the color yellow accurately here on UHH enough to show the bleached out walls. I see more red now than yellow but I think there is enough of a contrast of difference between the 2 photos to see the difference Fusion Natural has made. The "after" photo is a good color accurate example.
In regards to all of the suggestions and advice, again thanks so much. I will digest all of it and consider what will help me the most without slowing me down. I am slowly working towards the upper end housing shoots but now that i have shot a few 8000 and 10,000 sq footers its obvious I have to offer a more sophisticated product generated from a more sophisticated method of photography using multiple speed lights and maybe strobes. All well and good but time consuming and unprofitable at a price point of $145 for the 1st 2500 sq ft and $15 dollars per 500 thereafter. I am very aware that I have to charge more but not in the market my current realtor customers are in right now. Meaning $200K to $900k or so. Realtors won't pay it while they are turning deals in 1 to 30 days. As I am developing my skills to enter the luxury home market I will continue shooting fast in and out properties while slowly adding to my box of skills using some the advice you are presenting to me here. Thanks again.
In regards to all of the suggestions and advice, again thanks so much. I will digest all of it and consider what will help me the most without slowing me down. I am slowly working towards the upper end housing shoots but now that i have shot a few 8000 and 10,000 sq footers its obvious I have to offer a more sophisticated product generated from a more sophisticated method of photography using multiple speed lights and maybe strobes. All well and good but time consuming and unprofitable at a price point of $145 for the 1st 2500 sq ft and $15 dollars per 500 thereafter. I am very aware that I have to charge more but not in the market my current realtor customers are in right now. Meaning $200K to $900k or so. Realtors won't pay it while they are turning deals in 1 to 30 days. As I am developing my skills to enter the luxury home market I will continue shooting fast in and out properties while slowly adding to my box of skills using some the advice you are presenting to me here. Thanks again.
Jun 20, 2016 03:49:48 #
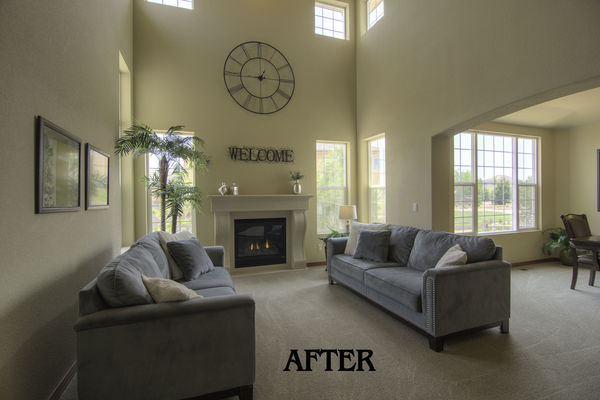
Here's a quick adjustment of both in ACR. In the "Before" shot I played with the HSL/Greyscale tab--shifted the oranges to yellow, darkened and desaturated slightly. Then I used the adjustment brush to adjust the windows, because I found them a bit washed out.
In the "After" I again adjusted the windows and lightened up the darker areas of the sofas with the adjustment brush, then brought up shadows globally, as well as lifting the brightness of the whole thing a bit with curves.
This took just a few minutes, and of course I'm working from little jpgs, so this isn't very accurate, but it will give you an idea of what you can achieve after the fact with just a few minutes of local and global adjustment.
Jun 20, 2016 06:00:51 #
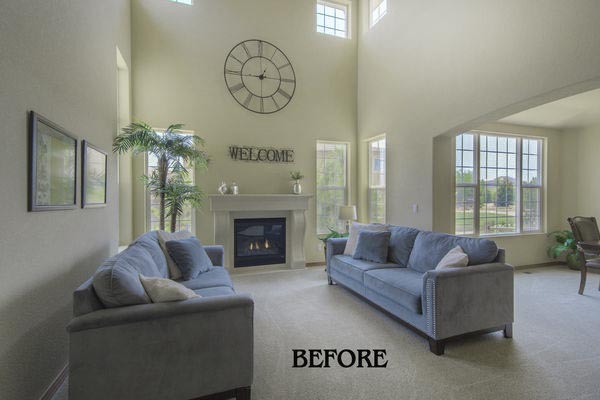
Didn't manage to edit the above post in time since in China they shut off the Internet randomly, but here is the "Before" again, with a bit more saturation on the walls. The problem of uneven saturation of the walls could be solved with the adjustment brush, but this is a rough idea of what is possible--compared to your original "Before".
Jun 20, 2016 08:37:53 #
DavidPine
Loc: Fredericksburg, TX
I strongly suggest that you invest in a Scott Hargis video course relating to RE photography. If you are interested in luxury property your skill level will need to be high. Composition will be equal to focus and white balance. HDR is not the answer. You will need to become proficient with off camera lighting. Personally, your composition of the photo you submitted bothers me. Not every shot requires that you compose to a corner of a room just as not every shot requires shooting at the widest ultra wide angle. More often than not, I will shoot at 24mm. You might rent a 24mm tilt-shift because you will have rooms that really require it – especially within the luxury market. One of the reasons off camera lighting is so important is that the ambient lighting from room-to-room is often vastly different. There is nothing simple about real estate photography and you will find that it can be a beast unto its own. You will have to shoot and process many, many properties in order to develop the skills needed to be proficient. Good luck.
rrg6481 wrote:
OK...now that I have waited for some responses it ... (show quote)
Jun 20, 2016 11:01:39 #
One thing I did not mention is that the sky was overcast with wild fire smoke from a local fire which contributed to the washed out look in the windows. I used a polarizer to bring out some of the blue in the sky which was pale blue at best. Thanks for your attempt at recolorizing my photos. Very nice of you. I always find it refreshing when I get positive feed back from individuals that merely want to help as opposed to complete negative narratives that simply support their own agendas of winning the argument by constant bickering. Thanks Kymarto.
If you want to reply, then register here. Registration is free and your account is created instantly, so you can post right away.