Picture Restoration Problem
Mar 26, 2014 12:26:06 #
Mar 26, 2014 16:08:37 #
Here is another attempt with what the OP has given us. Which is far from workable by most standards.

Mar 26, 2014 17:18:42 #

Thanks for all the replies. I have actually been restoring photos, some as old as 100 plus years but this one stumped me with the scratches as they were. I'm involved with a project on my house and became impatient when I ran into a roadblock.
As always, it is a pleasure to see all of your replies and attempts.--thanks ebbote--I'm going to show that to my friend's wife for her reaction, but she is the baby in the picture.
Arnie
As always, it is a pleasure to see all of your replies and attempts.--thanks ebbote--I'm going to show that to my friend's wife for her reaction, but she is the baby in the picture.
Arnie
Mar 26, 2014 17:54:26 #
Looks very good. Can you send that to me in 1:1 format?
I appreciate effort and most of all the help!
Arnie
I appreciate effort and most of all the help!
Arnie
Mar 26, 2014 18:13:12 #
Arnie, who are you talkiing to, you only gave it use as 57 Kb. Whats to send. It's was nothing but a thumb nail. I know you click down load, but it still only in thumb nail size.
Mar 26, 2014 22:05:25 #
canonmac100 wrote:
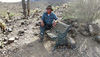
I have an original picture that has scratches across the face affecting the eyes. Has any one got any ideas how to fix this?
Thanks for any suggestions.
Arnie
Thanks for any suggestions.
Arnie
I tried to work on it a little and did manage to rescue some detail. I'm new to the forum and didn't realize that rules prohibit posting edited versions without permission. In order to make the suggestions, I needed to edit, but I won't keep a copy of your image after posting.
This is what I suggest: I used Photoshop CC, Perfect Resize 7.5, and a couple of Topaz plug ins. I'll run you through what I did in the hope that you can duplicate it or follow the general strategy in whatever program(s) you have:
1. I resized the image using Perfect Resize 7.5 so the resolution would be 300 and the vertical dimension would be 5 inches. This gave me something to work on. If you can rescan your photo, make sure you get it at a much higher resolution.
2. I loosely lassoed and feathered the lady's face and put it on its own layer.
3. Making the face fill as much monitor space as possible, I tried to rubber stamp away some of the spots on her cheeks, etc. using the rubber stamp on lighten mode and working at 20% opacity or less.
4. I ran a levels adjustment layer lightening her face somewhat and clipped it to the layer with the face selection.
5. I created a new empty layer, filled it w/50% gray in soft light mode, and using the brush tool at 20% and white to lighten and black to darken, I worked on areas of the face (and the photo in general) that needed either lightening, darkening, or defining. SPECIFICALLY her eyes, mouth, etc. I also worked on his face and his left pant leg and trying to define his left foot. (This technique is known as "painting with light." and is very handy).
6. I made a composite layer on the top of the stack and ran it through Topaz de noise (which softened it a little) and also through Topaz Detail to recover some detail. (I didn't note the settings, but I went pretty softly on this because it was recovering undesirable details). If you don't have Topaz denoise, use the PS "reduce noise filter."
7. Another composite layer and ran the Shadows and highlight filter on it to taste.
7. I duplicated this composite layer and I ran the high pass filter on it (which changes it to gray) and changed the mode to soft light. I was pretty conservative on the radius. I just concentrated on her face. I added a mask to the high pass layer, filled it with black and just allowed her face to get the effects of the filter by painting it in the mask using white. I then duplicated the high pass layer and reduced the opacity of the second instance to less than 50% (it needed a little more, but not too much).
8. A blank layer on top, sampled the color from a good point on her face and painted at 10% opacity over her face to even out tones (especially the blown out part of her forehead) as well as giving a little definition to cheekbones, etc. and anything I'd missed before. I then blurred the strokes using gaussian blur. This step was pretty helpful. I probably should have done it earlier in the process and saved myself some work.
I was able to recover her eyes (they are open and looking at something to her right below eye level which is why her head is tilted forward). Her nose is a bit indistinct, but it's there. Her eye brows are gone and I didn't try to guess what they are like, but if you know, you can "restore" them in step 5. Her mouth is a little vague. She appears to be biting down on her lower lip so only the top lip shows. I assumed that her skin tone is darker than it appears in your scan but lighter than his.
Mar 27, 2014 00:06:14 #

canonmac100 wrote:
I have an original picture that has scratches across the face affecting the eyes. Has any one got any ideas how to fix this?
Thanks for any suggestions.
Arnie
Thanks for any suggestions.
Arnie
If you blow the picture up and look close, it appears that the woman in the picture had her eyes closed or was looking down at the baby, so her eyes don't show. Also, the scratch appears tp stop at the corner of the eye and the damage seems to be in the temple area. A healing tool of clone stamp should be able to do the repairs pretty well.
Mar 27, 2014 04:15:00 #
Those aren't scratches. I was looking at this on my tablet and I zoomed in. She's looking down so you don't see her eyes, you see her eyelids. Whole face is blurred, looks like movement. You aren't going to be able to correct that. You can burn in the face for more definition/contrast in PS or another prg like GIMP. Beyond that, you have big problems with the multiple hazy looking sections on the rest of the photo and I don't think you can correct it. I couldn't.
Mar 27, 2014 04:33:35 #
alggomas
Loc: Wales, United Kingdom.
There are several simple photo re-touching software out there:
Gimp, elements, and one which came with your scanner.
As suggested by others I would scan your photo.
Then correct all the other flaws in the photo first.
It will be better to enlarge the the scratches on the photo which should make it easier and choose a small diameter touch up unit.
You could also go to google or ask to find out how to do this on your chosen software.
Good luck and take your time.
Mar 27, 2014 11:54:53 #

canonmac100 wrote:
I have an original picture that has scratches across the face affecting the eyes. Has any one got any ideas how to fix this?
Thanks for any suggestions.
Arnie
Thanks for any suggestions.
Arnie
Since there is little or no detail to work with I would try to find another old photo of the same person and try to insert the eyes from that photo. It might evev involve more than one photo and of course a lot of blending.
If you want to reply, then register here. Registration is free and your account is created instantly, so you can post right away.