2201 - Challenge - Horribly Underexposed
Jan 23, 2014 09:42:31 #
Country's Mama wrote:
I have the same question. What did you use as a blending mode and what was your High Pass set at? Or did you just use HP to sharpen then used the brightness/contrast etc to lighten?
As far as I know, the High Pass filter does nothing more that enhance contrast along lines.
Jan 23, 2014 10:07:02 #

Fstop12 wrote:
As far as I know, the High Pass filter does nothing more that enhance contrast along lines.
That is what I understand it to do, but the way he worded it it sounded like he used the highpass to lighten. Thought maybe he knew something more than I did. :-D
Jan 23, 2014 11:09:24 #

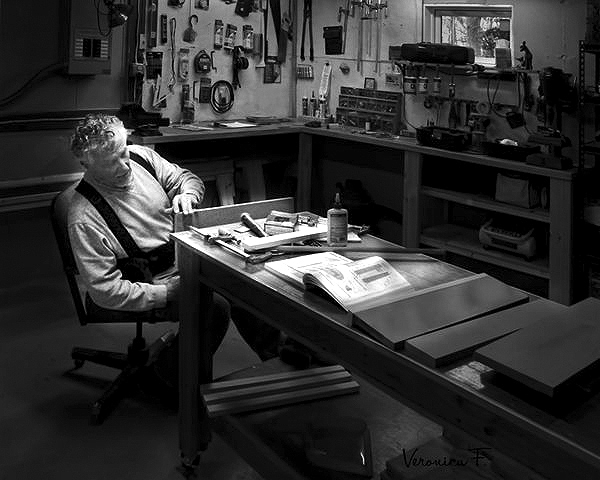
I love the B&W shot! I really like how the light isolates the subject from the rest of the room. I darkened the wall behind him a little more, increased the contrast and applied a little sharpening. I'd hang that one on the wall anytime.
Woodworker re-do
Jan 23, 2014 11:11:43 #
Country's Mama wrote:
That is what I understand it to do, but the way he worded it it sounded like he used the highpass to lighten. Thought maybe he knew something more than I did. :-D
I made an action with that makes a new layer with the high pass filter that lightens the photo a great deal, then, I adjust the opacity of that layer until the brightness is how I like it. Works terrific on all underexposed photo's. My post failed to mention I also put a mask on the high pass layer and used a soft faded brush on that to maintain the shadows of the original photo, which I liked.
The steps in this action I call High Pass are:
Layer via copy
set current layer
rename to HighPass
desaturate
High Pass
Radius 1.6 Pixels
set current layer to layer
mode color dodge
Very important to set the mode of the current layer to color dodge
This will really over lighten up most images, and then you have to adjust the opacity of the highpass layer to get it how you want it.
Hope this helps. Those with PSE cannot make an action, but you probably can still do those few steps manually w/o difficulty.
Hope this helps.
Oh, for the record, I agree with the poster the original was not very good and needed lightened. The picture however is wonderful, and I would spend the time to fix it. I like my rendition if I may say so myself. I'm sure it could be made even better though.
Jan 23, 2014 11:34:20 #

I'm amazed...with this one quick shot I've learned so much from all of you. Thanks!
Jan 23, 2014 11:34:52 #
SonyA580 wrote:
I love the B&W shot! I really like how the light isolates the subject from the rest of the room. I darkened the wall behind him a little more, increased the contrast and applied a little sharpening. I'd hang that one on the wall anytime.
Thank you so much...you understood me!
Jan 23, 2014 11:51:01 #
BigDaddy wrote:
I made an action with that makes a new layer with ... (show quote)
I think the color dodge blend mode is what is causing the lightening.
Jan 23, 2014 12:19:36 #
I really struggled with the distortion correction. Couldn't make it happen in Lightroom so had to go to free transform in CS6.
Did a little sharpening and noise reduction while there.
I used the radial filter in Lightroom to put the light on your husband. And some noise reduction.
Did a little sharpening and noise reduction while there.
I used the radial filter in Lightroom to put the light on your husband. And some noise reduction.

Jan 23, 2014 12:43:41 #
BigDaddy wrote:
I made an action with that makes a new layer with ... (show quote)
Thanks for the explanation. I knew it had to involve a blend mode on the layer after the high pass. Thanks again for replying back.
Jan 23, 2014 13:22:31 #
MtnMan wrote:
I think the color dodge blend mode is what is causing the lightening.
Individually, none of the steps do what you want in this case, but combined they work well I think.
Jan 23, 2014 13:40:16 #
Looking at the photos presented, I like the original, but it is too dark. All the B&W photos loose the warmth I associate with wood working, so for *me*, they are all too harsh. The adjustment by Ron was too washed out looking, and lacked color depth and warmth that I liked in the original. Mntman's is ok, but the color is off and too brassy, not warm as I would want. Sony did pretty good with the B&W but too cold for this picture, and I thought the lighting on the guy was too focused, and looked like a photo shop lighting effect to me, although it probably wasn't.
Hope I didn't offend anyone, but woodworking has been my passion for many years, and this picture really sparks my interest.
Vera, I would love this photo in my book, color for sure, but it is a good one regardless of your personal preferences. Good catch.
Hope I didn't offend anyone, but woodworking has been my passion for many years, and this picture really sparks my interest.
Vera, I would love this photo in my book, color for sure, but it is a good one regardless of your personal preferences. Good catch.
Jan 23, 2014 14:22:18 #
BigDaddy wrote:
Looking at the photos presented, I like the origin... (show quote)
Thank you BigDaddy...it is his new passion and I tried to get a candid shot with his hands and concentration on the wood. Thanks for the help!
Jan 23, 2014 19:04:03 #
TH
Loc: minnesota
I think your corrected black and white version is moody and has a soulful old-fashioned feel. I like it a lot.
Way to go,
TH
Way to go,
TH
Jan 23, 2014 19:16:09 #
TH wrote:
I think your corrected black and white version is moody and has a soulful old-fashioned feel. I like it a lot.
Way to go,
TH
Way to go,
TH
Thanks for looking!
Jan 24, 2014 01:04:37 #

BigDaddy, why the high pass filter rather than another way of sharpening?
If you want to reply, then register here. Registration is free and your account is created instantly, so you can post right away.