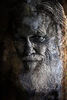
Summer Storm Landscape
Dec 14, 2013 08:33:04 #

I would lighting the cloud just a little and darken the sun ray just a little and leave the blown out area alone since it is the sun
Dec 14, 2013 10:04:39 #

Morning Cajon Photog, I like this shot. Prefer the version that F stop 12 submitted but would like to add that in rolling your shot up on my screen I noticed that cropping out that light and busy section on the bottom and leaving the dark tree line made my eye just zoom into the clouds. Maybe try this bottom crop. Sandy
Dec 14, 2013 10:14:35 #

roadking11 wrote:
Beautiful photo, I love the clouds and sun rays. I gave a try at recovering detail in the blown out areas. I did get recover some and made up what I couldn't retrieve. I ran the photo through Topaz restyle and came up with this image.
Really like what you did with this rendition. Well done, in my opinion.
Dec 14, 2013 10:20:46 #
flyguy wrote:
Really like what you did with this rendition. Well done, in my opinion.
Thank you Flyguy, Topaz restyle gives you thousands of option, makes it hard to find one that fits your mood.
Dec 14, 2013 10:50:05 #
Shakey wrote:
Thank you for showing us what can be done. Would you be kind enough to explain your technique?
I'm using Photoshop CS6. I always start with what I think will be the easiest/quickest solution. There are a gazillon different ways to do something in PS all arriving at the same outcome.
On this image the first thing was try a luminosity mask selection from the BLUE Channel and then using that to put a curves adjustment layer in the layer's pallet. I tried adjusting the curve to see if I could tone down the highlights. This didn't work.NOTE: hard to adjust pixels that just aren't there.
Plan B: made a selection around the blown out area and tried Content Aware Fill. I didn't like this.
Plan C: I tried the Color Clone technique: 1. I create a new transparent layer above the background layer and up on the tool bar I change the mode to " Color". Next, I get my dropper tool and click on the color of the sky I want to use to paint in the blown highlights. Make sure that the color you choose is showing in the "Foreground" box on your tool pallet. Now I Choose the "Brush" tool, Using a Very SOFT brush I lower the opacity to around 15-20% and start painting in over the highlights. Each pass of your brush lays down more paint. You can adjust the Opacity on the layer to taste.
Plan D: I make selections around parts of the image, in this case the areas of the clouds I like. Once the marching ants are showing the selections I right click and choose the "Feather" option and give it a 2 pixel feather. Now CTRL-J to put it up on it's own layer. Next get your move tool and lay this over the blown highlights. It most likely will be too strong so back off on the opactiy. Use the Eraser tool with a very soft brush and low opacity to erase/blend in the area.
It's a work in progress. Hope I haven't babbled on too long.
Dec 14, 2013 11:12:44 #

Fstop12 wrote:
I didn't spend much time on this but if it were mind I would probably try something like this. It would be a painstakingly time consuming process for me.
Nice. But, what did you do to get this result ??
Opps -- Missed the above response. Thank you .
Dec 14, 2013 11:15:22 #
dave sproul wrote:
Nice. But, what did you do to get this result ??
Opps -- Missed the above response. Thank you .
Opps -- Missed the above response. Thank you .
Mostly I went with Plan D.
Dec 14, 2013 11:39:02 #
Fstop12 wrote:
I'm using Photoshop CS6. I always start with what ... (show quote)
Thank you for the tutorial, Fstop12. I use GIMP but the instructions are easily transferred. Thank you for your patience.
Dec 14, 2013 11:41:10 #
Shakey wrote:
Thank you for the tutorial, Fstop12. I use GIMP but the instructions are easily transferred. Thank you for your patience.
Your welcome. That's what I like about this forum board. Sharing tips/ideas etc.
Dec 14, 2013 11:45:31 #
Shakey wrote:
Thank you for the tutorial, Fstop12. I use GIMP but the instructions are easily transferred. Thank you for your patience.
.wrong reference
Dec 14, 2013 11:47:33 #
Thank you for the information. It gave me something to try.
Fstop12 wrote:
I'm using Photoshop CS6. I always start with what ... (show quote)
Dec 14, 2013 11:57:57 #

Shakey wrote:
I like the Fstop12 image better (great job, Fstop12) but here's my shot. Got the blue from the tiny area of sky at top right, made a selection around each bright area and painted with the blue. Too fake to pass.
Nice job Shakey. Yeah, the blue is pretty much on the fakey side, perhaps if you had used a large feather and brought the saturation down, ......hmmmm More tinkering to be tried.
If you want to reply, then register here. Registration is free and your account is created instantly, so you can post right away.