Taking pictures in dark rooms
Jul 24, 2013 10:17:36 #

Starr wrote:
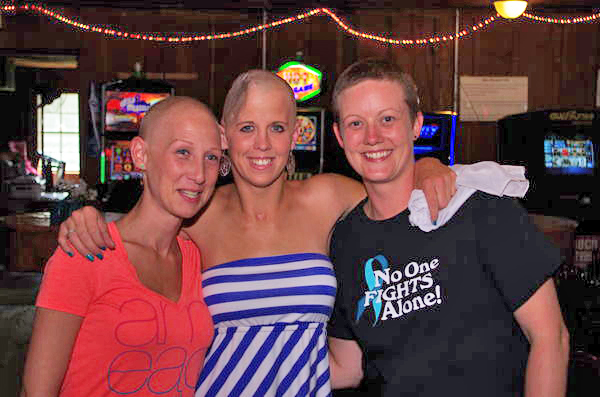
Please help. The last two events I photographed were held in rooms that were all wood - walls, floors, ceiling and furniture. I had a terrible time getting any photos to work out. There was nothing to bounce my external flash off of so pictures turned out too dark. My ISO was at 1600/3200 and metered my camera but still the colors were all off. I spent way too much time in post processing. Any suggestions?
A quick adjustment in guided section of PS10 using Lighten and Darken and, Brightness and Contrast.
Jul 24, 2013 10:20:55 #

[quote=sb][quote=Starr]I was using an external flash but there was nothing to bounce the light off of.
Hi sb. Actually, I didn't have my external flash yet but used a diffuser over my on camera flash. Since then I received my external flash. I've never heard of a pocket-bounce. I will have to check that out.
Thank you sb.
Quote:
Have you tried a softbox on your flash or a simple pocket-bounce?
Have you tried a softbox on your flash or a simple pocket-bounce?
Hi sb. Actually, I didn't have my external flash yet but used a diffuser over my on camera flash. Since then I received my external flash. I've never heard of a pocket-bounce. I will have to check that out.
Thank you sb.
Jul 24, 2013 10:22:58 #
Brian45 wrote:
A quick adjustment in guided section of PS10 using Lighten and Darken and, Brightness and Contrast.
Thank you Brian45 for you suggestion on how to brighten up this photo of these very brave women. I know my friend Alissa would love to have this photo.
Many thanks.
Jul 24, 2013 10:28:08 #

mfeveland wrote:
Which would you recommend. The Lite Genius Lite-Scoop II Flash Modifier, or the Lumiquest Softbox III ?
I have both, but prefer the Light Genius.
Weddingguy recommended it about a year ago.
The Lumiquest Softbox packs up too bulky and doesn't do much to get the light far enough away from the lens axis, unless you put it up on a bracket, which IS really helpful.
Jul 24, 2013 10:28:51 #
1. Use powerful strobe such as 580 EXII or Quantum.
2. Use a store bought or home made large white card rubber banded to the strobe as a fill reflector.
3. pull your shutter...i.e. take your speed down to a 30th or sometimes even slower if you can hold it.
4. your ISO does not need to be astronomical 800 perhaps 1600...
5. go to a little wider lens that will place you closer to your subject thus not needing as much output from strobe.
6. shoot RAW so they can be manipulated more
7. use fast lens
8. thank the great kodak god you aren't using color neg film.......
Jul 24, 2013 10:33:09 #
Mudshark wrote:
1. Use powerful strobe such as 580 EXII or Quantum... (show quote)
Thank you Mudshark. And thank God for number 8.
Jul 24, 2013 10:38:08 #
[quote=CaptainC]If you were at 3200 and could not go above that and get decent images, then accept that fact that you cannot get good images there. there is no magic.
For $6000 you can get a Nikon D4 that would get you to about 12,800, I think a new Canon can do the same, but image quality does tend to decrease pretty rapidly and I KNOW buying a new camera is hardly a great fix. Just accept that this is beyond your equipment. The noise reduction in CS5 and 6 and Lightroom is pretty good - MUCH better than just a few years ago and there are some good NR programs out there, but like I said...no real magic
Your candor is refreshing.
Jul 24, 2013 10:57:50 #

I have found that adjusting the type of light I am shooting under makes a terrific difference. On my Canon 60 I can change l what type of light I'm shooting under.
Jul 24, 2013 11:04:28 #

GoofyNewfie wrote:
I have both, but prefer the Light Genius.
Weddingguy recommended it about a year ago.
The Lumiquest Softbox packs up too bulky and doesn't do much to get the light far enough away from the lens axis, unless you put it up on a bracket, which IS really helpful.
Weddingguy recommended it about a year ago.
The Lumiquest Softbox packs up too bulky and doesn't do much to get the light far enough away from the lens axis, unless you put it up on a bracket, which IS really helpful.
Thanks for the advice. I think this will do the trick.
Jul 24, 2013 11:45:41 #

Check out this Web site for techniques of doing flash photography under various conditions:
http://neilvn.com/tangents/
Short version:
Set ISO high, say, to 3200. But try test exposures at a lower ISO to see what works for a decent exposure.
Set flash unit power manually to the highest -- usually by manually zooming it to 105mm, or to the highest focal length the flash unit will set.
Point the flash head to the nearest surface to bounce the flash lighting off of it.
Alternatively, you could try bouncing the flash lighting toward the rear of your camera, to gain a general bounced flash lighting off objects in the working space.
Keep the Shutter Speed at about 1/80 sec, or perhaps slower if the subjects will remain still.
Keep the Aperture wide, at f/2.8, or wider.
Shoot in the Manual Mode so you have control over all settings.
Give this approach a try, and get back to us.
Good luck.
Jul 24, 2013 11:53:15 #
Starr wrote:
Please help. The last two events I photographed were held in rooms that were all wood - walls, floors, ceiling and furniture. I had a terrible time getting any photos to work out. There was nothing to bounce my external flash off of so pictures turned out too dark. My ISO was at 1600/3200 and metered my camera but still the colors were all off. I spent way too much time in post processing. Any suggestions?
Yes, a dark interior will swallow almost all the light from a bounced flash ("gotta" watch out too for color casts in situations like that). The light fall off from a flash is very steep, one is seldom enough to light a whole room. The best bet would be to add more light (flashes), if you have that available to you. Or if the situation allows, change the whole approach (picture), not include as much of the interior and move closer to the subjects.
Jul 24, 2013 12:05:39 #
Starr wrote:
Please help. The last two events I photographed were held in rooms that were all wood - walls, floors, ceiling and furniture. I had a terrible time getting any photos to work out. There was nothing to bounce my external flash off of so pictures turned out too dark. My ISO was at 1600/3200 and metered my camera but still the colors were all off. I spent way too much time in post processing. Any suggestions?
Hi Starr,
I know this thread is kind of being beat to death . . . but here is my take on your images AND on some of the advice given.
I would like to say that the answer to your dilemma is not the great efforts of those that have done some post processing for you here. Your question had to do with preventing the same result happening again, and as you said, you spent far too much time already in post.
First you say "there was nothing to bounce your external flash off."
Why bounce? Millions of flash units have been sold that do not have a swivel/tilting head and were never designed to bounce . . and these units have created many beautiful images.
Bounce flash should only be used under very ideal conditions, like white or light, neutral colored walls and ceilings, smallish rooms, and careful placement of the subject. A strong flash, custom white balance setting and relatively fast lens are also recommended highly. If you bounce your flash from a black/dark wall it is like turning off your flash.
Unless you have greatly cropped your images, they appear to be taken within ten feet from the camera. At ten feet even the dreaded pop-up flash would expose the subjects properly, even in a black-walled room at 400 ISO . . . horrible light . . but non the less properly exposed.
So let's analyze what the real solution is for this situation . . . and let's try to establish a solution that is consistent with all conditions.
1) Because bounce flash is dependent on:
a) color of walls and ceilings
b) darkness of walls and ceilings
c) height of ceiling
d) size of room
e) distance the flash is from the wall
f) distance the subject is from the wall
g) angle the flash is bouncing back to the subject
h) etc. . . .
. . . . get the picture? No consistency . . . bad idea without much planning and absolute understanding of your equipment limitations and ability.
2) Now that we get the "bounce idea" out of the way, use the flash the way it was designed to be used . . . pointing at the subject! A simple manual camera setting of 400 ISO . . . 1/200th of a second shutter and F/4.5 . . . with a flash capable of ETTL will produce perfect flash exposure over 90% of the time within the power capabilities of your flash. Exposure "tweaking" can easily be done with the FEC /flash exposure compensation on your camera. If you don't know where that is or how to use it, it is very possible that is one of the causes of your badly underexposed images above. Without your knowledge it could be set at a minus setting. Check it out.
3) The settings above will assure consistent flash exposure under most conditions from small, light colored rooms, to out doors in the dark.
The next step is to improve the quality of the light from the harsh, flat lighting produced by the on-camera direct flash. Two things will eliminate the harsh, flat lighting. Get the flash OFF the camera, and add a good flash modifier that does waste light and does not depend on light bouncing back from other surfaces to work.
The Stefan, Gary Fong Light Sphere and other modifiers that throw light in all directions are light wasters and are only effective under a very few ideal circumstances. Goofy Newfie's recommendation is a good one. With his experience in photography, why not use what he uses?
My only other suggestion is, that to take the stress out of learning flash photography, for heaven' sake do the learning with some fun shoots with a girlfriend . . . not at an event where someone is depending on your results.
Hope that helps . . .
Jul 24, 2013 12:40:12 #

joer wrote:
Stick with the Vivitar since you already have it. All you need is the bounce attachment. You can make it work. The beauty of digital is that you can easily dial in your settings with a few practice shots
NOT a 'bounce attachment'. There's nothing to bounce off of!
Rather, like the Captain said, an off camera frame like the StroboFrame.
Been there, done that.
And I love my LumiQuest softboxes.
Tried the Gary Fong, but I lost too much light.
Jul 24, 2013 12:53:31 #
CaptainC wrote:
If you were at 3200 and could not go above that an... (show quote)
I have taken a photo in a completely dark room with an off camera flash, and it turned out fine. I did it just to experiment and I had my ISO at 100. I did it with my Canon Rebel XTI..worth about $300 now.
Jul 24, 2013 14:34:21 #

Weddingguy wrote:
Hi Starr,
My only other suggestion is, that to take the stress out of learning flash photography, for heaven' sake do the learning with some fun shoots with a girlfriend . . . not at an event where someone is depending on your results.
Hope that helps . . .
My only other suggestion is, that to take the stress out of learning flash photography, for heaven' sake do the learning with some fun shoots with a girlfriend . . . not at an event where someone is depending on your results.
Hope that helps . . .
Agree, what ever method you select for your flash photograpy, the one Captain C recommends or some of the other suggestions, please do practice so you know what you can do and what you can not do before you go to one more event.
If you want to reply, then register here. Registration is free and your account is created instantly, so you can post right away.