Sunrise photos
Jul 9, 2013 21:14:28 #

Ralloh wrote:
Can't complain about any of your examples. Looks like you are nailing it very well. You'll be tweaking as you learn though.
What settings were you using?
What settings were you using?
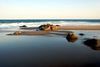
Thanks - I appreciate the comment! I was in manual mode, #1 was taken at f13 and 1/500, #2 and #3 were both taken at f8 and 1/1250. Unfortunately, all were taken at ISO 1000 - I meant to use 100 but goofed, got up at 3:30 to get there in time for the sunrise and was pushing it to get up to the top and set up in time.
Jul 9, 2013 21:22:33 #
quonnie wrote:
I think the photos are awesome. Your D7100 is awesome too, but without some talent behind the camera, you get garbage. I know; I've shot plenty of garbage with my D600. Just now really getting the hang of it after six months. By the way, the images from your camera are very clean even at ISO 1000.
Thank you :thumbup:
The D600 looks like an awesome camera too, and I love the D7100 - it's funny, I started with the m43 system because I was brand new to photography and thought a full blown DSLR seemed to intimidating to learn on, but I find the D7100 WAY easier to use when shooting because I never need to get into the menus to change a setting - total misconception on my part.
Jul 9, 2013 21:28:42 #
Chinaman wrote:
You can select the areas and then adjust the exposure. But be careful as it may be obvious that you have done that and dark areas can show up colour noise when lightened.
Ahhhh... I totally forgot about the adjustment brush, that is what you're referring to right? As I have been learning to use Lightroom I have been watching all the tutorial videos I can find on Adobe TV and You Tube, had to go check my notes to see if I could figure out how to do this when I read this comment and saw the adjustment brush... I will have to play around with this and see how it turns out.
Jul 9, 2013 21:36:33 #
sshinn1 wrote:
Ahhhh... I totally forgot about the adjustment brush, that is what you're referring to right? As I have been learning to use Lightroom I have been watching all the tutorial videos I can find on Adobe TV and You Tube, had to go check my notes to see if I could figure out how to do this when I read this comment and saw the adjustment brush... I will have to play around with this and see how it turns out.
Don't use Lightroom so can't confirm. In Photoshop, it is the tool (various options) that allows you to draw around the objects you want to work on. The outline is commonly called 'marching ants'.
Jul 9, 2013 21:50:39 #

IMHO, it's better to have NO filter than to use a 'cheapo.' Good glass)is just as important in filters as in lens elements. Poor quality (usually inexpensive) filters almost always result in a soft image. If you must use a GND filter, be sure to use an upper end Hoya, Coken, Tiffen, etc. Personally, I prefer a completely silhouetted foreground most of the time for sunrise photos, especially in urban and suburban areas. I think that yours are already very good - especially the first two.
Jul 9, 2013 22:00:32 #
FredB
Loc: A little below the Mason-Dixon line.
quonnie wrote:
The square ones (Lee/Cokin) are for drop in filter holders that screw onto the front of a lens. The round ones that screw directly onto a lens front have a rotating piece that lets you adjust the angle of the gradation. Both types have their uses, as the square ones can be adjusted up/down and at varying angles as well. The typical graduated ND is half dark, and half clear, so you don't have quite as much flexibility.Just looked at graduated ND filters on Adorama. They seem to range in price from ten bucks for a Sunpack to almost a thousand for some German brand. Why are most square or rectangular? Saw a 77mm (the right size for my go-to lens) that is a screw on type, but then, how would you adjust it. The price seemed do-able at $160. Heliopan or something like that. Anyone have a recommendation for the OP and I?
Tiffen and Hoya make quality round filters. Lee has a good product but Cokin's stuff is not bad either. Singh-Ray is the top shelf stuff, but I'm not sure that they're really worth $450. Neweer and the sub -$20 filters are probably not as high quality glass as the more expensive brands.
This is based on my personal use of these brands.
Yeah, there's a bit of marketing BS and price gouging, but in the end, good optical glass is not cheap.
Jul 9, 2013 22:14:16 #
Jul 9, 2013 22:15:09 #
ophart wrote:
IMHO, it's better to have NO filter than to use a 'cheapo.' Good glass)is just as important in filters as in lens elements. Poor quality (usually inexpensive) filters almost always result in a soft image. If you must use a GND filter, be sure to use an upper end Hoya, Coken, Tiffen, etc. Personally, I prefer a completely silhouetted foreground most of the time for sunrise photos, especially in urban and suburban areas. I think that yours are already very good - especially the first two.
Yes, this make perfect sense to me. The lens I used cost more than my camera, seems like it would be a real waste to put a cheap piece of glass or plastic in front of it. Looking around, the higher end Grad ND filters cost as much as a decent lens - I think maybe for now I will work on it in PP or maybe try some HDR...
Jul 9, 2013 23:05:50 #

The money you would spend on a good filter would be well spent if you intend on staying with old school methods. I think your money would be better spent on HDR software ($100-$130)and learn how to shoot for HDR images. Its the way of the future and when performed properly can make a scene look as natural and better than any single exposure with a grad ND filter. Go to http://www.stuckincustoms.com/ to see for yourself what I am referring to if you don't already know. None-the-less your photos are marvelous. I don't think a grad filter would do you much good at sunrise though because there is not enough light. The dynamic range of light is not broad enough at that time of day for a grad ND filter to have much effect. Sunset is a different matter. Your new camera allows for a broad EV bracketing spread. HDR would be a no brainer with this camera. I no longer use a grad ND filter. Occasionally use a polarizer to kill water reflection but that's it. As an experienced sunrise and sunset photographer I have struggled with lots of techniques and have realized HDR is the best. Just my opinion. BTW...if you are not shooting at the highest f-stop on your lens (F-22 - F32...you you might want to try it when shooting landscapes). It will extend the exposure time but will add a pleasing level of drama to the scene. The sun will sparkle a bit more and the edge of the horizon will be sharper and crisper and generally there will be more detail.....unless you are shooting for a specific effect and don't need this advice? Also are you post processing? The photos seem to need a bit of sharpening. Keep shooting....and have fun!!
Jul 9, 2013 23:45:23 #
rrg6481 wrote:
The money you would spend on a good filter would b... (show quote)
Thanks for the compliment and the advice! I agree HDR would be extremely easy with this camera, I downloaded the trial version of Photomatix several months ago and just never really tried it much, I need to try it again. I do PP in Lightroom 4, I didn't do any sharpening to # 1 and a little to #'s 2 and 3, I just increased it on all 3 and it does look a bit better - subtle, but I can see it when I go back and forth. Good eye! Thanks for the tip on the f stop - I used f8 for most of these, no real particular reason except that it seems that's always cited as one of the sharpest f stops when I read lens reviews. I will stop all the way down next time and see what happens.
Jul 10, 2013 00:13:04 #
When in the field try shooting at different stops of the same scene to see the results on screen. As you do this you will begin to get the feel for the relationship between cam, lens, time of day light, and the sweet spot for your lens. Some lenses are sharper at F16 than at 22 or 32. Also when you stop dn ...if you want to create a star burst with the sun ...wait for the edge of the sun globe to peak out from behind a cloud or tree trunk or mountain top.... etc...there will be a sparkle in your view finder...in your eye...thats when to fire away...and it gets exciting when the results are what you saw in the view finder...makes me want to drop what I am doing and get back out there!!!
Jul 10, 2013 00:21:08 #
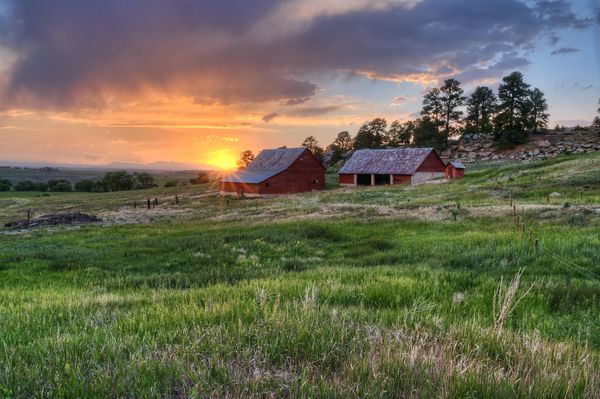
here is a sample of an HDR taken last week for a real estate shoot in Colorado. I have not done much PP on it except sharpening in Photo Shop and Topaz
Jul 10, 2013 00:27:52 #

Jul 10, 2013 00:30:59 #
Sorry...Got carried away some but just get so excited about HDR. It is so rewarding when done well. My images vary some because of the time constraints associated with due dates but when the time of day is right...it gets really fun. Hope I have helped....
Jul 10, 2013 00:33:59 #

rrg6481 wrote:
Looks like it needs a bit more sharpening...
One of the aspects of real estate shooting that many non professional real estate people do not understand is that listing/selling agents do not need (and usually do not really want is a tack sharp picture. Your first photo was fine!
If you want to reply, then register here. Registration is free and your account is created instantly, so you can post right away.