white balance
Feb 10, 2022 15:29:30 #
CHG_CANON wrote:
I've found myself going around in circles sometime... (show quote)
That it exactly what I am going to do right now. Re-visit later.
Feb 10, 2022 15:53:59 #

Ysarex wrote:
Are you processing raw files or camera JPEGs?
Although the eyedropper works best when used during a raw conversion, if the colors are close you can also use it on a JPEG.
Assuming that the sign in the background might have a white background, I clicked on it and it looks like it might show a satisfactory balance.
Since you want the fastest way, that's it.
Feb 10, 2022 16:22:37 #
therwol
Loc: USA
CHG_CANON wrote:
Use Lightroom instead ... For the most part, you c... (show quote)
In my experience, it is easier to adjust white balance, hue etc. in Lightroom than Photoshop. My only complaint is that the adjustments may not be fine enough if you're just using sliders.
As a PS, sometimes a subject with a dominant color can screw up the auto white balance. I demonstrated that once in a post.
Feb 10, 2022 19:13:07 #
Thank you to all who are helping me with the color cast problem. Truly appreciated.
Feb 10, 2022 22:07:02 #
My Advice would be to take some picts. around the house, in the yard or just anywhere in RAW and download them into Photoshop. You'll quickly see how much more latitude you have in post processing. A RAW file contains ALL the data of the image you take where as a JPEG only keeps the data the camera THINKS you will like which leaves you with a very limited amount of data to work with.
Feb 11, 2022 06:26:35 #
billnikon
Loc: Pennsylvania/Ohio/Florida/Maui/Oregon/Vermont
Jules Karney wrote:
jpeg
Push the Ctrl/Shift/A keys all at the same time and Photoshop will take you into RAW processing, there you can adjust the white balance.
However, you will have even more latitude shooting in RAW.
Feb 11, 2022 07:22:48 #

Jules Karney wrote:
In post I am looking for the fastest way to correct the colors on this shot and many other like it. Auto white balance is not cutting it. I use photoshop
Thank you,
Jules
Thank you,
Jules
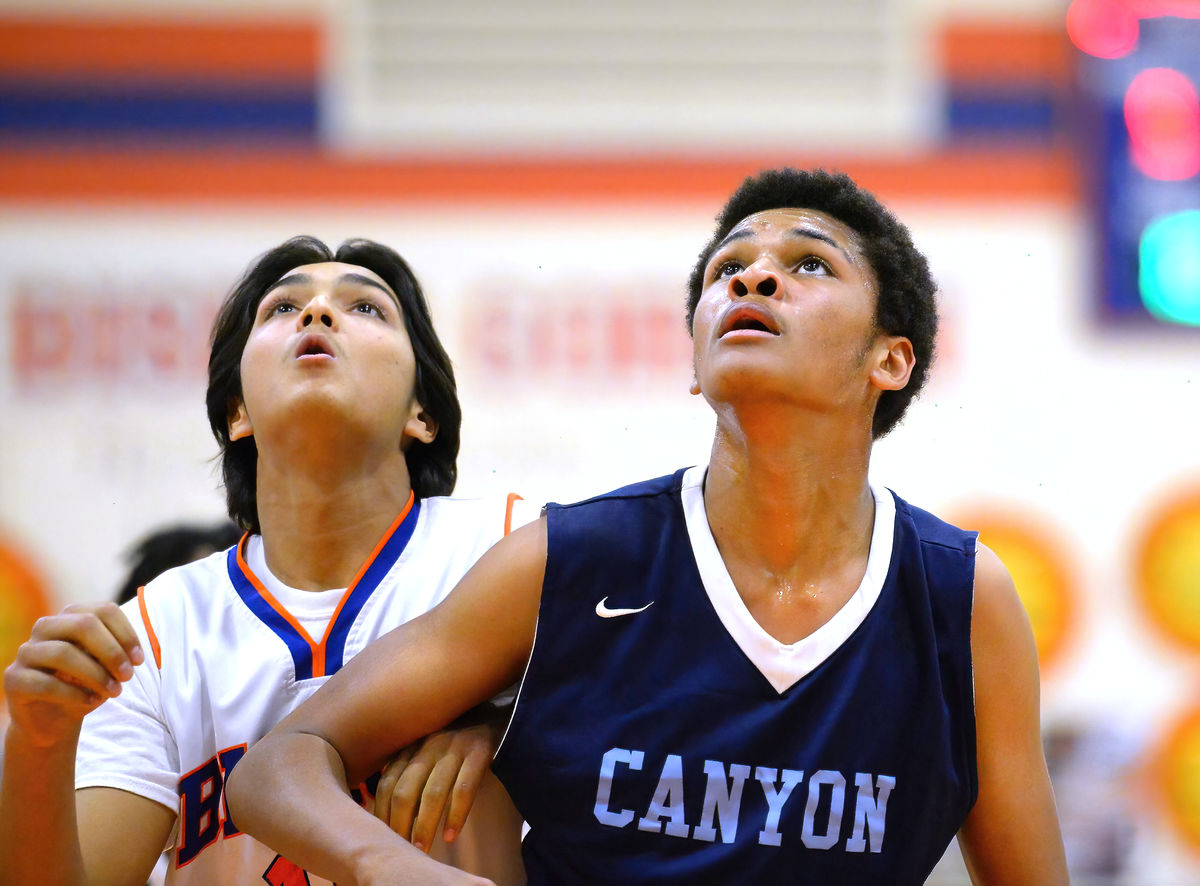
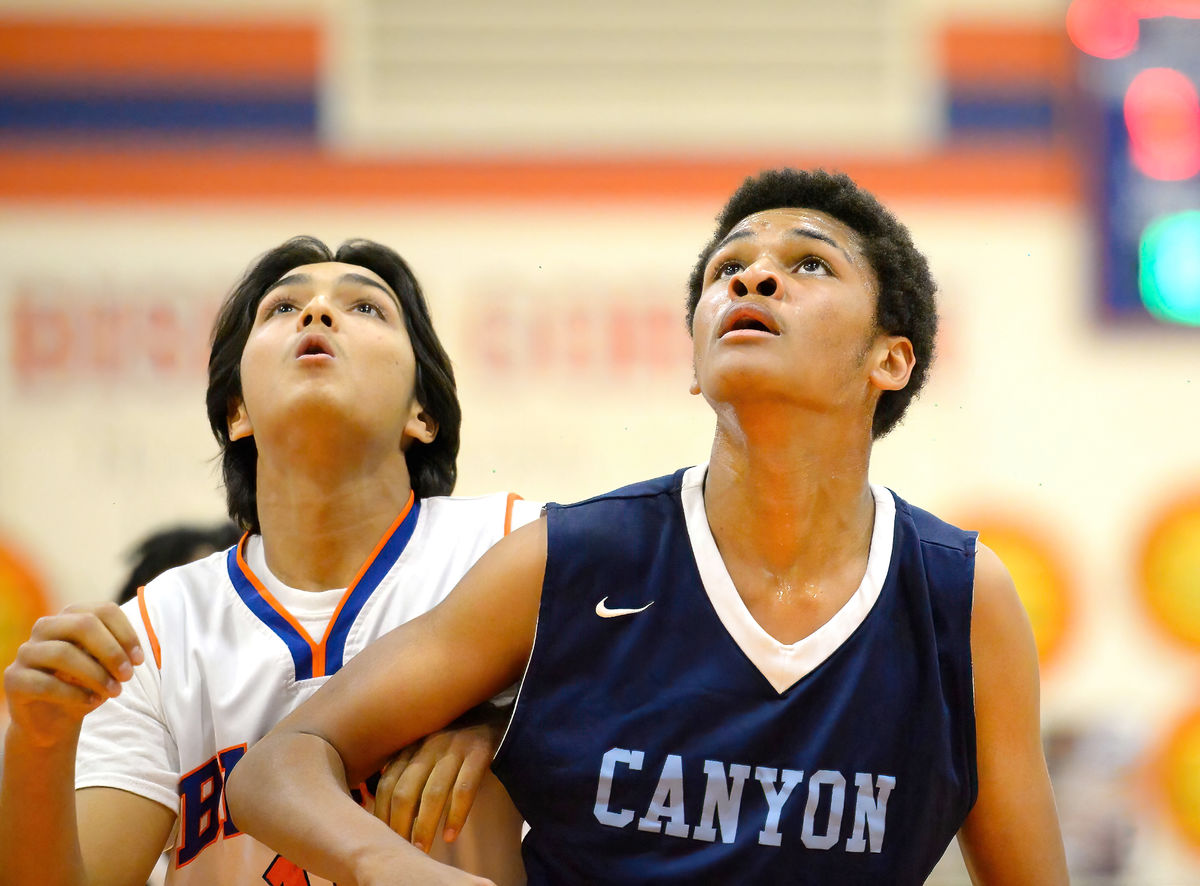
There are two sources (or more) of luminance that is making this hard to resolve for color purity - the main lights and the reflection off the court floor. Granted, the players and the floor are illuminated by the same light - so one would think that by correcting for the main source everything else everything else would correct. But the color of the floor is giving off a strong orange/yellow cast, which is evident in the neck and arms of the Canyon player.
I use an old trick that can almost always nail the color balance in images that contain humans and there is a clear shot of the whites of eyes. Using the Camera Raw Filter in PS use the white balance eyedropper and sample the white of an eye. Like magic, most of the cast will be gone. Adjusting the individual colors, or adjusting only the white balance is a huge waste of time, and will not not be easily repeatable when attempting correct a large number of images. Consistency from shot to shot is something that is much easier to accomplish when editing raw captures.
Shooting these as raw captures - which you seem to continue to be resistant to, would make this so easy - fix one image then sync the changes across all images. This will get you close, but it won't help with the color cast from the floor, which will have to be locally adjusted, easily done with Select and Mask in Photoshop, or even easier using local adjustment masking in Lightroom.
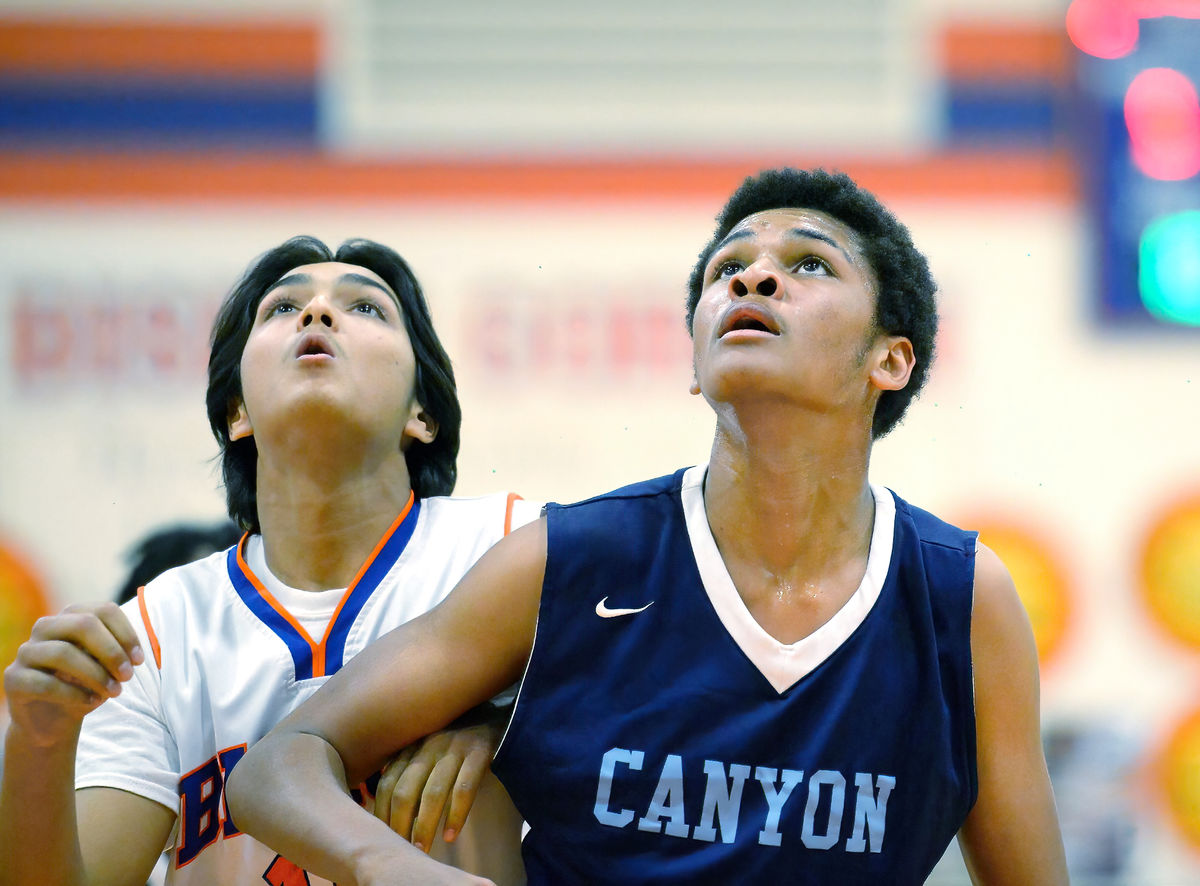
There is another approach, using Photoshop and jpegs that sometimes works, but is not completely flawless, especially with casts resulting from multiple sources. I documented it here:
http://pixeldiarist.blogspot.com/2012/01/correcting-color-cast-in-photoshop.html
I adjusted the first image using the eyedropper on white of eye method.
The second was the one documented in the link - both get you close enough for proofs.
Of course you are using a recently and accurately profiled display to do this kind of color correction. I would suggest that you use ISO 16000 and F4 - for sharper images and a little more depth of field - You won't even notice the higher ISO with the D4, especially if you use raw capture, where you have more control over the balance of detail vs noise.


Feb 11, 2022 08:32:38 #

You can adjust for the white balance using the curves adjustment to identify the white pixels in the image, and the same for the black point and the midtone grey point. Tutorials online describe these simple techniques.
Adobe has a Web-site that offers many tutorials for working Photoshop.
Adobe has a Web-site that offers many tutorials for working Photoshop.
Jules Karney wrote:
In post I am looking for the fastest way to correct the colors on this shot and many other like it. Auto white balance is not cutting it. I use photoshop
Thank you,
Jules
Thank you,
Jules
Feb 11, 2022 08:52:58 #

Obtaining perfect WB in gyms is tricky. Everyone posting in this thread has good ideas for correction. Factors influencing color include the lights themselves which usually don’t have a full spectrum, ambient light from windows and doors, and also the color of the floor. In this case it appears the wood or perhaps an orange logo could be reflecting light from below. In case others haven’t mentioned it, try doing a custom WB with a gray card, color checker, or just a clean white sheet of paper before the next game. It won’t be perfect, but it will get you in the ballpark.
Feb 11, 2022 08:56:51 #
I feel your pain, as there are some gyms I shoot in I absolutely hate for WB! My solution, try to avoid them. Going from the first post of CHG_Canon, which I agree with, I will add that, IMHO, this is a situation when shooting in RAW becomes more important. I would use AUTO WB BOTH in camera and in Lr. That will give you a starting point. You are going to have to hand adjust most shots if you want perfection and work on the file if you are selling a print. When you have multiple light sources with multiple WB, reflections from the floor, skin color and daylight pouring in, all hell can break loose. I normally also use Flicker Reduction under this type of lighting as well. It can easily become a big mess, especially if there are multiple skin colors in the same shot. Best of luck my friend.
Feb 11, 2022 09:32:20 #
I had to smile at Gene's inference to use the whites of the eyes... Yep, that works (but only for kids... as we age this becomes less and less reliable)... That said I've used it to validate my "guessimates".
Jules those players have lots of white in their uniforms... that works also :)
And like Gene said, why aren't you shooting in RAW?
The white balance eyedropper is my tool of choice (and has been for many years).
Never trust your eyes... they lie, even if you have a flawless color balanced workflow.
Only trust the numbers, k? 255; 255; 255; is white, period.
Albeit ~244; 244; 244; is generally white with detail..
Want to tweak the channels? Then
Red (255,0,0)
Lime (0,255,0)
Blue (0,0,255)
btw, best to ignore the naive who suggest you use Lightroom instead of Photoshop...
That is so wrong... very wrong...
I've worked with many professional retouchers and they would laugh in your face with such a silly suggestion...
Patience... warm weather and outdoor sports is coming soon :)
Sunlight is pretty reliable (provided the forest fire season doesn't tweak this also)
Feb 11, 2022 09:43:58 #
Thomas902 wrote:
I had to smile at Gene's inference to use the whit... (show quote)
It's time you learned to use Lr properly!
Feb 11, 2022 11:38:44 #
Jules Karney wrote:
In post I am looking for the fastest way to correct the colors on this shot and many other like it. Auto white balance is not cutting it. I use photoshop
Thank you,
Jules
Thank you,
Jules
Here is the technique I use as step one on every image. It takes only a few seconds and it works just fine for about 90% of my images. The other 10% require a little more finesse.
https://petapixel.com/2020/04/04/how-to-easily-remove-color-casts-in-photoshop/
Used this method for your image. Because of the mixed lighting, I used an additional step, a HSL layer to selectively desaturate some additional red in the face and neck. Total time was less than 30 seconds.
Feb 11, 2022 11:40:32 #


Feb 11, 2022 13:21:47 #
If you want quick, here's the trick!
Anthony Morganti has a brief video on YouTube (https://www.youtube.com/watch?v=Fb-Nh-5tl8I)
that offers a highly adjustable color cast removal / adjustment process in a few easy steps in PS:
Open image
Duplicate image
Blur - Average
Invert image - Cmd + I
Blend mode - Overlay
Now just adjust the opacity until you get the color scheme you desire. Also, you can then adjust the HSL settings in Color Mixer to fine tune the results. This image is a "down and dirty" quick edit using only these steps, and can be further adjusted by using the opacity slider and / or the HSL adjustments.

If you want to reply, then register here. Registration is free and your account is created instantly, so you can post right away.