Eliminating the orange cast of color negatives
Feb 18, 2021 10:02:11 #
cactuspic wrote:
Thank you Gene. The article you cited, br https:... (show quote)
Yes. If you counter the orange mask at the light source you will have far less final color adjustment after inverting the recorded image.
Feb 18, 2021 10:09:56 #
cactuspic
Loc: Dallas, TX
User ID wrote:
Yes. If you counter the orange mask at the light source you will have far less final color adjustment after inverting the recorded image.
Thank you User ID for both your suggestions of a wratan filter as well as confirmation of the idea of gelling the light source with the complement of the orange cast. I have also sent out a query to Rosco to see if they have a filter or gel in aproximately that complementary color.
Feb 18, 2021 10:17:31 #

E.L.. Shapiro wrote:
The ORANG appearance of colour negatives is explai... (show quote)
https://www.scantips.com/basic13c.html
Color Negatives
Color negatives are very different than scanning positive slides or prints. Color negatives have an overall orange mask, designed to aid photo printing of negatives onto regular photographic paper. The orange mask makes scanning color negatives difficult. Its presence seriously interferes with "automatic" correction of any real color casts. Color casts often remain, and must be manually removed. The photofinisher did this for us in prints, but it's our job now. Digital color balance is easier than darkroom work, but color balance is harder for negatives than for prints or slides.
"Negatives require the image be inverted, easy enough for B&W, but color negatives also require that the orange mask color be balanced out (it is a strong greenish blue when inverted to positive). The film scanner software has a Negative mode that does this, but the shade of orange varies among film brands, and even in different films from one manufacturer. Most film scanners offer a few film types to aid this.
Negatives can capture perhaps 3 more f/stops of scenic range than can slides, so there is less loss of shadow or highlight detail. This greater range is compressed to fit "in the film" so to speak. Slides have dramatic contrast, but not very good shadow or highlight detail. Negatives capture greater scenic range, but store it compressed in less range on the film. Negative film itself actually has lower overall dynamic range scanning requirements than slides, which makes life easier for inexpensive scanners.
Images from both slides and negatives can only span tone values 0 to 255 in the 24 bit image. But because this greater range of scenic detail is compressed into that span on the negative, it offers more possibilities to expand selected regions, to favor the shadows or favor the highlights, to show maximum detail. We cannot favor both ends, but we can do either, by various brightness adjustments, and negative film offers more opportunities for photo manipulation".
Thanks for the heads up!
I thought I copied and pasted the link and a quote with the most pertinent paragraph- see above''.
My apologies!

Feb 18, 2021 10:24:10 #

I am suspecting here that many people have little understanding of color printing from color negatives. And this leads to a lot of confusion about digitizing them for use with digital systems. In the "old" days generally only two color filters were used to print C-prints, Magenta and Yellow. The Cyan was really touched for color negatives. Note, that Cyan is "opposite" the Orange cast of the negatives. It is pretty easy to copy color slides and B&W negatives with a digital camera. Color negatives are a different matter. One really needs to know what the "color pack" correction that is needed for your negatives in PP. Personally I find it much easier to use a Scanner to copy color negatives where the scanning software can correct the color mask to create a fairly accurate color positive. When Ps or Lr or other PP can be used to correct the color of your copied image.
Feb 18, 2021 10:26:40 #
cactuspic
Loc: Dallas, TX
E.L.. Shapiro wrote:
https://www.scantips.com/basic13c.html br Color Ne... (show quote)
No need for apologies E. L. Your posts are always so informative that I see it as bonus, another opportunity to get additional info.
Feb 18, 2021 10:27:03 #
User ID wrote:
That sounds great.
But I can’t see where you’re concerned about a loss of sharpness. The OP’s idea colors the light source but does not filter the optics or the imaging path.
I would use an 85 blue wratten gel over the light source and then finish up all my minus-orange adjustment in post.
I’d put the 85 right on the lens. Some of us fear lens filters and some of us do not. That permanent difference always provokes a 12 page “discussion” !
Color negatives are considerably less sharp than color sides and black and white negatives. So I was taught (in the days before Photoshop) when shooting for compositing always shoot color slides. I interpreted the OP's actions as trying to composite a color correction layer, over the negative, which will reduce sharpness. If you use the color correction as a gel, between the light source and the negative it should work with no loss in sharpness. Just remember to use diffusion with a printed gel.
Feb 18, 2021 11:07:08 #
StanMac
Loc: Tennessee
cactuspic wrote:
I have had good success shooting high quality digi... (show quote)
There are many tutorials on YouTube on how to convert your negatives to positives and to remove the orange mask from color negative scans.
Stan
Feb 18, 2021 12:02:36 #

Just yesterday I copied two old color slides with an orange cast, probably from aged chemicals. I use my Olympus camera, LUMIX 30mm macro lens, and Nikon ES-2 slide copier to do it optically (I’m in the midst of a project to convert my best slides to digital format.). When I reviewed the product on my computer, the orange cast is gone. In fact, there is a blue sky with cumulus clouds, the way it was supposed to be. I believe the auto white balance in the camera did the correction on its own. If you plan a big project, you might want to consider a similar option, not necessarily Olympus with LUMIX lens, but certainly using an optical slide copy attachment such as the Nikon ES-2. Just for your consideration. JimR (PS: I have prior posts on the advantages of use of the ES-2.)
Feb 18, 2021 12:31:05 #

cactuspic wrote:
I have had good success shooting high quality digital copies of slides using a high resolution camera on a copy stand with light table in a dark room. Because of the orange cast of color negatives, I have been hesitant to convert them into digital images. ....
Don't try to remove the cast from the negative. Wait until you have turned it into a positive.
Once you have the negative digital color image with the color cast, load it into any photo editor and convert it to a positive image.
For example, in PS Elements it's Filter/Adjustments/Invert. Other editors have similar conversion features.
Film scanners do this by default if you tell the program you are scanning a color negative.
Then do your white balance on the resulting positive image.
Feb 18, 2021 12:51:53 #
cactuspic wrote:
No need for apologies E. L. Your posts are always so informative that I see it as bonus, another opportunity to get additional info.
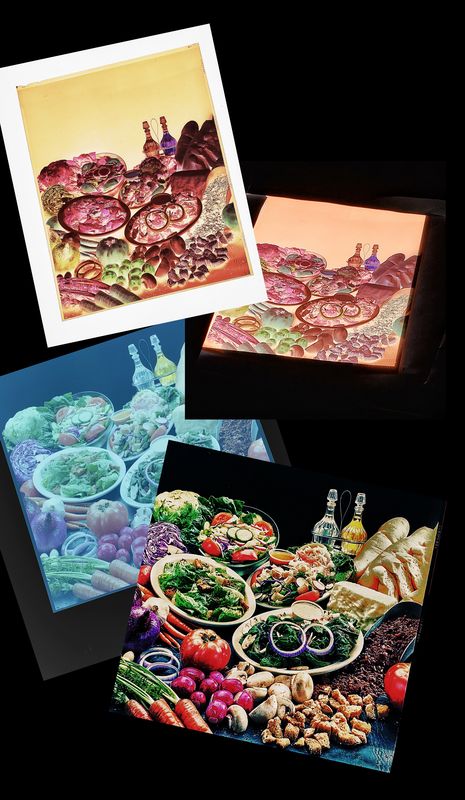
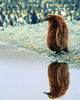
Here's an image made from a digitized colour negative using a camera. The negative is a place on a lightbox. Mine has a full spectrum fluorescent ligt source. Then I mask off the negative with black paper so that the ligh does not strike the lens and cause contrast diminishing flare. The room is darkened as well. In the computer the negative image is inverted. Directly after inversion, the first image will exhibit a cyan or bluish cast due to the orange mask but simple colr correction will restore the actual colour.
Many years ago, the image was made for extremely large display prints on 8x10 colour negative film.
Another attached image shows the steps.- the original negative, the inversion, the subsequent rough correction and the large image is the final correction.

Feb 18, 2021 13:16:14 #

If you're using a recent version of Photoshop, the curves adjustment has a color negative preset. It's worth a try.
Feb 18, 2021 14:06:14 #
Shutterbugger2
Loc: Chicago
My method, using a slide copier, was to put a blue filter between the light source and the diffusion screen. I recall using a flash as a light source to minimize movement of the copier. I think I used something like a 30 CC blue or cyan, or maybe a mix, and arrived at the value through trial and error.
Import the digital file into the image editor, invert the image, and adjust color balance (gray parts look gray) and when you get the right formula, do final edits.
~Bob~
Import the digital file into the image editor, invert the image, and adjust color balance (gray parts look gray) and when you get the right formula, do final edits.
~Bob~
Feb 18, 2021 14:17:15 #

cactuspic wrote:
I have had good success shooting high quality digi... (show quote)
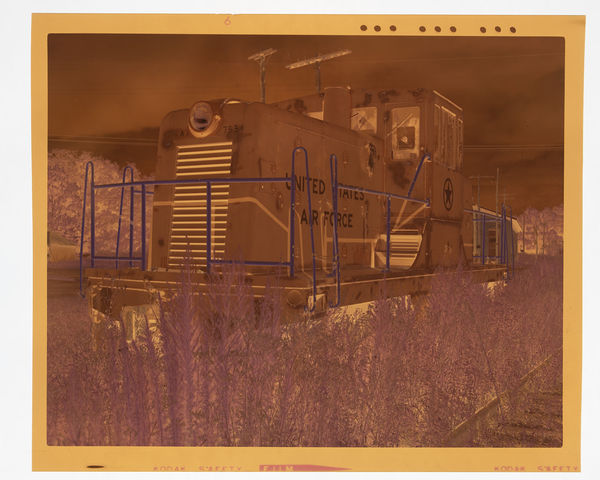
Here's my 20$ worth (.02 cents adjusted for inflation). It works for me and my setup has been improved through the intervening months. The neg I used for this demo has seen a lot of "not healthy for color negs storage" through the past 40 years, hence the color shift in parts of it. If you can look past the defects you might find it useful.
The orange cast is a mask inherent in most if not all color negs. My example is a Kodak Vericolor neg from the mid 70's processed by me in a real lab, as opposed to the kitchen sink. :)
It was copied using my Canon T-6 with a light box using the latest advanced engineering techniques and locally sourced materials (I slammed it together from what I had lying around at the time).
It was shot as a RAW image and processed in Photoshop.
First shot is the neg as it came from the camera, although this one, along with the other two were saved as a jpeg to conserve space and make for an easy upload.
I opened the original in Photoshop, went to Image,Adjustments, Levels and select the White Point selector (right eyedropper under the (Options)selector.
I clicked on the orange mask in the outside frame of film, its not exposed, just processed.
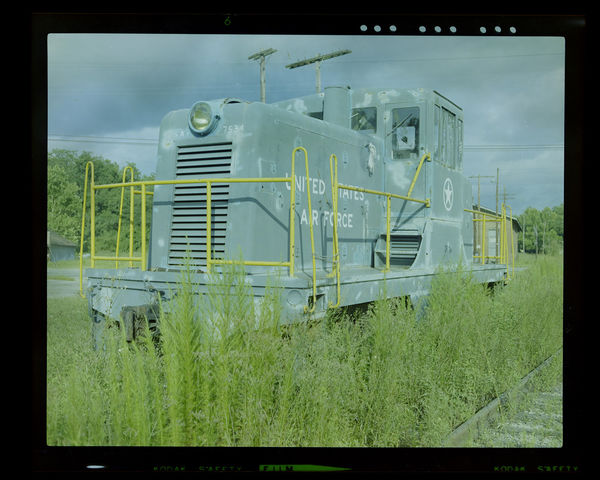
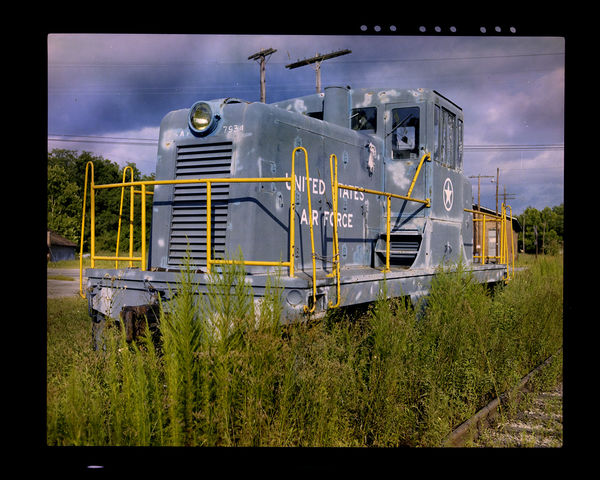
This gave me the odd color cast, at which time I went back to Adjustments and clicked on Invert, that gave me an image that was a starting point. After some color and exposure adjustments, I ended up with the final image.
It sounds like a lot when I read things over, but once you do it a couple of times it becomes a snap.
There are other ways to do it, I'm sure, this just what I use, and its a part of PS.
I hope this helped you to find a direction to go.
Lotsaluck in your efforts!
Feb 18, 2021 15:58:11 #
amfoto1
Loc: San Jose, Calif. USA
cactuspic wrote:
I have had good success shooting high quality digi... (show quote)
Geez... just get a proper film scanner. The software with those have built-in means of removing the orange mask from color neg film. The better scanning software (such as Silverfast) even gives you a preview that's accurate enough you can make further adjustments to exposure, contrast, color temp and tint before starting the actual scan.
Feb 18, 2021 16:00:49 #
Lots of good ideas on digitizing color negs. I use an old color head and a digital camera. (Color heads are not too expensive these digital days.) Also, you can use the negative carrier from the same color enlarger. I then adjust the color head, f stop and exposure time to get a "good" balanced histogram on my Nikon digital camera. At that point I have all three colors in the digital file close to neutral and orange mask, fading, different film types, etc. is take care of by the color head. Naturally, a red apple on green grass has no blue and is a "subject failure" so you do have to do some thinking. Then I put the digital file in PS or other software and "tweak" the color, etc. to what works for my eye. Need to have good digital camera with histogram, proper bellows/lens for close up work and some distance to the light source so it is out of focus (scratches, dirt and etc. will show if light is too close). Also, flatbed and other specialized scanners with Vuescan or other Neg/digital camera software (noted above) will work OK and the software and scanner has digital ice much of the dirt and scratches will just disappear. Lots of setups, ideas and software about negative shooting/scanning on line also.
If you want to reply, then register here. Registration is free and your account is created instantly, so you can post right away.