Can this be saved?
Feb 14, 2021 11:47:14 #

CindyHouk wrote:
That looks pretty good! I have the denoise but was this with the sharpen program?
I used both DeNoise and Sharpen.
Feb 14, 2021 13:04:46 #
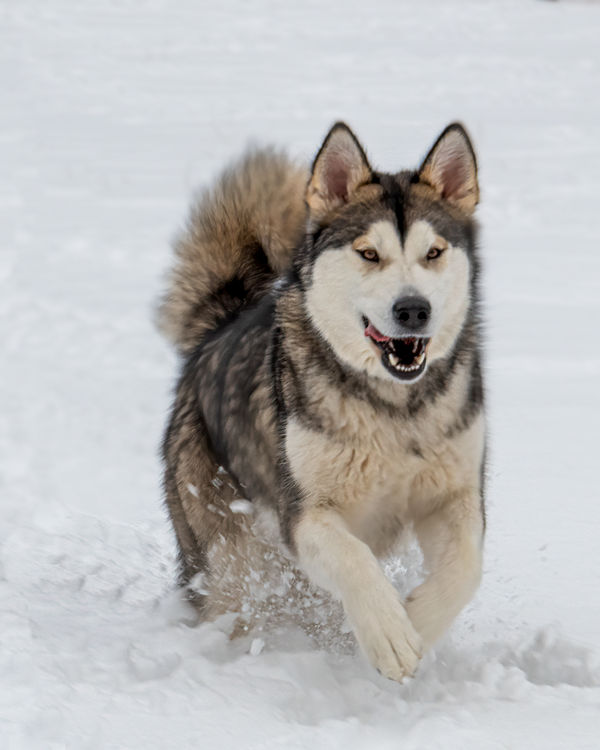
I'm not sure if this is any better. Maybe parts of it will be an improvement to you. Please open the Download as it will have more detail in it.
First Made a duplicate layer.
Next step I just learned a couple of weeks ago and have been using it.
It is to apply sharpening in a different way. Go to Filter>Sharpen>Unsharp Mask. You will be doing this twice.
First time I set the sliders Amount at 50 Radius 4.0 OK
Next do it again set Amount at 100 Radius 1.0
On the video he mentioned the first time set it at Amount 20 Radius 4.0. In your picture I didn't see enough so I made my adjustments.
Next I wanted to blur the background. I saw what looked like fur or something and other artifacts.
Made a new composite layer Command+Option+Shift+E
Tried gaussian blur and didn't like it.
I used Filter>Blur>Lens Blur set Radius 24 Blade Curvature 57. Zero all outher setting.
Added a white mask and Black painted out the dog and foreground
At this point I noticed a white line around the nostrils. Made a white mask on all my layers that didn't have mask and painted black over the white nostril areas.
Made a new Composite layer again.
I thought the head was too black compared to the body so I opened this layer in Filter>Camera Raw then lowered the black slider a bit. Now made a Black mask and opened just the head area.
Next now that the blacks evened out I could use additional black overall. Made another Composite layer and upped my black slider. Kind of redundent but it's how I went about it.
I now saw some areas that had some sharp fur edges that should not be at that point in the picture so I use the blur tool and panted over those areas.
As I said at the beginning I'm not sure this is any better but some areas you might like and want to ask how I went about it so mentioned all steps. I do think the background looks better and when printed it should be an improvement. The dog not so sure.
Feb 14, 2021 13:13:40 #

Jim-Pops wrote:
I'm not sure if this is any better. Maybe parts of... (show quote)
Thanks for the steps on how you did this! I am going to follow your steps and see how I do as well, I knew this would be an awesome learning exercise for me! And your edits look way better than mine!
Feb 14, 2021 13:23:57 #
ahudina
Loc: Browns Point, WA
CindyHouk wrote:
I took this photo of my neighbors dog and she wants to print it in an 8x10 but it's out of focus. I have played in PS using the Sharpen/Motion Blur tools but I just can't seem to get it to look right.
Does anyone have any tricks that I could try? I am not very good at post processing in PS but want to learn.
Thanks
Cindy
Does anyone have any tricks that I could try? I am not very good at post processing in PS but want to learn.
Thanks
Cindy
I am not very good at post work in PS either but I am still trying. To sharpen, I have only used the most recent version of Topaz Sharpen AI and I found it did a remarkable job at saving a very large (Nikon d850) HDR and focus stacked file. In my opinion this software is worth every penny. I started with it on automatic and made only a slider adjustment or two and let it do it’s magic. It took about 2 minutes to render the image on a very fast (i9 10900x chip with 128gb of ram and an 8gb graphics card) so be prepared to wait a bit, but the results saved my image and it should render your image quite easily. I highly recommend this piece of software.
Feb 14, 2021 13:54:57 #
I really like the version by SoHillGuy - it looks the best so far on my pc.
Feb 14, 2021 14:13:24 #

SoHillGuy wrote:
One more.
I downloaded your file of 5.? MP
First, I used Topaz Gigapixel AI v5.4. set to Scale (2X), AI Mode (Auto) which gave me a 60 MP+ sized file.
Second, I used Topaz Sharpen AI v2.2.2 set to "Sharpen - Auto (Sharpen 18) /Auto (Noise Suppression 28)".
Thirdly I imported the file into PhotoScape Pro, set the white balance, and then reduced the file size from 60 MP+ to 7.8 MP to post on UHH.
Since I was in a hurry I only used the completely "Auto" settings for both Topaz programs.
I feel certain that if I had "tried" several approaches I may have done better.
I have a similar or better experience using Topaz JPG to Raw AI, Topaz Gigapixel AI, and Topaz Sharpen AI in concert.
If you like I would be willing to give it another try or you may do so for free (for 30 days) by downloading these programs at:
Topaz Products and FAQs: https://help.topazlabs.com/hc/en-us
Topaz workflow: https://topazlabs.com/the-ultimate-workflow-for-topaz-labs-ai-software/?utm_source=Topaz+Updates&utm_campaign=8c480bdca3-EMAIL_CAMPAIGN_2020_11_19_04_29&utm_medium=email&utm_term=0_5e4dd8652a-8c480bdca3-92602881&mc_cid=8c480bdca3&mc_eid=c9be7297b0
Tutorials: https://www.youtube.com/results?search_query=topaz+tutorials+on+youtube
Jim Nix Topaz Tutorials: https://www.youtube.com/results?search_query=Jim+Nix+topaz
David Kelly Tutorials: https://www.youtube.com/results?search_query=dave+kelly+topaz
How to make Topaz Products Run Faster: https://www.youtube.com/watch?v=GraqwH2YYJ4
Start at about 1:40 min. into the video.
Finally, go to this site(s) for current Topaz Products discount codes.https://www.google.com/search?q=topaz+products+coupon+code&oq=topaz&aqs=chrome.2.69i65j69i57j35i39j0i433j46i175i199j69i60j69i65j69i61.6895j0j7&sourceid=chrome&ie=UTF-8
A few folks are negative regarding Topaz Products, however, if you mind your workflow and don't try to "help" the programs and use the "Auto" buttons first you will learn a lot and fast.
The only caution that I have is to read about their "recommended" computer requirements and don't expect everything to work instantly. These programs work both as "plug-ins" and as "stand-alone" as I use them.
I sure hope that this helps.
Smile,
JimmyT Sends

Feb 14, 2021 14:38:38 #
Jimmy T wrote:
I downloaded your file of 5.? MP br First, I used ... (show quote)
Thanks and I do have the denoise but can't use the others because my system will not support them, Sharpen just crashes because my processor is to old and slow. Can't update system yet...so just have to deal with what I got for now. But I do really like the Denoise program, it's amazing!
Feb 14, 2021 16:58:31 #

Jimmy T wrote:
I downloaded your file of 5.? MP br First, I used ... (show quote)
***
Were you working from my post or from Cindy Houk's Post?
Feb 14, 2021 17:01:33 #
CindyHouk wrote:
Thanks and I do have the denoise but can't use the others because my system will not support them, Sharpen just crashes because my processor is to old and slow. Can't update system yet...so just have to deal with what I got for now. But I do really like the Denoise program, it's amazing!
Cindy
When you do update your computer I would get the following: Denoise AI, Sharpen AI, and Adjust AI.
Here are a couple of tips to help you to check out your computer:
After loading a file in any Topaz XXX.AI program then select all of the "Full Auto" selections, run "Update", then . . "Select File, Preferences, Reset, and Close".
This allows the program to select the best/fastest settings for your computer.
Now select "Save Image" as you desire for the type of file, location, etc.
Another hint. Close all programs not in use as this will allow your computer to perform at its best.
After doing this, open "Task Manager" select "Performance" and watch the graphs as the program processes the file to see if you have enough Memory/CPU etc.
Also: DO NOT select "Auto-Update Preview"!! It may be handy for making small changes but it will REALLY ADD to your processing times!
Remember Topaz products are nondestructive so experiment.
That is all that I can recommend.
Smile,
JimmyT Sends
Feb 14, 2021 17:03:40 #
SoHillGuy wrote:
***
Were you working from my post or from Cindy Houk's Post?
Were you working from my post or from Cindy Houk's Post?
I was working from the pic Cindy posted. Did I cause a problem?
JimmyT
Feb 14, 2021 17:06:03 #
Jimmy T wrote:
Cindy br When you do update your computer I would... (show quote)
Thanks for the tips on getting the products to run better, I was an IT tech for 20 years and built this laptop about 12 years ago...but it's time to build another one
Processors and ram are so expensive right now...just hoping the prices come down a little in this next year.Feb 14, 2021 17:08:48 #
Jimmy T wrote:
I was working from the pic Cindy posted. Did I cause a problem?
JimmyT
JimmyT
No, I just saw that you were using my name as a reply to post your application process.
Feb 14, 2021 17:09:58 #
CindyHouk wrote:
Thanks for the tips on getting the products to run better, I was an IT tech for 20 years and built this laptop about 12 years ago...but it's time to build another one Processors and ram are so expensive right now...just hoping the prices come down a little in this next year.
Processors and ram are so expensive right now...just hoping the prices come down a little in this next year.I wish that I could help more . . .
JimmyT
Feb 14, 2021 17:11:53 #
SoHillGuy wrote:
No, I just saw that you were using my name as a reply to post your application process.
Whoops, sorry. . . I guess that I got in a hurry.
JimmyT
Feb 14, 2021 17:35:01 #

Jim-Pops wrote:
I'm not sure if this is any better. Maybe parts of... (show quote)
You've improved it. But there is nothing stopping one at this point from putting subtle well placed catchlights in the eyes with a brush to add more of a feeling of sharpness.
If you want to reply, then register here. Registration is free and your account is created instantly, so you can post right away.