GIMP: Quick and Easy Tutorials
Oct 15, 2012 09:41:06 #
The Quick Mask (continued.):
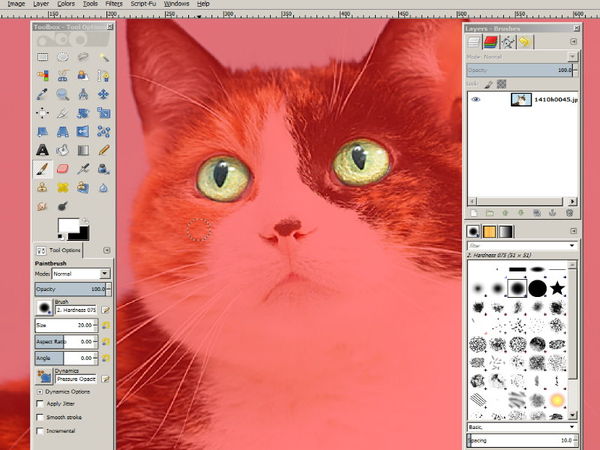
7. With the Hard brush paint or click over each of the cat's eyes. The white brush paints away the red mask to expose the eye. The hard brush leaves a sharp edge which is ugly in the final photo. So, don't paint out to the edge of the eye, leave a fringe which you will clean up with a soft brush.
8. Select the soft brush and clean up each eye with a natural (feathered) edge.
9. If you make a mistake and paint to expose more than than an eye, toggle the black and white arrow so that black is now the top color. Paint over the mistake and the red mask will be restored. You might want to try that to increase your skill.
10. When you are happy with the cat's eyes, turn off the red mask. Look down to the bottom left corner of GIMP, you'll see a tiny red square. This red square does not appear until the mask is active. Click the square and the Quick Mask will disappear.
11. The Cat's eyes are now surrounded by marching ants. Great!
12. We'll do more. Go the the 'Color' menu and select 'Colorize'. Move the sliders as shown to change the color of the cat's eyes. As you realize, the marching ants are preventing the color from overflowing onto the cats fur.
13. For information only, do nothing yet: (If you wanted to keep the cat's coat in full color you would click Select/None and the marching ants vanish. You remember that, right? Of course you remember!)
The Quick Mask #2
The Quick Mask #3

Oct 15, 2012 09:47:55 #
The Quick Mask (continued.):
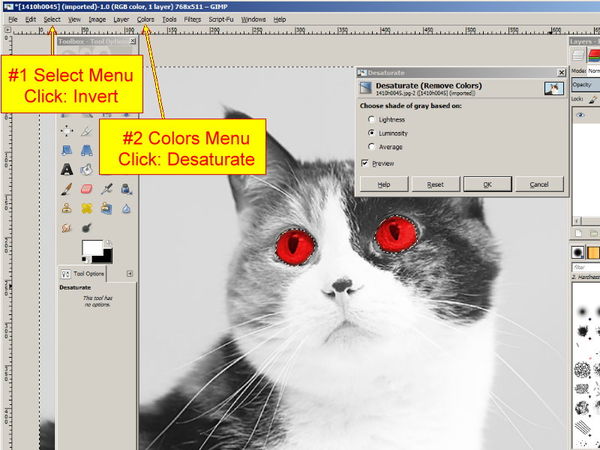
14. We'll go a step further. Go to the Select menu and click 'Invert'. To look at the cat nothing has changed, but by choosing Invert the cat becomes subject to whatever changes we wish to make.
15. Go to the Color menu and select 'Desaturate'. A Box will open. You have three options for the B&W photo which will appear. Choose which ever option you prefer. Click 'OK'.
16. Now go the the Select menu and click 'None'. Job done.
The Quick Mask #5
Oct 15, 2012 09:55:32 #
can you tell us where this "content aware" / resynthisiser feature is hiding in GIMP? Not being 'negative' but can you or your 11 year old tutor tell us if it actually is in GIMP or has to be downloaded seperately from yet another site and then installed?
Curt H.
Curt H.
Check out Commercial and Industrial Photography section of our forum.
Oct 15, 2012 10:15:32 #
cdhakl wrote:
can you tell us where this "content aware" / resynthisiser feature is hiding in GIMP? Not being 'negative' but can you or your 11 year old tutor tell us if it actually is in GIMP or has to be downloaded seperately from yet another site and then installed?
Curt H.
Curt H.
Yes, this is a free plugin for GIMP. It is updated regularly. The resynthesize plugin for Gimp 2.8.2 has not yet been announced. We are all waiting and hope to see it soon. The previous version was 2.6 which works in 2.8 after a fashion (not good). I'll keep the forum posted when the update becomes available.
In the mean time, try the heal tool or the Clone tool. Manual operation but excellent tools.
Oct 15, 2012 12:23:04 #
Oct 15, 2012 14:37:32 #
cdhakl wrote:
no thanks, I have PhotoShop.
Well, thanks for looking at some of the things GIMP can do. Have a great time working with Photoshop.
Oct 15, 2012 14:50:01 #

Check out Bridge Camera Show Case section of our forum.
Oct 15, 2012 17:21:43 #
jradose wrote:
Thank you Shakey, worked like a charm!
I'm pleased that you liked it, Jradose. Thanks.
Oct 16, 2012 08:35:46 #
Oct 16, 2012 12:05:06 #
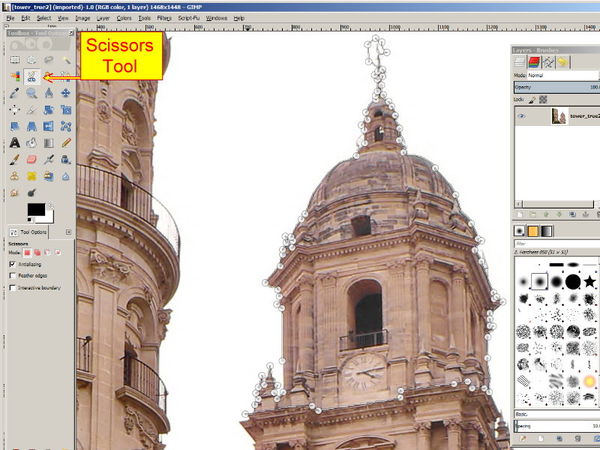
The Scissors Select Tool:
The Scissor Tool is related to the Magic Wand Tool. A suitable image for this tool has a strong contrast between the image to be selected and the background. The photo of the fish has both good and bad contrast qualities.
1. Select the Scissors tool. The available options are Antialiasing, Feather edges and Interactive boundary.
Antialiasing: Gently smooths the edges of the selection.
Feather edges: Blurs the border to give you even softer edges. (AKA Radius when you choose to make adjustments to the amount of feather.)
Interactive Boundary: Displays the path when a control node is moved.
2. Start by left-clicking the mouse on the edge of the subject. Add control points along the outline. The line between the points is the 'path' of the selection. Add nodes to edit the selection path as you go. The more nodes you add the greater the accuracy of the tool.
3. When the selection is complete, left click on the first control node to close the selection. Watch for the cursor to change from a + sign to two tiny interwoven rings when you reach and click on the first control point. Now add and/or move any control node, up, down, or sideways, to improve your selection.
4. Change your path to a selection (marching ants) by left-clicking in the center of your selection.
Scissors Selection Tool
Oct 16, 2012 12:08:52 #
The Scissors Selection Tool (continued):
5. Shift+Q to flood your image with the Quick Mask. You can now see if the Scissors tool has been accurate or if you need to use the Quick Mask to fine tune your selection. While using QM: select Paint Brush, select the size you need, check that the colors are black and white in the foreground/background tool. (Other colors DO NOT work with the Quick Mask.) Select your brush type: hard is good for this work.
6. When you have cleaned up your selection, click the red box to close Quick Mask.
7. The marching ants will have adjusted to your new selection.
8. We'll go a little further: right click within the march ants, a drop down menu will appear. Click on 'Feather', a box will appear to allow you to adjust the soft edge, 5 is the default but you choose anywhere between 2 and 7. Beyond 7 is extreme softening. Click 'OK'. Ctrl+Z to return to the previous setting.
9. Right click within the march ants again, a drop down menu will appear. Click on 'Shrink', a box will appear to allow you to adjust the edge of the selection around your object. Choose by how much you want the selection to shrink. Click 'OK'. Ctrl+Z to return to the previous setting.
10. Now choose to Edit/Cut (Ctrl+X) and paste (Ctrl+V) your cut out image onto another photo, just to see how it looks.
Job done.
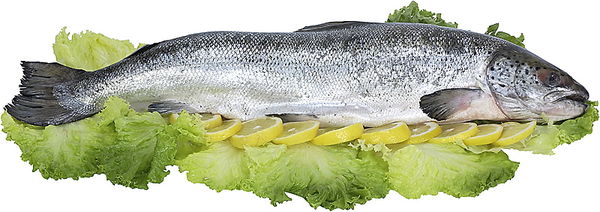
Fish photo attached: cut out the fish.
5. Shift+Q to flood your image with the Quick Mask. You can now see if the Scissors tool has been accurate or if you need to use the Quick Mask to fine tune your selection. While using QM: select Paint Brush, select the size you need, check that the colors are black and white in the foreground/background tool. (Other colors DO NOT work with the Quick Mask.) Select your brush type: hard is good for this work.
6. When you have cleaned up your selection, click the red box to close Quick Mask.
7. The marching ants will have adjusted to your new selection.
8. We'll go a little further: right click within the march ants, a drop down menu will appear. Click on 'Feather', a box will appear to allow you to adjust the soft edge, 5 is the default but you choose anywhere between 2 and 7. Beyond 7 is extreme softening. Click 'OK'. Ctrl+Z to return to the previous setting.
9. Right click within the march ants again, a drop down menu will appear. Click on 'Shrink', a box will appear to allow you to adjust the edge of the selection around your object. Choose by how much you want the selection to shrink. Click 'OK'. Ctrl+Z to return to the previous setting.
10. Now choose to Edit/Cut (Ctrl+X) and paste (Ctrl+V) your cut out image onto another photo, just to see how it looks.
Job done.
Fish photo attached: cut out the fish.
Scissors Selection Tool #2
A Photo to Work On
Check out True Macro-Photography Forum section of our forum.
Oct 16, 2012 12:16:25 #
paulbrimmeier wrote:
And I'm Happy using Picasa :-D
Good for you, Paul. Have fun!
Oct 16, 2012 12:28:36 #

Thank you for all your time and effort that has gone into these tutorials. I have been using Gimp for 5-6 years and I did learn something about the quick mask.
Oct 16, 2012 12:31:44 #
RaydancePhoto wrote:
Thank you for all your time and effort that has gone into these tutorials. I have been using Gimp for 5-6 years and I did learn something about the quick mask.
Thanks, Raydance, your compliment is much appreciated.
Oct 16, 2012 14:56:47 #
PhotoGator
Loc: Florida
GIMP Tutorials by Shakey and his Grandson.
Page 1
http://www.uglyhedgehog.com/t-69708-1.html
Chapter 001: Crop Tool
Chapter 002: Zoom Tool
Chapter 003: Eraser Tool
Chapter 004: Perspective Tool
Download: Two Castle Images to Work on it
Chapter 005: Understanding Save Options
Page 2
http://www.uglyhedgehog.com/t-69708-2.html
Chapter 006: How To Get Rid of Purple/Blue Fringing
Ep 006-a: Removing Purple/Blue with a Selection Tool
Page 3
http://www.uglyhedgehog.com/t-69708-3.html
Page 5
http://www.uglyhedgehog.com/t-69708-5.html
Chapter 007: Clone Tool
Chapter 007-a: Clone Tool in Use
Download: Image to work n it
Chapter 008: The Heal Tool
Chapter 008-a: Heal Tool: Practice photos
Download: Girl Bath and Baby to Heal
Page 6
http://www.uglyhedgehog.com/t-69708-6.html
Chapter 009: The Fuzzy Tool
Chapter 009-a: The Fuzzy Tool in Practice
Downloads: Towers for Fuzzy Tool Sky for Fuzzy Tool Work
Chapter 010: Select By Color Tool
Chapter 010-a: Select by Color Tool (continued)
Chapter 010-b: Select by Color Tool Download Photo
Note: To save work as JPEG
File Menu
Click 'Export'
Write name of file and format (picture.jpg) in the top (Name) slot.
Click Export button.
Select degree of quality. Click Export button
Chapter 011: The Quick Mask
Download: Cat to work with it
Page 7
http://www.uglyhedgehog.com/t-69708-7.html
Chapter 011-a: The Quick Mask (continued.)
Chapter 011-b: The Quick Mask (continued.)
Q&A:
Q: can you tell us where this "content aware" / resynthisiser feature is hiding in GIMP? Not being 'negative' but can you or your 11 year old tutor tell us if it actually is in GIMP or has to be downloaded seperately from yet another site and then installed?
A: Yes, this is a free plugin for GIMP. It is updated regularly. The resynthesize plugin for Gimp 2.8.2 has not yet been announced. We are all waiting and hope to see it soon. The previous version was 2.6 which works in 2.8 after a fashion (not good). I'll keep the forum posted when the update becomes available.
In the mean time, try the heal tool or the Clone tool. Manual operation but excellent tools.
Chapter 012: The Scissors Select Tool
Chapter 012-a: The Scissors Selection Tool (continued)
Download: Fish photo to work with
If you want to reply, then register here. Registration is free and your account is created instantly, so you can post right away.
Check out Smartphone Photography section of our forum.