GIMP: Quick and Easy Tutorials
Oct 11, 2012 11:46:11 #
As I'm learning GIMP, I'm sure there other members who are interested in photo post processing with this incredible, renowned, and free program. There are many tutorials online but many are complex, hence I'll show you quick and easy techniques courtesy of my tutor, my great-grandson Keven (aged almost 11, I was told to make that clear).
To start with GIMP you'll need to download the latest version of the program, Gimp 2.8.2. This is a considerable upgrade from earlier editions. The link is: http://www.gimp.org/downloads/
This is the Windows XP (SP3), 2000, Vista, and 7 update.
Mac users have their own program available here:
http://www.macupdate.com/app/mac/14597/gimp
Oct 11, 2012 11:50:00 #
We'll make a start where many photographers begin when they open a new photo: Cropping
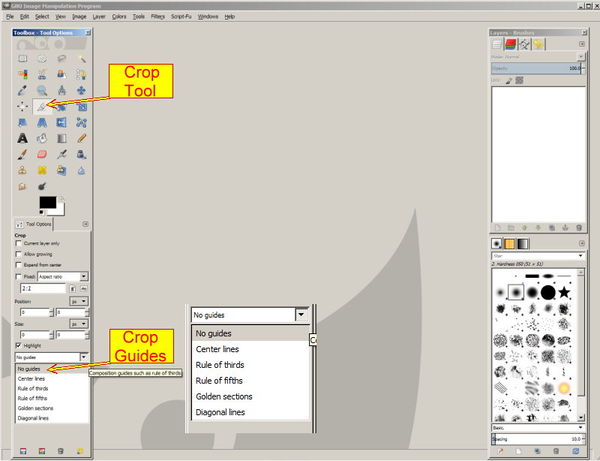
The crop tool in GIMP is shown below. This tool has the option of selecting a number of composition aids as shown below.
The crop tool in GIMP is shown below. This tool has the option of selecting a number of composition aids as shown below.
Cropping Tool with Options
Oct 11, 2012 12:05:35 #
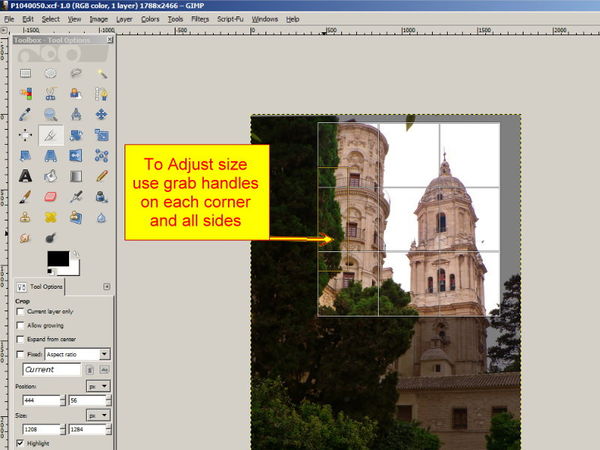
With the Crop tool selected, draw around the area you wish to keep. In the example below, I have selected the Rule of Thirds composition cropping option. The crop box may be adjusted by placing your mouse arrow on any corner or side that you wish to use. Click and hold in the yellow box, and drag the box to enlarge or shrink the crop area.
When you have made your selection, double click in the box or hit the Enter key on your keyboard. Your cropped image will appear and the Crop box will close. If, however, you open the cropping tool and wish to close it without making a crop simply click in the gray area surrounding your photo. The box will close.
To remove your crop action and return to the original photo, press the Ctrl on your keyboard follow by the Z key. Repeat Ctrl+Z until you have removed your unwanted results. Ctrl+Z works with almost all tools to remove unwanted effects.
The Crop Box - Rule of Thirds
Oct 11, 2012 13:41:55 #
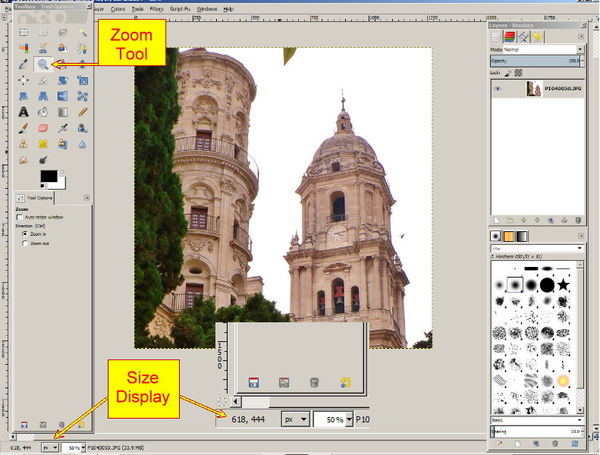
Zoom Tool: Click on the Zoom tool to activate. You will see a magnifying glass with a + sign on your image. The default is enlarge, which means for each left click of the mouse your photo gets bigger. You shrink the image by holding down the Ctrl key and repeatedly left clicking. When you shrink the image the magnifying glass will be shown with a - sign.
At the lower left of your screen you will see the size of the photo in pixels, plus the percentage of enlargement. You may need to move the floating tool bar up to view this information. (Click on the tool bar title and drag up.)
At the lower left of your screen you will see the size of the photo in pixels, plus the percentage of enlargement. You may need to move the floating tool bar up to view this information. (Click on the tool bar title and drag up.)
Zoom Tool
Oct 11, 2012 14:29:31 #
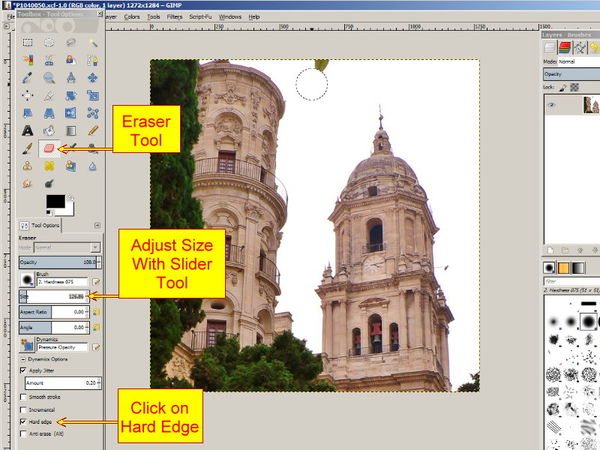
Eraser Tool: This tool will erase anything in your photo. In the normal mode, this means you only activated the tool, you will get a white circle where you click on the image. So, it's ideal for getting rid of unwanted objects on a white background. For example: the leaf at the top of the picture. The dotted circle you can see is the tool in action.
If you need to erase some group of pixels completely, leaving no trace behind of their previous contents, you should check the "Hard edge" box in the Tool Options. Otherwise, you may get partial erasure at the edges of the brush-stroke, even if you use a hard-edged brush.
You also have other options with drawings:
Ctrl For the Eraser, holding down the Ctrl key puts it into color picker mode, so that it selects the color of any pixel it is clicked on. Unlike other brush tools, however, the Eraser sets the background color rather than the foreground color. This is more useful, because on drawings that don't support transparency, erasing replaces the erased areas with the current background color. If you don't understand that and you don't want drawings, don't worry about it.
Adjust the size of the Eraser tool by using the slider indicated. This can be a little clumsy. If you see a tiny arrow pointing up, drag to the right to get a bigger circle (technically a brush). Drag to the left for a smaller circle. You'll see a blue line moving as you drag. Alternatively, highlight the numbers and insert your preferred size.
Use the Ctrl+Z to recover lost areas of the photo if you go too far. Don't paint with the eraser, work click by click. If you need to recover areas the Ctrl+Z will win it back one click at a time.
Eraser Tool
Oct 11, 2012 15:11:01 #
Oct 11, 2012 16:39:10 #
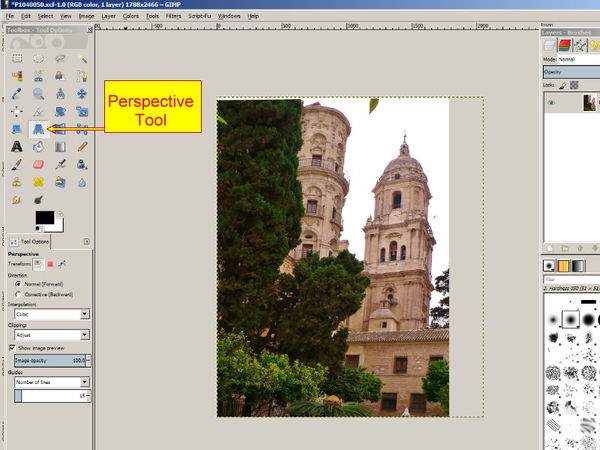
Perspective Tool: The Perspective Tool is used to change the perspective of the image (you may also see descriptions such as: active layer content, selection content, or of a path. Don't be confused by jargon.)
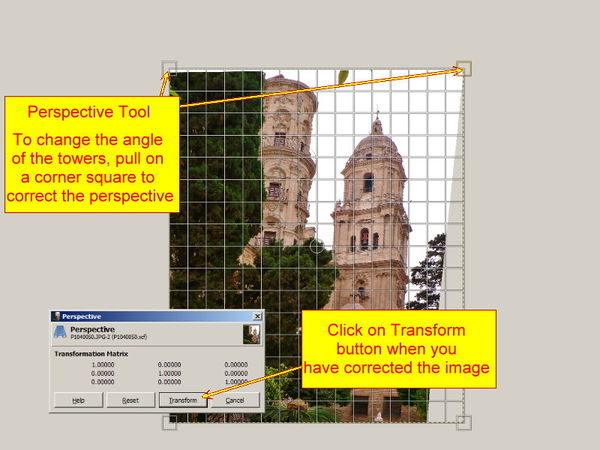
When you click on the image, according to the Perspective type you have selected, a rectangular frame or a grid pops up around the photo with a handle on each of the four corners. By moving these handles by click-and-drag, you can change the perspective. At the same time, a Transformation information box pops up, which is asking you to agree to the transformation.
At the center of the element, a circle also lets you move the element by click-and-drag. This is were you have fun dragging images around just to see what happens. Experiment and you'll get the hang of the handles and the center circle.
(You may also change the perspective of a selection, or a layer, if you have created one. More about selections and layers later.)
There are main 6 perspective tools in the tool box, they are close together and colored blue. Each changes a perspective by using a different method. When you have got the hang of this perspective tool experiment with the others. Have fun! Ctrl + Z will get you out of trouble.
Perspective Tool
Perspective Tool (Continued)
Oct 11, 2012 18:07:42 #
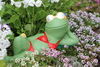
Images to work with:
Here's two images that I have been using to demonstrate the tutorials. Please feel free to download them to help you follow the tutorials more closely.
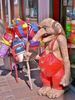
#1. Crop as the example in cropping, practice with the zoom tool, use the eraser tool to get rid of the leaf at the top of the page and any branches at lower right.
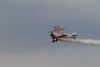
#2. Here's an example of leaning towers. Use your perspective tools to correct the problem. Yep, I do mean that you should experiment with any perspective tool to help cure the problem.
Here's two images that I have been using to demonstrate the tutorials. Please feel free to download them to help you follow the tutorials more closely.
#1. Crop as the example in cropping, practice with the zoom tool, use the eraser tool to get rid of the leaf at the top of the page and any branches at lower right.
#2. Here's an example of leaning towers. Use your perspective tools to correct the problem. Yep, I do mean that you should experiment with any perspective tool to help cure the problem.
Tutorial Image #1

Tutorial Image #2

Oct 12, 2012 06:30:58 #
I don't use it myself but thanks for all your time and effort that you have put into this series of explanations of using GIMP.
Oct 12, 2012 06:41:26 #
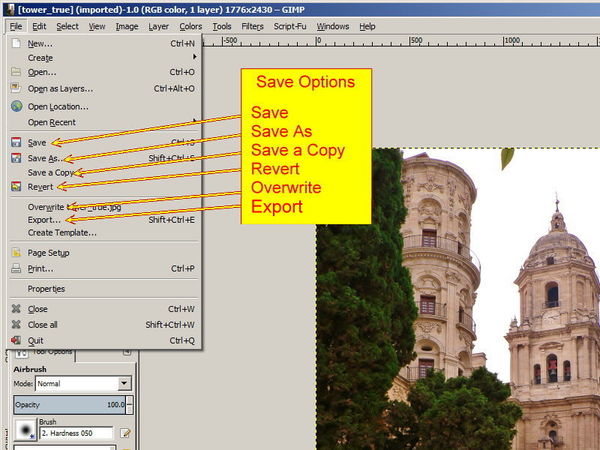
Understanding Your Save Options:
The 'Save' command displays the Save Image dialog. Since GIMP-2.8, the file is automatically saved in the XCF format and you can't save in another file format (for this, you have to Export the file).
The 'Save As' dialog allows you to save in the XCF format with another name and/or to another folder.
The 'Save a Copy' command does the same thing as the Save command, but with one important difference. It always asks for a file name and saves the image into the XCF file format, but it does not change the name of the active image or mark it as clean. (As a result, if you try to delete the image, or exit from GIMP, you are informed that the image is dirty and given an opportunity to save it.)
This command is useful when you want to save a copy of your image in its current state, but continue to work with the original file without interruption.
The 'Revert' command reloads the image from disk, so that it looks just like it did the last time it was saved (Unless, that is, you or some application other than GIMP have modified the image file, in which case, the new contents are loaded.)
The 'Overwrite' command allows you to overwrite or update the photo you are working on. This command is only good for the format you have open on your screen.
The 'Export' command allows you to save your image in a format other than XCF. This is a command you'll use regularly to save to other formats such ad .jpg, .png, etc. Enter the name and format (.jpg) at the top of the box
Save Options
Oct 12, 2012 07:02:53 #
waterbug49307
Loc: All over, currently Big Rapids Michigan
Thanks a million for the examples. I have had gimp for several months and there is a huge learning curve for those of us that are non computer people. This is an excellent starting point along with the suggested tutortials.
Oct 12, 2012 07:13:03 #

Oct 12, 2012 07:22:22 #
Granddad wrote:
I don't use it myself but thanks for all your time and effort that you have put into this series of explanations of using GIMP.
Thanks, Grandad. I appreciate that comment.
Oct 12, 2012 07:30:02 #
Thank you for all of your work have never used it but can see how much you have put into your instructions
Oct 12, 2012 07:34:35 #
Snecko wrote:
Great! I'll download it tomorrow! Thanks!
Thank you, Waterbug, June, and Snecko.
If you want to reply, then register here. Registration is free and your account is created instantly, so you can post right away.