Help with manual mode
Jun 17, 2019 11:14:31 #
Elissa.allen21 wrote:
I've been trying to learn how to use manual on my nikon z6 (first time camera owner)..
Well, theres something weird going on when i take my pictures. The picture gets VERY grainy... in my u1 or u2 mode, or any other mode, i dont have any issues taking pictures. Any insights or suggestions? Im going to post two pictures of what it looks like in manual mode vs another mode
Well, theres something weird going on when i take my pictures. The picture gets VERY grainy... in my u1 or u2 mode, or any other mode, i dont have any issues taking pictures. Any insights or suggestions? Im going to post two pictures of what it looks like in manual mode vs another mode
Get and read Peterson's book on Understanding Exposure and turn off auto ISO. Or shoot in P mode.
Jun 17, 2019 11:41:12 #

CO wrote:
I rented the Z6 for two weeks not long ago. I didn't have that issue but something similar when using my studio strobes. I take light meter readings from the strobe and enter those values into the camera in manual mode. That results is a very dark viewfinder - too dark to use. The final photo is properly exposed but the viewfinder is very dark.
the reason this is happening is that this camera is showing you a "live view" for the settings you have on the camera which are set for much more light (from the flash). I have a sony camera which does the same thing. Sony has an effects menu item which allows you to either use the live view or override it and give you a view of a wide open lens similar to the film cameras of yesteryear... look for it on your menus (Nikon may call it something else but on sony it is effects on and off.. hope this helps
Jun 17, 2019 12:31:48 #
Jun 17, 2019 13:47:32 #
amfoto1
Loc: San Jose, Calif. USA
First, you actually aren't "shooting manual exposures". You have Auto ISO on, which means it's still auto exposure.
Second, what the heck? 1/8000 shutter speed? That's far, far faster shutter speed than necessary. That's why the first images is so under-exposed. The camera pushed ISO as high as it could, but it still wasn't enough!
Finally.... I'd call it a "lucky accident". I think the grainy, under-exposed shot is wonderful! It reminds me of an impressionist painting... a Seurat or a Monet.
I hope you don't mind me messing around with your image... I wanted to see how it would look with MORE grain, stronger contrast, and a bit of warming up in Photoshop. Here's the result:

Jun 17, 2019 14:12:42 #
Notwithstanding the camera, a simple strategy to start using and understanding Manual Mode is:
1. Decide if the subject/scene requires a fast shutter speed to control motion--fast to stop it or slow to blur it like a "creamy looking" waterfall. OR does the subject/scene require control of depth of field
(apparent focus).
2. If Motion is the priority, choose the best shutter speed, and then adjust the aperture so as to make the meter indicator hit the middle mark in your viewfinder.
3. If Depth of field (sharpness from near to far, is your priority set the appropriate aperture; Large opening-smaller number, e.g. f4, for a narrow band of sharpness or a smaller opening--larger number e.g. f 11 or 16 for better front to back sharpness. Then do the matching thing with the meter by adjusting your shutter speed.
Then you can experiment with moving the indicator up or down a mark or two to see how this makes your pictures look--sharper, blurry, lighter or darker.
All this is also accomplished semi automatically using Aperture or shutter Priority modes.
An alternative is using Auto ISO, which I think you did with the dark photos. If you choose that option, experiment and then choose the option to limit you maximum ISO to something like 3200 or 6400--I'm not familiar to how your camera behaves--but experiment and decide what your limits and preferences are.
After years of practice and many f them when Manual was the ONLY option, most of us find that aperture and shutter priority are our preferred methods. BUTTTTTT, Manual is the ultimate way to control everything about your exposure, OR once you found the right exposure--to keep it constant and not change between photos--like when you're doing a panorama or other specialized HDR work.
YouTube has a number of video tutorials on this including an excellent (tho maybe a bit advanced) by Steve Perry, one of our members specifically using Nikon equipment. Search "Tutorial: Using Manual Exposure for Photography."
Jun 17, 2019 14:18:07 #
Elissa.allen21 wrote:
Just figured it out 🤣🙈
My exposure time was ridiculously high. Lol
My exposure time was ridiculously high. Lol
I would have said rediculouly fast or short (in duration) or high speed.
Jun 17, 2019 16:43:07 #
BillyP
Loc: Cedar Point, NC
You're a quick learner, will soon have that camera down pat. ISO of 204800, I guess it was a little grainy. Thanks for sharing.
Jun 17, 2019 17:30:12 #
lloydl2 wrote:
the reason this is happening is that this camera i... (show quote)
I found out from Nikon that it's menu option d8 “Apply settings to live view" I needed to turn that off. It was great after that.
Jun 17, 2019 18:41:01 #
Jun 17, 2019 18:51:39 #

Open the download file in a program like Lightroom or photoshop or even Preview on a Mac will display it using the inspector function. There are other EXIF tools that will perhaps give more EXIF data too...
pnittoly wrote:
How can I see the exif data on these photos ?
Jun 17, 2019 23:04:41 #

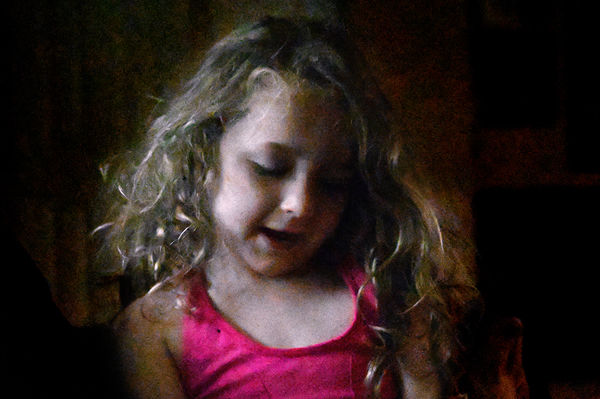
Elissa.allen21 wrote:
This is the original if you all want to take a look 🙂
Both ISO and shutter speed to high. You could have probably shot this at 1/60th of a sec shutter and ISO400

Jun 18, 2019 05:55:21 #

jeep_daddy wrote:
Both ISO and shutter speed to high. You could have probably shot this at 1/60th of a sec shutter and ISO400
ISO 3200. It's dark.
Jun 18, 2019 11:23:33 #
BebuLamar wrote:
ISO 3200. It's dark.
What are you talking about. Check out what I've got circled and it's a lot higher than ISO 3200.....

Jun 18, 2019 11:39:14 #
jeep_daddy wrote:
What are you talking about. Check out what I've got circled and it's a lot higher than ISO 3200.....
The dark shot was shot at 1/8000 ISO 204800. The good shot was shot at 1/200 ISO 9000. To get the same exposure at 1/60 the ISO must be 3200 and not 400. Although the good shot is slightly bright so ISO 2000 would be OK but ISO 400 would be too dark.
Jun 18, 2019 11:43:17 #
If you want to reply, then register here. Registration is free and your account is created instantly, so you can post right away.