Using Photoshop Elements to make Anaglyph images.
Apr 16, 2019 18:03:55 #
Guyserman
Loc: Benton, AR
I decided to take up making Anaglyph 3D images and my search on how to do it mostly turned up recommendations to buy this software or that software. One side described a process using (full blown) Photoshop and its Advanced Blending feature to separate the color channels. But alas, Photoshop Elements does not have Advanced Blending. Never fear... Levels to the rescue. My work flow is as follows:
1. Shoot an image from each of two positions at three or four inches apart, left to right, and load into Photoshop Elements.
2. Use the leveling tool on the same reference point in both images to make sure they are horizontally aligned the same.
3. Using the right image as the background, drag the left image onto it.
4. Convert the background to a layer. You now have a layer for right and above it a layer for left.
5. With the left layer selected, choose Enhance > Adjust Lighting > Levels. In the Channel Drop Down choose Red.
6. On the Output Levels slider, move the 255 stop all the way to the left (0.)
7. With the right layer selected, choose Enhance > Adjust Lighting > Levels. In the Channel Drop Down choose Green.
8. On the Output Levels Slider, move the 255 stop all the way to the left (0.)
9. With the right layer still selected, Adjust the Blue Channel the same as the Green.
10. Select the top layer (Left) and set the opacity to 50%.
Edit: 10.5 At this point you can use the arrow keys to nudge the layers into better alignment, if needed.
11. Press and hold Shift, Control, Alt and press E to get a merged layer at the top of the stack.
12. Choose Enhance > Adjust Lighting > Brightness/Contrast to lighten as needed.
13. Save as a jpeg.
I went out this morning and grabbed a couple of shots to try this out. The results are in the gallery: https://www.uglyhedgehog.com/t-587797-1.html
I'm now ready to document the world in 3D.
Apr 16, 2019 18:35:10 #

Good for you for finding a new aspect of photography that piques your interest. I admit to not being a fan of 3D, but I wish you fun and success!
Thanks very much for sharing this info in PP Forum.
Thanks very much for sharing this info in PP Forum.
Apr 16, 2019 19:05:41 #
Guyserman
Loc: Benton, AR
Linda From Maine wrote:
Good for you for finding a new aspect of photography that piques your interest. I admit to not being a fan of 3D, but I wish you fun and success!
Thanks very much for sharing this info in PP Forum.
Thanks very much for sharing this info in PP Forum.
Thanks for recognizing that my interest was piqued and not peaked.

Apr 16, 2019 19:15:08 #
Guyserman wrote:
👏😄Thanks for recognizing that my interest was piqued and not peaked.
Apr 16, 2019 20:07:50 #

Linda From Maine wrote:
👏😄
Bravo to you both!
To people who haven’t loosed there cents of Yuma!
Andy
Apr 17, 2019 05:10:09 #

Guyserman wrote:
I decided to take up making Anaglyph 3D images and my search on how to do it mostly turned up recommendations to buy this software or that software. ...
I can appreciate your efforts to make an anaglyph using familiar image processing software. I went through the same learning process and it wasn't easy.
Then SoHillGuy pointed me to StereoPhoto Maker which is free and very easy to use. You can create an anaglyph in four simple steps:
1. O brings up the Open dialog. Open the Left image first, then the Right image.
2. Ctrl+A opens the Alignment Mode dialog. Click on a common point near the foreground in each image and they will shift slightly to align.
3. F7 displays the anaglyph.
4. S opens the SaveAs dialog. Pick a new name and save it.
I will cover this in more detail in a coming thread along with some suggestions and things to look out for.
Apr 17, 2019 07:41:54 #
AZNikon
Loc: Mesa, AZ
AndyH wrote:
Bravo to you both!
To people who haven’t loosed there cents of Yuma!
Andy
To people who haven’t loosed there cents of Yuma!
Andy
Very clever!

Apr 17, 2019 09:07:31 #
selmslie wrote:
... I will cover this in more detail in a coming thread along with some suggestions and things to look out for.
It's in the Main Photography Discussion as How to Create Your Own 3D Images since it involves more than just post processing.
Apr 17, 2019 09:27:45 #
selmslie wrote:
It's in the Main Photography Discussion as How to Create Your Own 3D Images since it involves more than just post processing.
Very interesting concept, Scotty. I have a sliding tripod mount from film days, so it ought to be easy to try this digitally. Thanks very much for the research.
Andy
Apr 17, 2019 09:31:45 #
AndyH wrote:
Very interesting concept, Scotty. I have a sliding tripod mount from film days, so it ought to be easy to try this digitally. Thanks very much for the research.
Andy
Andy
That should address the leveling challenge. If you an extend the separation beyond 3 inches you can also capture deeper scenes.
Apr 17, 2019 09:34:13 #
selmslie wrote:
That should address the leveling challenge. If you an extend the separation beyond 3 inches you can also capture deeper scenes.
I'll have to dig it out of storage, but I recall the adjustment as being capable of more than a 3 inch separation - I used it with medium format gear back in the day. Again, thanks for the effort you put into this topic.
Andy
PS: I neglected to thank Guyserman for beginning this topic and explaining the process quite clearly in the first place. If I hadn't peeked at it in the first place, my interest would be less than peak.
Apr 17, 2019 10:25:26 #

Guyserman wrote:
I decided to take up making Anaglyph 3D images and... (show quote)
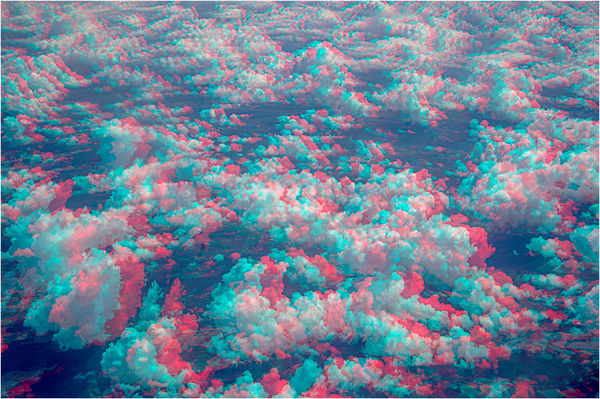
I've got an easier way fellas. With a stereo pair open just take the red channel from the right one and copy and paste it into the red channel from the left.
I shot this from an airplane window and didn't even have to have a slide bar.
Apr 17, 2019 11:10:54 #
Fotoartist wrote:
I've got an easier way fellas. With a stereo pair open just take the red channel from the right one and copy and paste it into the red channel from the left.
I shot this from an airplane window and didn't even have to have a slide bar.
I shot this from an airplane window and didn't even have to have a slide bar.
Yes, that works.
The only issue is that you can't control the location of the virtual image relative to the surface of the display. In this case, all of the elements in the image are floating above the surface.
The way I can tell that this is happening is by concentrating on a specific detail. Then when I pass the cursor over that detail I see a red cursor to the left of the cyan cursor. It's easier to observe if you download the image and look at it full sized.
The only place I see a single white cursor is in a small gap in the clouds along the top edge about 1/3 of the way from the top left corner.
Apr 17, 2019 11:26:47 #
Guyserman
Loc: Benton, AR
Fotoartist wrote:
I've got an easier way fellas. With a stereo pair open just take the red channel from the right one and copy and paste it into the red channel from the left.
I shot this from an airplane window and didn't even have to have a slide bar.
I shot this from an airplane window and didn't even have to have a slide bar.
Beautiful shot. Guess I'll have to book a flight just to get a shot.
Apr 22, 2019 15:29:52 #

If you want to reply, then register here. Registration is free and your account is created instantly, so you can post right away.