4 X 5 Film Photography
Feb 21, 2024 12:59:32 #
dbrugger25
Loc: Raleigh, NC
GreenReaper wrote:
I can understand wanting to start using 4x5 film. ... (show quote)
You will probably hear from me as I work through this process. I suspect I will use a blend of old and new technology.
Feb 21, 2024 13:32:04 #
You have already had lots of good suggestions
If you can make your windowless bathroom light tight loading film into 4x5 holders is not difficult.
A little humidity does help with dust and static.
>film holders can have light leaks, inspect for any damage / lose hinge tape
> if you are rusty on your loading technique , once you are sure your bathroom is light tight take ONE sheet of film out of the box, and reseal the bag and clam shell box. You can then turn the light on (sacrificing one sheet of film) and practice loading with the lights on --Locate notches and develop a technique that is ALWAYS the same and will place the emulsion side up.
>check every holder, vacuum them clean and pay attention to the little rails under which the film is secured---- these can be bent, or have dirt under them.
A small anti static mat with a wrist strap will mitigate static electricity (it plugs into a ground on an outlet)
Number your holders any way you want, if you have 6 holders you can just number them 1/2, 3/4, 5/6 etc
As you shoot make notes about what was on each, so that if later you notice a light leak , you will know which side of which holder is bad. This also allows you to make notes on the kind of development (Push or pull) There are also anti static brushes for cleaning them
4x5 is large enough to make beautiful contact prints which can be amazing in their jewel like qualities.All you need for that is a lightbulb and a printing frame and a little safe light. and doing so means you only need 3-4 8x10 trays, which you can manage in a small bathroom -it also keeps expenses down
If you want enlargements, scan the film.
You can Tray develop negatives, or visit Freestyle Photo and buy a Daylight developing tank, (usually 6 sheets)
If you have a Graflock back , you can buy roll film holders, they do work, BUT you already have a Rollei if you want roll film , and why buy a 4x5 and not shoot 4x5?
This should be a fun project for you, enjoy it.....
Good Luck
Feb 21, 2024 13:34:08 #
Ysarex wrote:
Changing bags for sheet film are a problem. You ne... (show quote)
The other problem with regular changing bags is that they collapse on what you are doing making it difficult to work and the dust problem already mentioned worse. I’ve seen a self supporting version advertised but haven’t tried one. Loading film in your darkened and humidified bathroom is a good suggestion.
Feb 21, 2024 16:02:45 #
spaceytracey
Loc: East Glacier Park, MT
Ysarex wrote:
Changing bags for sheet film are a problem. You ne... (show quote)
Great advice. I was also going to suggest he use the windowless bathroom.
Feb 21, 2024 16:04:05 #
Feb 21, 2024 16:46:23 #

burkphoto wrote:
Click the b All Sections /b button at the bottom... (show quote)
I love that last shot, which is absolutely fabulous. And that grave yard shot just blew me away 💎💎💎
Feb 21, 2024 16:47:21 #
Feb 21, 2024 16:51:44 #
Feb 21, 2024 16:56:59 #
dbrugger25
Loc: Raleigh, NC
MJPerini wrote:
You have already had lots of good suggestions br I... (show quote)
These are a lot of great suggestions. I am considering the purchase of an Epson Perfection V-850 instead of an enlarger. I already have a Canon Pixma Pro-200 printer and a powerful laptop and Spyder monitor calibration system so I am most of the way there.
When I was about 9 years old my parents built and equipped a very nice darkroom because my older brother thought he might be interested. He never used it and I "inherited it". Sadly, when I started taking all color photos, the equipment wasn't suitable so I gave it all away when I was in my mid 20's. BIG MISTAKE!!!
My biggest concern is the film processing and that doesn't need to be that expensive. The Crown Graphic I purchased was manufactured in 1955 which, I believe, was among the last model types. It was discontinued in 1970. I think the shutter will activate and sync with a modern electronic flash.
Feb 21, 2024 17:58:26 #
MrPhotog wrote:
1) You may not need a changing bag. Since you have... (show quote)
So many possibilities. I have 2 Graflargers (2 different color light panels for some reason) and they work but are not very bright. If you have the Graflok back on the camera, a copy stand, it is a an option. You would probably want to get a 135mm enlarging lens and another lens board to mount it on. Intrepid makes a 4x5 enlarger back kit that is probably brighter and definitely more versatile.
However, I went the 120 roll film route eventually.
Feb 21, 2024 21:33:33 #
Jersey guy
Loc: New Joisey
My father was an advanced amateur photographer for his time (early '30s to about late '40s) with a Graflex 3 1/4x4 1/4 RB. As a child I recall many times being in his fully equipped darkroom with the three different Eastman Kodak safety filters for his light — panchromatic film, one for developing prints and I believe one for Orthochromatic film.
The Graflex had a revolving back since the camera couldn't be turned 90°. In effect, it was a big SLR. After he passed I opted to buy a Speed Graphic around 1950-51 but foolishly chose the same smaller format because I thought it would be nice to use his cut film holders and the film pack holder. Later I regretted that as more modern accessories, e.g. roll film adapters, were plentiful for the 4x5 size but not so for the 3 1/4X 4 1/4.
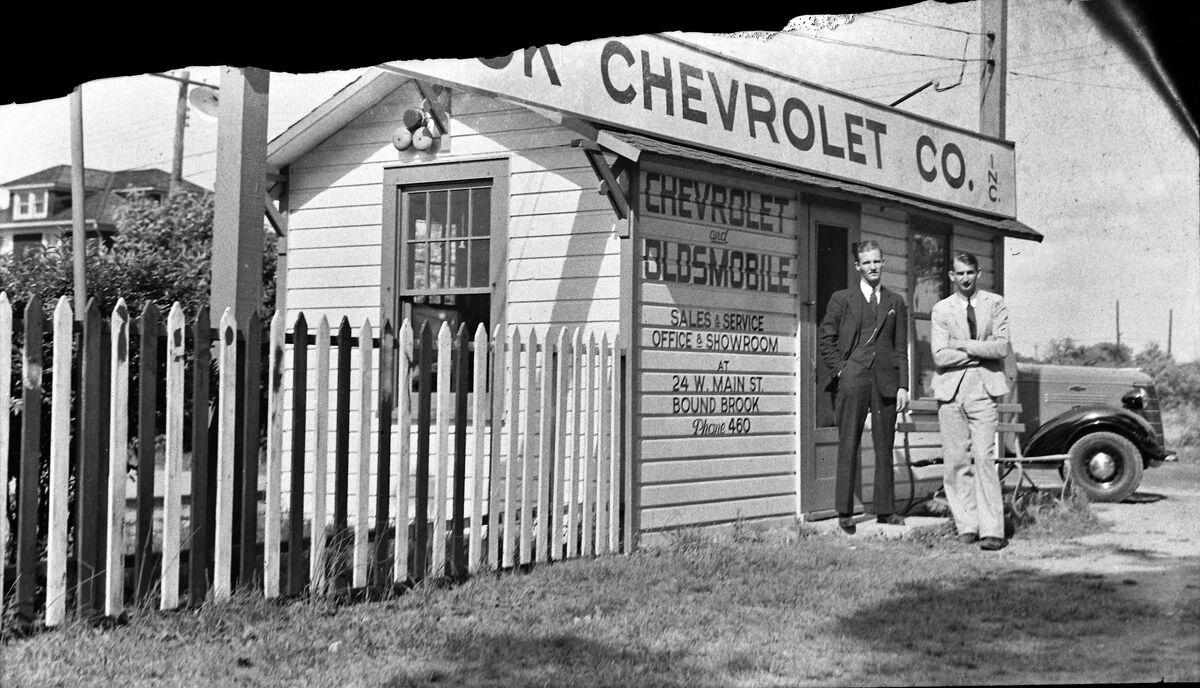
In any event, I am left with hundreds of negs from those years that I have been photographing with my digital camera using a crude light box made from an artist's tracing light pad powered from my PC using the USB port. The pad, unfortunately, consists of multiple leds so I had to jerry-rig a diffuser set up. It works fine as I use GIMP to convert the neg to a positive image (have not tried to print any yet). This is a sample: my father started a Chev.-Oldsmobile dealership in 1930 and this was his used car lot with 2 salemen.
The Graflex had a revolving back since the camera couldn't be turned 90°. In effect, it was a big SLR. After he passed I opted to buy a Speed Graphic around 1950-51 but foolishly chose the same smaller format because I thought it would be nice to use his cut film holders and the film pack holder. Later I regretted that as more modern accessories, e.g. roll film adapters, were plentiful for the 4x5 size but not so for the 3 1/4X 4 1/4.
In any event, I am left with hundreds of negs from those years that I have been photographing with my digital camera using a crude light box made from an artist's tracing light pad powered from my PC using the USB port. The pad, unfortunately, consists of multiple leds so I had to jerry-rig a diffuser set up. It works fine as I use GIMP to convert the neg to a positive image (have not tried to print any yet). This is a sample: my father started a Chev.-Oldsmobile dealership in 1930 and this was his used car lot with 2 salemen.
Feb 21, 2024 21:58:04 #
Timmers
Loc: San Antonio Texas.
dbrugger25 wrote:
When I was a teen, I owned Graphex Crown Graphic 4... (show quote)
You need to 'make the darkroom', here is why. You can load and process your film in that small bathroom/darkroom, it really is the best way. Instead of trying to cover any window with opaque 'things', gust mask off the glass and spray paint the window on inside and out with black matt spray paint. To return the 'window' later scrape off the paint with a single sided razor blade and your done. The door, depending, can be trimmed using a product like Ice King weather stripping. Here is an important trick for a standard door, before putting the weather stripping on the frame, remove the strike plate from the door. Set the door at about half sealed when putting in the weather stripping. To set the door for a solid seal, return the strike plate to it's place and secure with the two screws. Now close the door. If it is tight, use a flat blade screw driver and slowly bend the central tang of the strike plate till the door just seats closed. If the door is to tight to seat closed, remove the4 strike plate and bend it inward and return the strike plate back into place, then slowly using a hammer and straight screw driver to bend the tang back so that the door just seats and sets. By the way, this is how any good door installing trip carpenter corrects a rattling door that when closed has to much 'play' and rattles when closed.
Now, film processing. Your going to love this. Process the 4X5 film in tubes. What you are looking for is a product called a Bitz Tube". These were invented by Brian Mikitan here in San Antonio Texas. He later sold them and the right to the design to a rich guy in Arizona, but Brian designed them. I helped Brian with the development. All the processing is done a sheet at a time. A tray of water and your ready to go. You put the developer into the top cap part, then load the dry sheet of film into the long bottom part and screw the base onto the top where the developer is located, all in the dark, the rest is done in normal room light. To process you pick up the standing tube, shake it up and down several times (three is just fine), then drop the tube into a water half filled tray and spin the floating Bitz tube. Perfect film processing (by the way, these were made in 45 and 8X10 Bitz Tubes). Here is a big tip, after developing, I dropped the open ended tube into a tray of stop bath after taking off the cap end with the developer removed. Then put a cap full of Raid fixer back onto the Bitz tube to finish the processing all in the light. Brian did the testing with densitometer and confirmed that there was no change in density for the 'base + Fog" of the film. The only film affected was Kodak 4X5 HS Infrared film which is no longer available. We ran tests on C-41 sheet film as well and this was a perfect film processing technique for that film as well.
As you can see, a darkroom is to your best advantage with the 4X5 material. You should be able to find Bitz tubes as used equipment at any major supplier of equipment. The one wear factor is the black "O" ring on the cap end of the tube, not to worry Brian made sure that the tubes were designed to have 'standard' size 'O' rings that are made for industrial use so they are readily available through ant supplier.
To anyone thinking about it, yes, Brian and I did testing on 120 length film in experimental Bitz tubes, it was a failure and simply did not work. The film metal can system for 'Nikon' band makes a great oversized processing tank and reals out of stainless steel that work well. The same tanks can be used with a different insert to process 4X5 film in a tall 'Nikon' processing talk, and it works well, but for best results the Bitz Tube System gives the best over all consistency for film developing.
PM me if you have any questions.
By the way, there are dozens of Omega 4X5 enlargers out laying around. People will give you their old 4X5 enlargers, just ask (and they usually have all the other pieces of gear you will need for a darkroom as well, just ask, newspaper adds?).
Feb 22, 2024 00:56:24 #
RodeoMan
Loc: St Joseph, Missouri
Ysarex wrote:
I have 5 digital cameras that all have f/stops, shutter speed, and ASA (now ISO) and can be focused manually or by setting a distance on the lens.
Yes and I have this contraption I am using to reply to you, but once in awhile I enjoy using a fountain pen.
Feb 22, 2024 01:15:08 #
The Stearman 4x5 developing tank is a nice design. I haven’t had a chance to use one. I’m currently looking at their 8x10 daylight tank, which has dividers that allow processing four 4x5 films, or two 5x7 negs.
The stainless steel tanks popularzized by Nikor ( only one K, not related to Nikon or their Nikkor lenses) are still around. You can find them used on eBay. The design has been cloned by lots of companies. Similar tanks which have plastic caps (perfectly fine) are made by Kalt and a few other companies. They use the Nikor reels and their many clones.
For a while there were inserts that held several sheets of 4x5 film and fit into standard Nikor tanks. You may be able to find one. I’m not fond of these designs, as it appears that they may be prone to scratching the film.
Jobo processing tanks have a larger diameter and are plastic, with good-fitting tops. They can be agitated by hand or on a motorized roller. There are 4x5 film holders which fit inside these tanks, and appear to do so more gently than the metal versions made for the other tanks.
Thingiverse had a couple of designs for holding 4x5 film in Jobo tanks. If you can’t find one made by Jobo at a reasonable price, contact the guy who posted this design and see if he can print one for you.
https://www.thingiverse.com/thing:2137492
Feb 22, 2024 08:52:12 #
Ysarex
Loc: St. Louis
RodeoMan wrote:
Yes and I have this contraption I am using to reply to you, but once in awhile I enjoy using a fountain pen.
I responded to this comment: "I still can't get all the features on these new digital cameras F stop, Shutter Speed, and ASA were what we used to determine our exposure, and focus was by eye or distance settings." [my bold] I would hope someone trying to use an old Crown Graphic is doing so because they expect to enjoy it. Suggesting that modern digital cameras lack basic features that were available 50 years ago with film cameras isn't correct.
If you want to reply, then register here. Registration is free and your account is created instantly, so you can post right away.