Ugly Hedgehog - Photography Forum
Home Active Topics Newest Pictures Search Login Register
Photo Gallery
A PP technique I use for cropping shots
Page <prev 2 of 3 next>
Feb 3, 2024 14:12:22   #
fantom Loc: Colorado
 
What PP program are you using?

Reply
Feb 3, 2024 14:16:42   #
JD750 Loc: SoCal
 
Bridges wrote:
I know there are people on here much more experienced in PP than I am, and also know there are other ways to accomplish what is needed to preserve a photo the way the maker wants it to look. This is something I do to get to the end result. It is quick and easy and can be done in about a minute.

Problem 1: The photo is not straight
Problem 2: Cropping the shot in a traditional manner will result in cutting off part of the white cow on the left side of the shot.

Photo 1 -- original shot
Photo 2 -- original shot with standard cropping
Photo 3 -- original shot with added border
Photo 4 -- crop after border is applied
Photo 5 -- additional crop to get the final look
Photo 6 -- finished photo after cloning in some grass in the lower left corner to eliminate the black triangle left
from the final crop. Additional PP to boost color and eliminate noise.

I hope this will help a few people to save a shot or two. I have used it to keep a face from being cut in half and for other shots like the one posted. While this isn't a wonderful photo or a wall-hanger, it served as a good example of this technique I use for cropping.
I know there are people on here much more experien... (show quote)
First thank you for that great tip! Make the image bigger so you can straighten it without loosing a critical piece of the image. Great idea! I had not thought of that. Myself, I would not crop out the border, for me in this process, you get the border as an added bonus. ;)

However with a simple border, grass in this case, I think what you did in 6 steps can more easily be accomplished using “content aware crop”.

Reply
Feb 3, 2024 15:23:12   #
JohnSwanda Loc: San Francisco
 
Bridges wrote:
I know there are people on here much more experienced in PP than I am, and also know there are other ways to accomplish what is needed to preserve a photo the way the maker wants it to look. This is something I do to get to the end result. It is quick and easy and can be done in about a minute.

Problem 1: The photo is not straight
Problem 2: Cropping the shot in a traditional manner will result in cutting off part of the white cow on the left side of the shot.

Photo 1 -- original shot
Photo 2 -- original shot with standard cropping
Photo 3 -- original shot with added border
Photo 4 -- crop after border is applied
Photo 5 -- additional crop to get the final look
Photo 6 -- finished photo after cloning in some grass in the lower left corner to eliminate the black triangle left
from the final crop. Additional PP to boost color and eliminate noise.

I hope this will help a few people to save a shot or two. I have used it to keep a face from being cut in half and for other shots like the one posted. While this isn't a wonderful photo or a wall-hanger, it served as a good example of this technique I use for cropping.
I know there are people on here much more experien... (show quote)


One of the best uses for Photoshop Generative Fill is to fill those triangles that result from straightening. Works much better than cloning or using the old content aware fill.

Reply
 
 
Feb 3, 2024 19:04:13   #
Bridges Loc: Memphis, Charleston SC, now Nazareth PA
 
JD750 wrote:
First thank you for that great tip! Make the image bigger so you can straighten it without loosing a critical piece of the image. Great idea! I had not thought of that. Myself, I would not crop out the border, for me in this process, you get the border as an added bonus. ;)

However with a simple border, grass in this case, I think what you did in 6 steps can more easily be accomplished using “content aware crop”.


I don't use Photoshop.

Reply
Feb 3, 2024 19:04:40   #
Bridges Loc: Memphis, Charleston SC, now Nazareth PA
 
fantom wrote:
What PP program are you using?


Paintshop Pro by Corel

Reply
Feb 3, 2024 19:19:44   #
Bridges Loc: Memphis, Charleston SC, now Nazareth PA
 
Shooter41 wrote:
Dear Bridges... Would you explain how one adds a black border OUTSIDE THE ORIGINAL IMAGE? (I know how to add a black border inside the original image using Photoshop CS4, but not outside the origianal image.) Thank you. Shooter41


I use Photoshop Pro by Corel. One of the adjustments is adding borders. You can make the borders any width you would like. They don't have to be the same width on each side which is nice for making digital cards.


(Download)

Reply
Feb 3, 2024 19:22:25   #
Bridges Loc: Memphis, Charleston SC, now Nazareth PA
 
Cany143 wrote:
As mentioned above, there are many ways to skin a cat.... if kitteh skinnin' happens to be your thing.

We --or at least some of us-- have lots of tools at our disposal. Some of those have been around for a very long time, others are relatively new. Below is a demonstration of using both sets of tools in combination.

#1: the right- and left-hand margins of your image have both been extended, been given more 'real estate' with which to work. Though there are several ways this could've been done (increase canvas size then clone those areas in, though doing so tends to produce unwanted repetition in large areas), I used generative fill --which can be done by either of several ways-- to 'expand' the image.

#2: after turning on a grid overlay (which makes setting verticals and horizontals more precise), the image was selected and 'transformed' --skewed in this instance-- as shown.

#3: blank areas (on the rh side and bottom) were 'filled' using AI content aware fill, and now you have one possible 'final' image, at least crop-wise. I'd suggest not cropping it though, since the light-colored AI generated shed on the right now tonally 'mirrors' the light-colored cow on the left, and this (in my view) provides a better "point ~ counterpoint" 'balance' tonally, with the added benefit of the cow being no longer awkwardly close to the left margin.
As mentioned above, there are many ways to skin a ... (show quote)


That's good, but I don't use PhotoShop. The Corel program I use doesn't have content-aware as of yet. They improve it each year and 2024 isn't out yet.

Reply
 
 
Feb 3, 2024 19:26:01   #
DirtFarmer Loc: Escaped from the NYC area, back to MA
 
Shooter41 wrote:
Dear Bridges... Would you explain how one adds a black border OUTSIDE THE ORIGINAL IMAGE? (I know how to add a black border inside the original image using Photoshop CS4, but not outside the origianal image.) Thank you. Shooter41


Didn't see an answer so I'll jump in. This is the way I would do it. I don't know how the OP did it. (Edit: it appears that Bridges and I were posting at about the same time).

I use PSCC, not CS4 but I suspect the answer will be the same.

Load the image into a layer.


Increase the canvas size. Image > Canvas Size


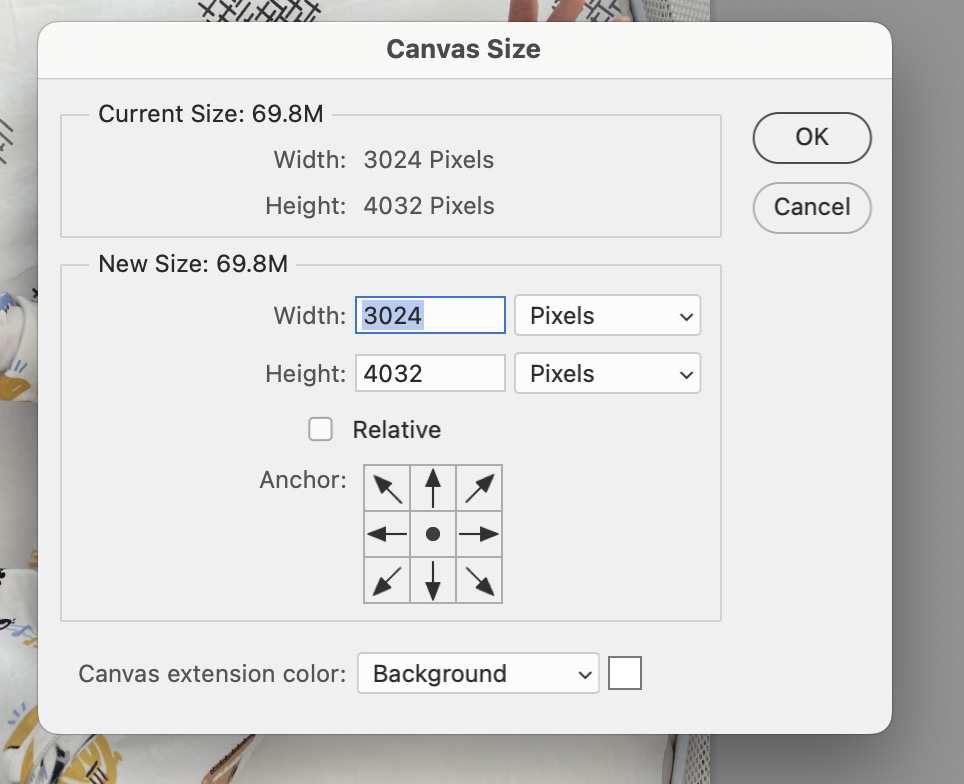
Note that the resulting dialog has the image dimensions listed. Edit those numbers to larger numbers.


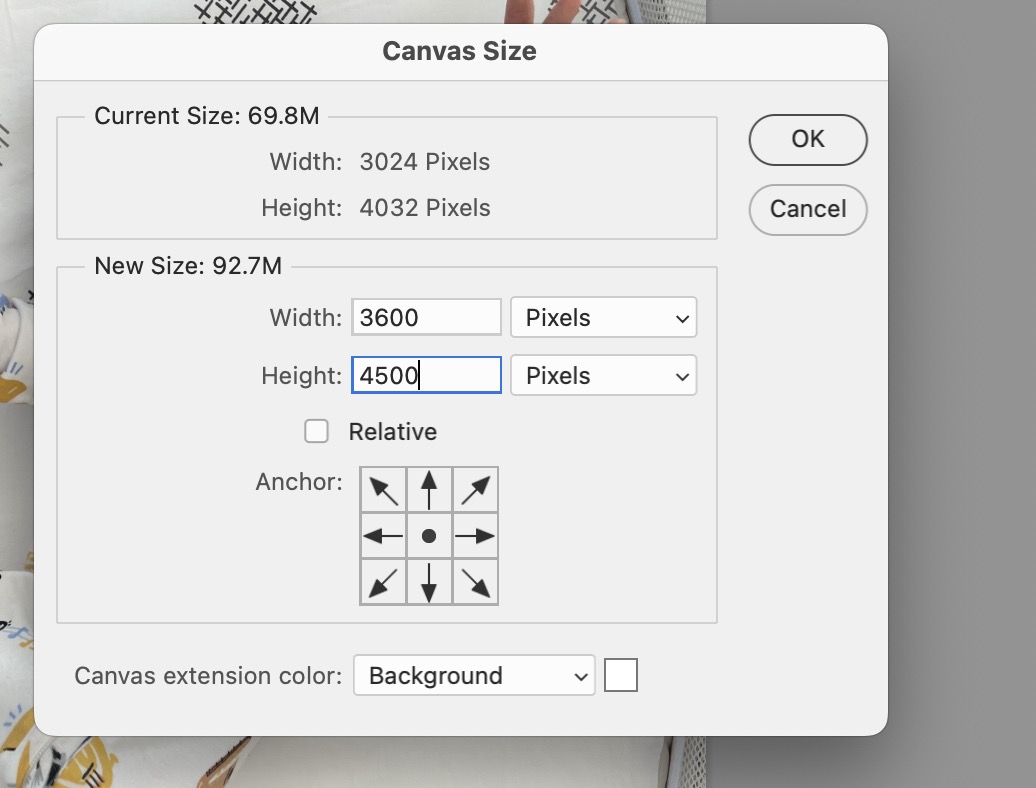
There is a pad with a dot in the center and 8 arrows. That determines how the resulting image will be centered in the new canvas. Don't change anything and the image will be centered, i.e. the margin will be blank around all sides of the image. Assuming you started with the image in a layer, the margin will be transparent (hatched grey and white). If you started with the image as a background, the margin will be all white.

Clicking on the "OK" button will give you the image with a transparent margin.


You can place a layer below the image if you want with a solid color to make the margin something other than transparent, but you can use the transparent margin. It doesn't have to be black as the original poster displayed.

One other note: you only need to increase the size of the original in the direction that would crop something you don't want cropped when you rotate it. For example, you don't need to add a border above or below the photo because you're not losing essential objects in those directions. OTOH, you might be able to get a shed on the right side along with the cow on the left side.

Reply
Feb 3, 2024 19:41:53   #
joecichjr Loc: Chicago S. Suburbs, Illinois, USA
 
Cany143 wrote:
As mentioned above, there are many ways to skin a cat.... if kitteh skinnin' happens to be your thing.

We --or at least some of us-- have lots of tools at our disposal. Some of those have been around for a very long time, others are relatively new. Below is a demonstration of using both sets of tools in combination.

#1: the right- and left-hand margins of your image have both been extended, been given more 'real estate' with which to work. Though there are several ways this could've been done (increase canvas size then clone those areas in, though doing so tends to produce unwanted repetition in large areas), I used generative fill --which can be done by either of several ways-- to 'expand' the image.

#2: after turning on a grid overlay (which makes setting verticals and horizontals more precise), the image was selected and 'transformed' --skewed in this instance-- as shown.

#3: blank areas (on the rh side and bottom) were 'filled' using AI content aware fill, and now you have one possible 'final' image, at least crop-wise. I'd suggest not cropping it though, since the light-colored AI generated shed on the right now tonally 'mirrors' the light-colored cow on the left, and this (in my view) provides a better "point ~ counterpoint" 'balance' tonally, with the added benefit of the cow being no longer awkwardly close to the left margin.
As mentioned above, there are many ways to skin a ... (show quote)


Nice work

Reply
Feb 3, 2024 19:49:10   #
joecichjr Loc: Chicago S. Suburbs, Illinois, USA
 
Bridges wrote:
I know there are people on here much more experienced in PP than I am, and also know there are other ways to accomplish what is needed to preserve a photo the way the maker wants it to look. This is something I do to get to the end result. It is quick and easy and can be done in about a minute.

Problem 1: The photo is not straight
Problem 2: Cropping the shot in a traditional manner will result in cutting off part of the white cow on the left side of the shot.

Photo 1 -- original shot
Photo 2 -- original shot with standard cropping
Photo 3 -- original shot with added border
Photo 4 -- crop after border is applied
Photo 5 -- additional crop to get the final look
Photo 6 -- finished photo after cloning in some grass in the lower left corner to eliminate the black triangle left
from the final crop. Additional PP to boost color and eliminate noise.

I hope this will help a few people to save a shot or two. I have used it to keep a face from being cut in half and for other shots like the one posted. While this isn't a wonderful photo or a wall-hanger, it served as a good example of this technique I use for cropping.
I know there are people on here much more experien... (show quote)


Nicely done result 🎯

Reply
Feb 3, 2024 21:06:09   #
fantom Loc: Colorado
 
Bridges wrote:
Paintshop Pro by Corel


Thanks, that answers a lot of questions I may have had. I have used Photoshop to do what you described but was hoping you had found a good way to do it in LR---- the program I use the most for editing.

Reply
 
 
Feb 4, 2024 05:14:24   #
nison777 Loc: illinois u.s.a.
 
Great idea...
Makes perfect sense..
Thanks

Reply
Feb 4, 2024 09:36:41   #
frankraney Loc: Clovis, Ca.
 
Bridges wrote:
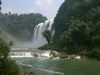
Because it extends the crop outside of the original shot allowing the content you want in the shot to remain. This will produce a shot where a little of the black border is left as it is in the lower left-hand corner of this shot. That can be eliminated by cloning in (a little grass) to cover the black area.

If you look at the original crop, you will see it cuts off part of the white cow.


You can clone fill and never use the black border. You have several unnecessary steps in this instance, IMHO.

Reply
Feb 4, 2024 09:43:16   #
gvarner Loc: Central Oregon Coast
 
I run into fewer problems when I crop in RAW, especially where there’s a lot of tilt. But then I’ve never run into a situation where I wanted to retain corner detail. I read some good advice that said to compose a larger scene then crop down to what you want. I hardly think ahead enough to do that but I see where it could be beneficial. I have to spend a bit of time to avoid tilt because I naturally hold the right corner of the camera down a little when I bring it up to my eye.

Reply
Feb 4, 2024 09:49:10   #
jlg1000 Loc: Uruguay / South America
 
Longshadow wrote:
I would have adjusted the original crop to not cut the cow.


Why? The cow can be pasted again into the composition.

Reply
Page <prev 2 of 3 next>
If you want to reply, then register here. Registration is free and your account is created instantly, so you can post right away.
Photo Gallery
UglyHedgehog.com - Forum
Copyright 2011-2024 Ugly Hedgehog, Inc.