how to remove the shadow in this shot
Nov 2, 2023 15:00:58 #
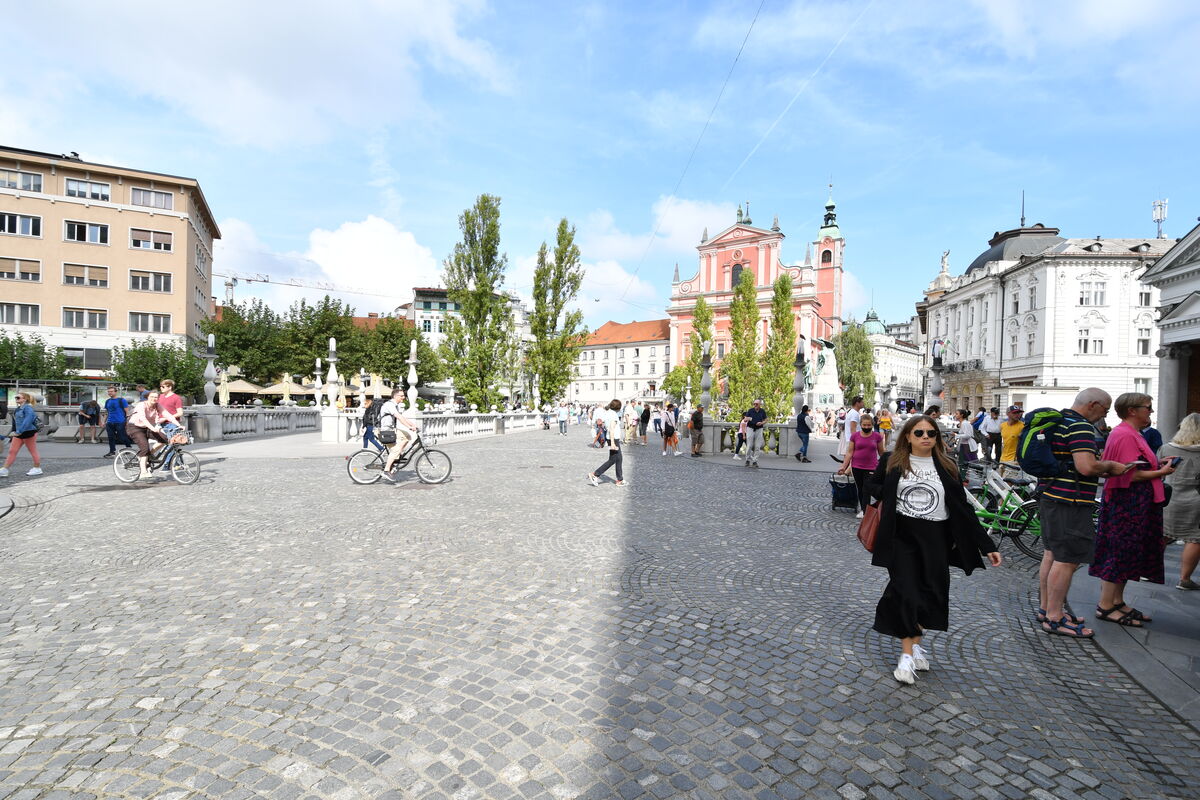
I just want the steps either in Lightroom or photoshop or a video that will guide me. I have other city scapes or landscapes with shadows that need corrected.The time is later by 6 hours than shown in the data and the photo taken at 11:54 am not 5:54 am. This is the out of camera Jpeg and I will develop the NEF. The only youtube videos I have found have not been helpful.
Nov 2, 2023 15:07:57 #

Nov 2, 2023 15:46:09 #

home brewer wrote:
I just want the steps either in Lightroom or photoshop or a video that will guide me. I have other city scapes or landscapes with shadows that need corrected.The time is later by 6 hours than shown in the data and the photo taken at 11:54 am not 5:54 am. This is the out of camera Jpeg and I will develop the NEF. The only youtube videos I have found have not been helpful.
It's such a cool shot on the whole, but divided so obviously into two, it must be frustrating
 Me
Me  I would figure out a way to crop it in half - or spend hours trying to darken one half and light the other until they matched. But does anyone have all that time available
 Nov 2, 2023 17:11:06 #

Two things - check out Greg Benz's YouTube page and website - gregbenzphotography.com
He has videos on removing shadows, one is especially good at removing the shadow of a tripod. https://www.youtube.com/watch?v=QZxkEXEWV2Q That method might work just as well on your image's shadows.
Also, consider using LR Luminosity Marks, they might help reduce the shadows.
He has videos on removing shadows, one is especially good at removing the shadow of a tripod. https://www.youtube.com/watch?v=QZxkEXEWV2Q That method might work just as well on your image's shadows.
Also, consider using LR Luminosity Marks, they might help reduce the shadows.
Nov 2, 2023 17:29:26 #
Longshadow wrote:
Oh, you mean "How do I..." not "How to...".
Great distinction there. Heres "How would I":
*I* would select the area and adjust for both brightness and contrast.
Most likely theres no really great (non AI) way to make it look as if it was never there, so I would just increase brightness and contrast til it "looks really good" and is not distracting.
I realize that I havent offered step by step details. IMNSHO those who ask for step by step instruction are usually not capable of doing the job anywho.
Furthermore, its a boring shot that would likely be even more bland with the shadow completely undone, so better to just brighten it up a bit. Its typically amatuerish to think of fixing up a nothingburger by making it worse. Yes, I am cynical, arrogant and unapologetic. A spade is a spade.
Nov 2, 2023 17:47:18 #
User ID wrote:
Yes, I am cynical, arrogant and unapologetic. A spade is a spade.
I agree...and most of the time mostly wrong.
Nov 2, 2023 17:53:21 #
fredpnm wrote:
I agree...and most of the time mostly wrong.
ROTFLMFAO
Thanks for the chuckles.
Just keep on keepin on.
Nov 2, 2023 18:19:50 #
home brewer wrote:
I just want the steps either in Lightroom or photoshop or a video that will guide me. I have other city scapes or landscapes with shadows that need corrected.The time is later by 6 hours than shown in the data and the photo taken at 11:54 am not 5:54 am. This is the out of camera Jpeg and I will develop the NEF. The only youtube videos I have found have not been helpful.
In the Develop module, use the masking panel and select the brush tool. Size with the "[ ]" keys to fit. Set feathering to something like 80 for the margins of the shadow. Holding the left mouse button down, drag the brush to cover the shadow area. Then adjust the Shadows slider to lighten. Then fiddle with blacks and contrast until you get the overall look you want.
You probably won't be able to remove all the shadow, but you'll definitely be able to lighten it.
Nov 2, 2023 18:20:33 #

home brewer wrote:
photo taken at 11:54 am not 5:54 am.
Pick a better time of day.
Link to YT video fredpnm mentioned where he deals with tone and color ... but you have a difficult fix.
https://www.youtube.com/watch?v=QZxkEXEWV2Q
Nov 2, 2023 18:26:16 #

dannac wrote:
The cobblestones on the right side of the dividing line appear to be blurry. Was that from cloning?Once you brighten, the colors do not match.
I haven't looked at the video yet (when you posted, I was busy trying to figure it out on my own
 ), but in the edit I pm'd to our OP, after I darkened the left side and brightened the right side, it helped a lot to reduce the yellow and the cyan in the entire image, while masking a few elements that needed to retain those colors, mostly the trees.
Nov 2, 2023 18:33:11 #
Linda From Maine wrote:
The cobblestones on the right side of the dividing line appear to be blurry. Was that from cloning?
Yes as mentioned ... quick and dirty edit.
Was I not suppose to edit or post the image ? ( please remove if out of line )
Nov 2, 2023 18:53:32 #
dannac wrote:
Was I not suppose to edit or post the image ? ( please remove if out of line )
No can do. I have manager controls in Digital Artistry only Was I not suppose to edit or post the image ? ( please remove if out of line )
If OP wants it removed, he will need to send a pm to Admin.
Nov 2, 2023 18:55:47 #
Nov 2, 2023 20:16:43 #
Linda From Maine wrote:
The cobblestones on the right side of the dividing... (show quote)
I wish you had shared your solution with us, since I think that 12 hours and a hundred layers or so to make this look good might be a rather optimistic estimate.
For instance, how did you restore the cobblestones where you blended the edge of the main shadow? How did you deal with the people who are now in bright sunlight but have no sun on their faces or clothing, and are casting no shadows as are those on the other side? Did you fix the lens distortion?
Enquiring minds...
Nov 2, 2023 20:24:00 #
rgrenaderphoto wrote:
In the Develop module, use the masking panel and select the brush tool. Size with the "[ ]" keys to fit. Set feathering to something like 80 for the margins of the shadow. Holding the left mouse button down, drag the brush to cover the shadow area. Then adjust the Shadows slider to lighten. Then fiddle with blacks and contrast until you get the overall look you want.
You probably won't be able to remove all the shadow, but you'll definitely be able to lighten it.
You probably won't be able to remove all the shadow, but you'll definitely be able to lighten it.
You can't fix the multitude of problems with his image in Lightroom. You can easily make it worse, but you can't fix this in Lightroom.
If you want to reply, then register here. Registration is free and your account is created instantly, so you can post right away.