Flash Shadow
Jul 2, 2023 17:36:03 #
larryepage
Loc: North Texas area
Amadeus wrote:
I see pros use this type of setup and really never knew why. Now I do. I can see how the flash is centered now on vertical shots. But in the landscape position the flash is extremely off center. Will that cause excessive shadows in that position?
There are two or three different kinds of flash frame designs. Each has benefits and shortcomings. Some allow the camera to rotate. I find those awkward, but others do not. If your flash has shaped output, the upper and lower tails of a rotated camera image may be dark, especially with a wide angle lens. Others have a rotating arm that reposition the flash, leaving it properly aligned but in a new pisition to eliminate the visible shadows. But you have to watch the position of your flash cable and make sure it doesn't end up where it can cause havoc.
Go to Custom Bracket's website. They have some good educational material.
Jul 2, 2023 18:37:13 #

Having the direct flash centered helps with the shadows. But bouncing the flash will also result in softer, more pleasing lighting.
Jul 2, 2023 20:17:56 #
Amadeus wrote:
In the attached pic, from B&H, you must ignore the arrangement in the upper left. That one is deeeeeeply WTF ! I see pros use this type of setup and really never knew why. Now I do. I can see how the flash is centered now on vertical shots. But in the landscape position the flash is extremely off center. Will that cause excessive shadows in that position?
The other two arrangemeents show the flash is centered properly over the lens.
Acoarst the bottom arrangement is for when you rotate to "portrait mode" but unfortunately is not shown in its actual "in use" position ... rotate your monitor 90 degrees !
EDIT: Added 2nd pic which makes it very clear how it works in "portrait mode".


Jul 2, 2023 20:19:53 #

lamiaceae wrote:
I think the why has been covered. In either lands... (show quote)
This is the correct answer. Move models away from the background. Bounce will work but a bit more challenging
Jul 2, 2023 23:08:29 #

The first step is to get a bracket that will elevate the flash unit about 12" directly above the lens and a mechanism to maintain that position in horizontal (landscape ) and vertical (portrait) orientation. This will throw the backgornd shadow behind the subject(s) and NOT along side them where it is visible. It is best, however, to also allow some distance between the background wall and the subject(s). This will also slightly improve the depth of lightg and provide a bit more modeling.
This is also an ideal system for modified or bounce lighting. It will work well with direct flash, especially in situations where bounce techniques are not possible such as high or dark ceilings and surrounding walls.
I made my first bracket in 1960 when they were not commercially available. I have purchased many of these brackets, over the years, to accommodate differet cameras. I use it in multiple lighting setups where the on-camera flas acts as a fill light source and out-of-doors for flash fill.
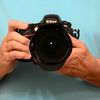
Attached, is an image of my hand-held setup.
If you are usg a shoe-mounted speedlight, you will need an extension cable o connect the foot of the Speedlightothe hot-shoe atop the camera. Make sure to purchase the cable which is compatible with your Speedlight and camera.
This is also an ideal system for modified or bounce lighting. It will work well with direct flash, especially in situations where bounce techniques are not possible such as high or dark ceilings and surrounding walls.
I made my first bracket in 1960 when they were not commercially available. I have purchased many of these brackets, over the years, to accommodate differet cameras. I use it in multiple lighting setups where the on-camera flas acts as a fill light source and out-of-doors for flash fill.
Attached, is an image of my hand-held setup.
If you are usg a shoe-mounted speedlight, you will need an extension cable o connect the foot of the Speedlightothe hot-shoe atop the camera. Make sure to purchase the cable which is compatible with your Speedlight and camera.

Jul 3, 2023 00:08:17 #
Hip Coyote wrote:
This is the correct answer. Move models away from the background. Bounce will work but a bit more challenging
I felt that is the simplest way for the OP to get the results he wants with out having to invest in more equipment. Also if he was using a flip or pop-up flash on the camera the bracket would not help.
Personally I have several brackets for off camera / off center flash. I learned you usually don't want totally even light but 2/3, 3/4 etc., and a reflector or bounce for fill and to also reduce eye socket, brow, or chin shadows. But that is not what the OP asked. And you obviously understood that as well.

Jul 3, 2023 00:14:56 #
Amadeus wrote:
You need to arrange the flash so that it is on the same vertical center with the lens (ie directly above the lens). The Lower-most configuration will do this when the camera is rotated 90 degrees clockwise (not as pictured horizontally - rotate it vertically).I see pros use this type of setup and really never knew why. Now I do. I can see how the flash is centered now on vertical shots. But in the landscape position the flash is extremely off center. Will that cause excessive shadows in that position?
Jul 3, 2023 09:29:20 #
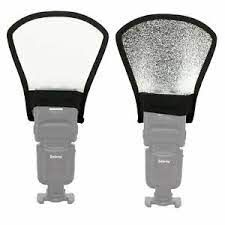
I have had terrific luck using a Flash Bounce Card. I have all of the flash mounts listed in the responses and have the best success with the Flash Bounce Cards in small rooms and tight corners. I suggest you keep the subjects 2-4 feet from the walls. I usually shoot f/8, 125/sec. auto-ISO.
Jul 3, 2023 09:41:07 #
andiamo236 wrote:
I have had terrific luck using a Flash Bounce Card. I have all of the flash mounts listed in the responses and have the best success with the Flash Bounce Cards in small rooms and tight corners. I suggest you keep the subjects 2-4 feet from the walls. I usually shoot f/8, 125/sec. auto-ISO.
I still think just bouncing it off the ceiling will give better, softer lighting.
Jul 3, 2023 09:56:25 #
gvarner
Loc: Central Oregon Coast
Subjects are too close to the background in the shadow photo. YouTube has some real practical videos on how to use on-camera flash.
Jul 3, 2023 10:20:22 #
Amadeus
Loc: New York
I really appreciate all the input here. I’m going to look into the bracket and try some of the techniques mentioned. I have gained some really good facts I wasn’t aware of previously. Thanks again for all the recommendations.
Jul 3, 2023 13:30:43 #
Just a note: Before this bracket became popular, there were similar fals techniques. Ordinary flas L-barracked quick reals plates buid onto the press camera enable fast detachment of the flash unit and hand holding it in the prescribed position.
Back in the day, I learned to do it with a big-old heavy 4x5 press camera and a sizeable strobe. I was a skinny kid, at the time, but by doing that on a daily basis, I developed forearms like Popeye the Sailorman! The problem was, many photographers found that difficult and would get seriously uneven lighting coverage. The bracks solved that issue.
Folks keep insisting on using BOUNCE lighting- which is a perfectly good technique but is not alwas possible. If there are no viable reflective surfaces in reasonable proximity to the light source and the subject- you are out of luck. If you bounce straight up off the ceiling you will underexpose the eyes and orbital areas of the face and end up with "raccoon eyes". On-board modifiers are helpful but to avoid distracting background shadows, you still need to position the flash properly.
There are many other flash techniques that help produce more natural and pleasing lightng- bare bulb, partial bounce, multiple flashes, and the use of a wide variety of modifiers. It's all a matter of learning and practice.
Jul 3, 2023 13:43:31 #
Jul 3, 2023 14:24:21 #
Amadeus
Loc: New York
I’m not enamored with bounce lighting. I’ve used it before with mixed results. I’m not eager to mount a huge bracket either but that seems like the proper approach. I don’t do a lot of the indoor stuff. Those were prom pics, and I’m running out of grandchildren for that. 😂
But hand holding the flash off a cable, for me, might be the best solution.
But hand holding the flash off a cable, for me, might be the best solution.
Jul 3, 2023 15:09:12 #
gvarner
Loc: Central Oregon Coast
Amadeus wrote:
I’m not enamored with bounce lighting. I’ve used it before with mixed results. I’m not eager to mount a huge bracket either but that seems like the proper approach. I don’t do a lot of the indoor stuff. Those were prom pics, and I’m running out of grandchildren for that. 😂
But hand holding the flash off a cable, for me, might be the best solution.
But hand holding the flash off a cable, for me, might be the best solution.
I use a Lite Scoop device by Lite Genius, mounts on the flash, great for informal indoors, moving around. There’s a YouTube video on its use.
If you want to reply, then register here. Registration is free and your account is created instantly, so you can post right away.