Ugly Hedgehog - Photography Forum
Home Active Topics Newest Pictures Search Login Register
Post-Processing Digital Images
Advice Please
Page <prev 2 of 2
Mar 24, 2023 15:19:36   #
terryMc Loc: Arizona's White Mountains
 
Jim-Pops wrote:
Very good job Terry.


Thank you. I've had some practice doing this, since I had a younger brother, now deceased, who did some pencil drawings that others in the family wanted to preserve. They weren't this bad, but this technique also works well on B&W photo restorations where tape is a problem.

Reply
Mar 24, 2023 15:31:49   #
terryMc Loc: Arizona's White Mountains
 
StanMac wrote:
The best, most defined example yet.

Stan


Thanks, Stan. I didn't really finish it, just wanted to show what was possible.

Reply
Mar 24, 2023 20:37:47   #
Taff22 Loc: UK
 
Thank you all for your excellent suggestions, this is a great site!
Gerry.

Reply
 
 
Mar 26, 2023 14:27:50   #
BigDaddy Loc: Pittsburgh, PA
 
Taff22 wrote:
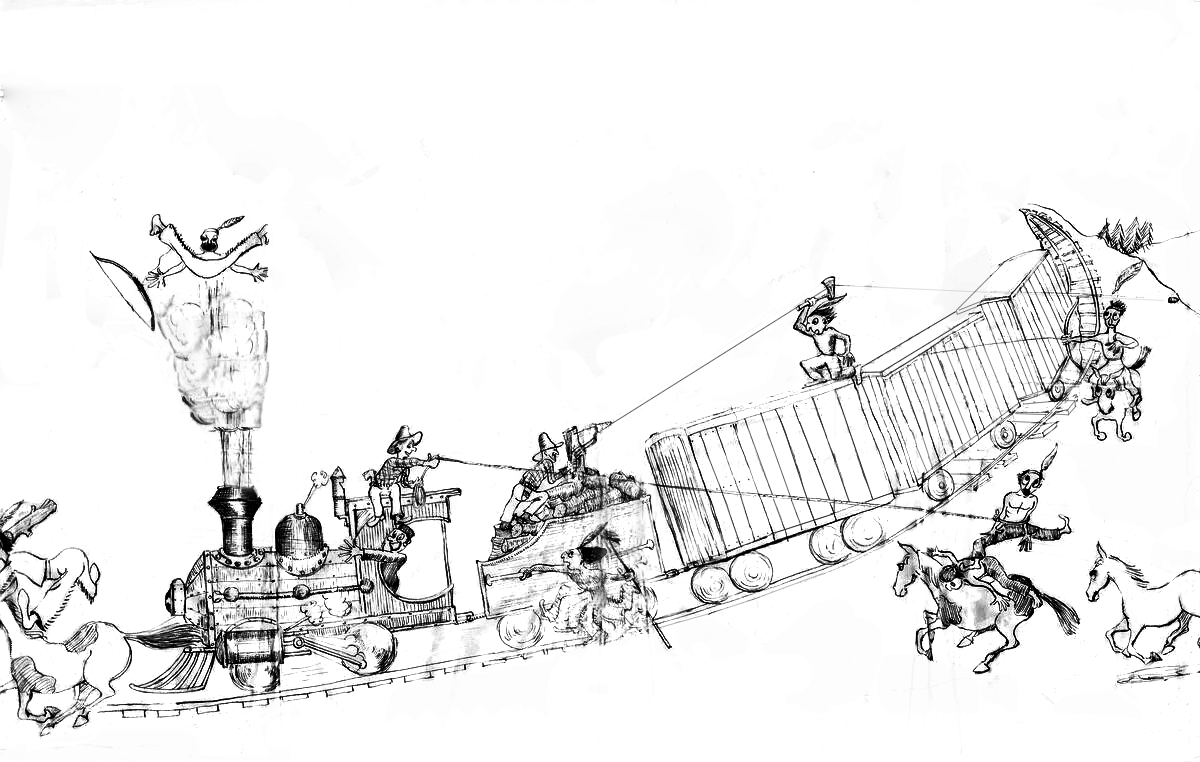
I have 7 old drawings done by my father when my brother and I were children. These are 65+ years old and have suffered damage including sellotape stains (one attached). I would like to digitally restore them, but have no idea of the process! I have just got Photoshop, but am not confident in it's use yet. How would I go about this? Any help would be greatfully revieved. TIA. Gerry.

I use Affinity Photo but basically, I converted it to Black & White with a B&W adjustment layer. This removed all the yellowing from aging.
Next I used the paint brush tool to paint over everything that didn't look like it was the original painting, setting the color of the paint brush to whatever white resulted from converting it to black and white. This is easy, but tedious. Use the bracket keys to adjust the size of your brush as needed.

On lines, such as the lines on the box cars, if they were missing, incomplete, or painted over when I was painting white, I set the paint brush to one pixel, and set the color close as I could to the lines (3D3D3dHex, in my case). When repainting missing lines and such, in Affinity if you click on the start of a line, move the curser to the end of the line, Hold SHIFT and click again, it will draw a straight line between those two points. PS does this but I don't recall how. Also, you will have 2 colors a white for BG and the gray for the lines. Shift between them with the X key, and for the lines, adjust the opacity to get the shade you want.

For some things, like the smoke stack with the Indian blown up in the air, I used the clone stamp tool to fix the missing parts (smoke). This takes a bit more skill, so learn how to use the clone stamp. It's not hard but many don't know you can rotate things with the arrow keys. It's a tool used all the time, so good idea to learn it.

When I was all done, the black lines looked a bit faded so I added a B&W adjustment layer, and set the blend mode to LINEAR BURN and dropped the opacity of the layer until it looked good to me, which in this case was 50%. PS has the same stuff I recall, so it's the same, or very similar.

The steps in PS should be about the same. These were very basic steps with an editor, and you need to know them anyway. I suggest using Youtube to look up how to use your editor. The hardest part for me was determine what was pixel damage, and what was shading from your Dad. I also noticed after I uploaded it I missed a few dark spots in the background, but I'd already spent a lot of time fussing with the details.

Anyhow, this is a good one to learn some of the most basic editing tools, specifically the Brush, Clone Stamp and Adjustment Layers with Blend Modes. Note, when I say easy, I've been editing photos for many years. Just using layers can take a while to learn, so easy is a relative term. Don't get discouraged, learning how things work and what you can do is a ton of fun, although frustrating at times. If you get stuck, ask here, many will love to help, and remember, YouTube is always there with a billion tutorials.


Reply
Mar 26, 2023 14:31:56   #
DWU2 Loc: Phoenix Arizona area
 
Well done!

Reply
Mar 26, 2023 14:46:52   #
terryMc Loc: Arizona's White Mountains
 
That's a great job. Well done.

Reply
Mar 26, 2023 14:56:34   #
BigDaddy Loc: Pittsburgh, PA
 
terryMc wrote:
That's a great job. Well done.

I like compliments so I'll assume these were aimed at me, so thanks.
Always a good idea to quote the message to which you are replying.

Reply
 
 
Mar 26, 2023 15:39:33   #
Taff22 Loc: UK
 
BigDaddy wrote:
I use Affinity Photo but basically, I converted it to Black & White with a B&W adjustment layer. This removed all the yellowing from aging.
Next I used the paint brush tool to paint over everything that didn't look like it was the original painting, setting the color of the paint brush to whatever white resulted from converting it to black and white. This is easy, but tedious. Use the bracket keys to adjust the size of your brush as needed.

On lines, such as the lines on the box cars, if they were missing, incomplete, or painted over when I was painting white, I set the paint brush to one pixel, and set the color close as I could to the lines (3D3D3dHex, in my case). When repainting missing lines and such, in Affinity if you click on the start of a line, move the curser to the end of the line, Hold SHIFT and click again, it will draw a straight line between those two points. PS does this but I don't recall how. Also, you will have 2 colors a white for BG and the gray for the lines. Shift between them with the X key, and for the lines, adjust the opacity to get the shade you want.

For some things, like the smoke stack with the Indian blown up in the air, I used the clone stamp tool to fix the missing parts (smoke). This takes a bit more skill, so learn how to use the clone stamp. It's not hard but many don't know you can rotate things with the arrow keys. It's a tool used all the time, so good idea to learn it.

When I was all done, the black lines looked a bit faded so I added a B&W adjustment layer, and set the blend mode to LINEAR BURN and dropped the opacity of the layer until it looked good to me, which in this case was 50%. PS has the same stuff I recall, so it's the same, or very similar.

The steps in PS should be about the same. These were very basic steps with an editor, and you need to know them anyway. I suggest using Youtube to look up how to use your editor. The hardest part for me was determine what was pixel damage, and what was shading from your Dad. I also noticed after I uploaded it I missed a few dark spots in the background, but I'd already spent a lot of time fussing with the details.

Anyhow, this is a good one to learn some of the most basic editing tools, specifically the Brush, Clone Stamp and Adjustment Layers with Blend Modes. Note, when I say easy, I've been editing photos for many years. Just using layers can take a while to learn, so easy is a relative term. Don't get discouraged, learning how things work and what you can do is a ton of fun, although frustrating at times. If you get stuck, ask here, many will love to help, and remember, YouTube is always there with a billion tutorials.
I use Affinity Photo but basically, I converted it... (show quote)


Wow, thank you, I have much to learn, but you have given me the confidence to try!

Reply
Mar 26, 2023 15:51:41   #
DirtFarmer Loc: Escaped from the NYC area, back to MA
 
Taff22 wrote:
Wow, thank you, I have much to learn, but you have given me the confidence to try!


It is always good to be in danger of learning something new.

The thing about Photoshop is that you can try it at home without anyone watching. If you fail, you can learn from your mistakes and erase your failure. If you succeed, you can publish your result and accept accolades.

Reply
Mar 26, 2023 22:02:39   #
terryMc Loc: Arizona's White Mountains
 
BigDaddy wrote:
I like compliments so I'll assume these were aimed at me, so thanks.
Always a good idea to quote the message to which you are replying.


Sorry, I usually do quote just for that reason, but it slipped by me this time.

It was a good job. You earned the compliment.

Reply
Mar 31, 2023 11:04:51   #
terryMc Loc: Arizona's White Mountains
 
BigDaddy wrote:
I use Affinity Photo but basically, I converted it to Black & White with a B&W adjustment layer. This removed all the yellowing from aging.
Next I used the paint brush tool to paint over everything that didn't look like it was the original painting, setting the color of the paint brush to whatever white resulted from converting it to black and white. This is easy, but tedious. Use the bracket keys to adjust the size of your brush as needed.

On lines, such as the lines on the box cars, if they were missing, incomplete, or painted over when I was painting white, I set the paint brush to one pixel, and set the color close as I could to the lines (3D3D3dHex, in my case). When repainting missing lines and such, in Affinity if you click on the start of a line, move the curser to the end of the line, Hold SHIFT and click again, it will draw a straight line between those two points. PS does this but I don't recall how. Also, you will have 2 colors a white for BG and the gray for the lines. Shift between them with the X key, and for the lines, adjust the opacity to get the shade you want.

For some things, like the smoke stack with the Indian blown up in the air, I used the clone stamp tool to fix the missing parts (smoke). This takes a bit more skill, so learn how to use the clone stamp. It's not hard but many don't know you can rotate things with the arrow keys. It's a tool used all the time, so good idea to learn it.

When I was all done, the black lines looked a bit faded so I added a B&W adjustment layer, and set the blend mode to LINEAR BURN and dropped the opacity of the layer until it looked good to me, which in this case was 50%. PS has the same stuff I recall, so it's the same, or very similar.

The steps in PS should be about the same. These were very basic steps with an editor, and you need to know them anyway. I suggest using Youtube to look up how to use your editor. The hardest part for me was determine what was pixel damage, and what was shading from your Dad. I also noticed after I uploaded it I missed a few dark spots in the background, but I'd already spent a lot of time fussing with the details.

Anyhow, this is a good one to learn some of the most basic editing tools, specifically the Brush, Clone Stamp and Adjustment Layers with Blend Modes. Note, when I say easy, I've been editing photos for many years. Just using layers can take a while to learn, so easy is a relative term. Don't get discouraged, learning how things work and what you can do is a ton of fun, although frustrating at times. If you get stuck, ask here, many will love to help, and remember, YouTube is always there with a billion tutorials.
I use Affinity Photo but basically, I converted it... (show quote)


This is almost exactly the way I approached this in Photoshop, and you're right that the controls are nearly identical, since Affinity Photo has tried to copy familiar Photoshop controls and shortcuts whenever possible. Your technique for drawing a straight line (click, hold shift, click again) has been exactly the same in Photoshop since ver.1.0. Works just like that with every tool that uses a brush.

Reply
Page <prev 2 of 2
If you want to reply, then register here. Registration is free and your account is created instantly, so you can post right away.
Post-Processing Digital Images
UglyHedgehog.com - Forum
Copyright 2011-2024 Ugly Hedgehog, Inc.