Advice Please
Mar 23, 2023 13:34:00 #
Taff22
Loc: UK
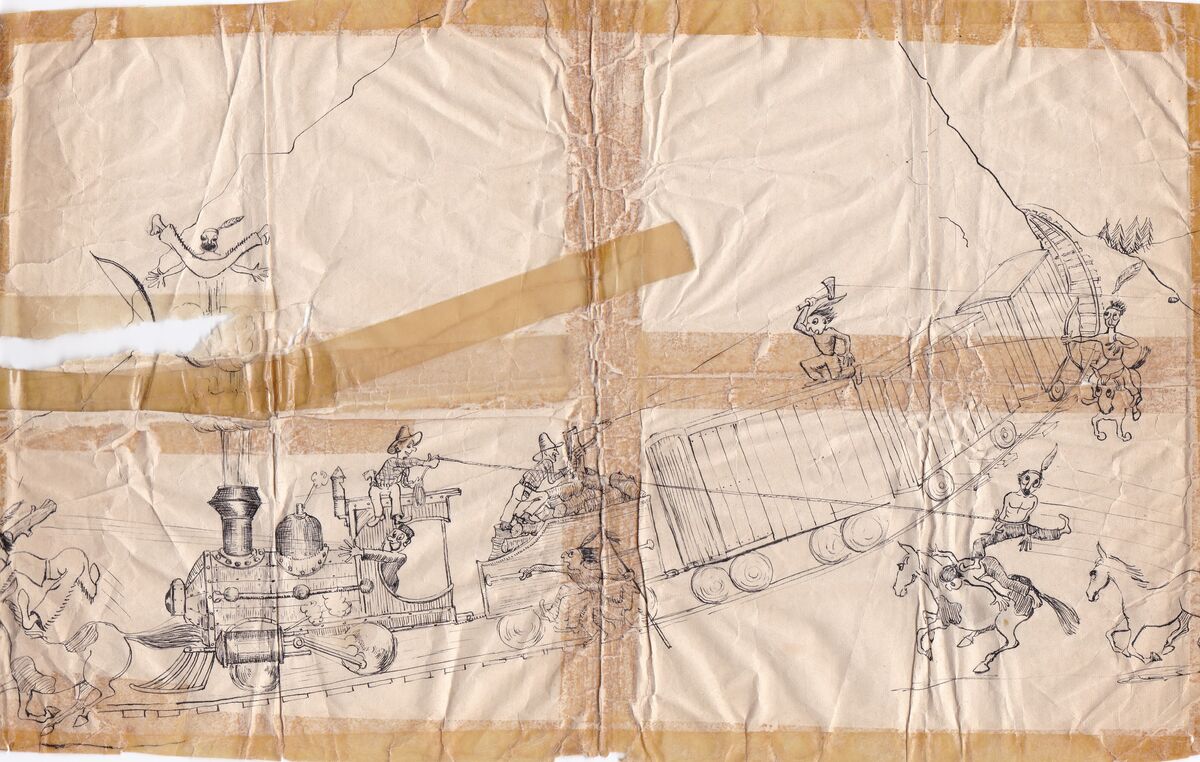
I have 7 old drawings done by my father when my brother and I were children. These are 65+ years old and have suffered damage including sellotape stains (one attached). I would like to digitally restore them, but have no idea of the process! I have just got Photoshop, but am not confident in it's use yet. How would I go about this? Any help would be greatfully revieved. TIA. Gerry.
Mar 23, 2023 13:41:02 #
Huge challenge! I would inquire at a sizeable museum and/or art gallery/restorer.
Mar 23, 2023 13:57:05 #

Taff22 wrote:
I have 7 old drawings done by my father when my brother and I were children. These are 65+ years old and have suffered damage including sellotape stains (one attached). I would like to digitally restore them, but have no idea of the process! I have just got Photoshop, but am not confident in it's use yet. How would I go about this? Any help would be greatfully revieved. TIA. Gerry.
Please provide the largest original you can scan. Maximal size in MB is 20MB.
You might want to scan as 'line art' and push the contrast.
Save as JPG if you must but use the least compression as there are too many compression artifacts in your sample.
Best format to save this after scanning is PNG.
As is, the best solution is to use the pen tool (1pixel) to redraw the entire image, time consuming for sure but it will be worth it. Note that once redraw you will need to locally adjust the tracing in order to get grey tones.
Mar 23, 2023 14:24:05 #
goldenyears
Loc: Lake Osewgo
Wow, your father was very skilled at drawing! No wonder you want to restore them. It will be a challenge, but it is doable. The first step, as mentioned above, is get the largest scan possible. Topaz Gigapixel may be able to help.
Mar 23, 2023 15:29:34 #
There are people here who enjoy the challenge or the exercise. There are also people on dpreview.com who like to do such things but that site is shutting down April 10th. If you can find someone there you could probably communicate by email. Otherwise, try the photo gallery section on UHH. https://www.uglyhedgehog.com/s-5-1.html
As noted by others, it's best if it could be scanned with as large a size as possible. If the drawings are too large for whatever scanner you might have available, you can scan it piecewise and reassemble the images in post. Leave 30% overlap to make reassembly easier for software. If you have multiple drawings, name them so that you know which images belong together.
As noted by others, it's best if it could be scanned with as large a size as possible. If the drawings are too large for whatever scanner you might have available, you can scan it piecewise and reassemble the images in post. Leave 30% overlap to make reassembly easier for software. If you have multiple drawings, name them so that you know which images belong together.
Mar 23, 2023 15:34:45 #
Rongnongno wrote:
...As is, the best solution is to use the pen tool (1pixel) to redraw the entire image, time consuming for sure but it will be worth it. Note that once redraw you will need to locally adjust the tracing in order to get grey tones.
Trying to trace over a drawing with a mouse or trackpad or trackball is tough (for me, anyway). I think a better option would be to put the scan into Photoshop. Do a select/color range and select one of the lines. Then add a blank layer, switch to paths and use the make path from selection tool. You can then stroke the path with a pencil (at whatever width is appropriate) to the blank layer, then delete the path. You will get the lines on the new layer and you can turn off the visibility of the original.
Selection of a color range frequently gets some noise involved, so you might have to clean up the drawing a bit.
Played a bit with the image and there is too much gradation in the lines. The color selection doesn't get a complete line, but has breaks. Or if the color selection is broadened it gets too much noise. Tried the threshold adjustment and was able to get some of the lines but not all. But this approach may be able to get sections done that you can put together later.
There is a general prohibition for posting images or edits of the original poster's image without permission. Do you permit people to post their efforts here? Just for this image?
Mar 23, 2023 16:06:51 #

When you say you just got Photoshop, are you referring to the full Adobe Photoshop 2023, or Photoshop Elements?
My first suggestion is, either scan or photograph the drawings before they deteriorate further. As others have said, use the highest possible resolution.
Second, here is a book that might prove helpful: https://www.amazon.com/Digital-Restoration-Start-Finish-Photographs/dp/1138940259/ref=sr_1_1?crid=3HKBFI2G9NXY3&keywords=restoring+old+photographs&qid=1679601403&sprefix=restoring+old+ph%2Caps%2C201&sr=8-1&ufe=app_do%3Aamzn1.fos.006c50ae-5d4c-4777-9bc0-4513d670b6bc. However, it presupposes you are fairly skilled in the full Adobe Photoshop, then offers "recipes" for restoration. Since you are just starting out with PS, there's a long learning curve to navigate before you would be ready to try to restore the drawings.
I took a screen capture of the photo you took, and tried using blend modes to remove the tape color with partial success. That might be one of numerous things you could eventually try. I didn't think it was good enough to post.
Finally, it's worth a look into the cost of a professional restorer. Though not cheap, that might produce the best results.
Mar 23, 2023 16:46:16 #
I wish you were more familiar with Photoshop, but here goes:
Open it in Photoshop, and duplicate the background layer (Ctrl/Cmd +J.) (Making it a Smart Object is a good idea, but optional.)
Go to Layer>New Adjustment Layer>Black and White (or just click on the icon at the bottom of the layers panel for "Make new fill or adjustment layer" and choose "Black and White" from the flyout.) Move the red and yellow sliders to eliminate most of the tape marks. Don't go too far; but some of the lines in the drawing will grow fainter in any case. Don't let that bother you.
Make another copy of the layer (ctrl/cmd +J.) Set the blend mode to "Multiply." The lines will get darker. You can continue duplicating the layer until the drawing looks good to you. If you get too dark, delete a layer or reduce opacity of the last layer until you like it.
Use Healing brush, Spot healing brush, Clone stamp and Patch tool to get rid of unwanted lines and spots.
Mar 23, 2023 19:24:38 #
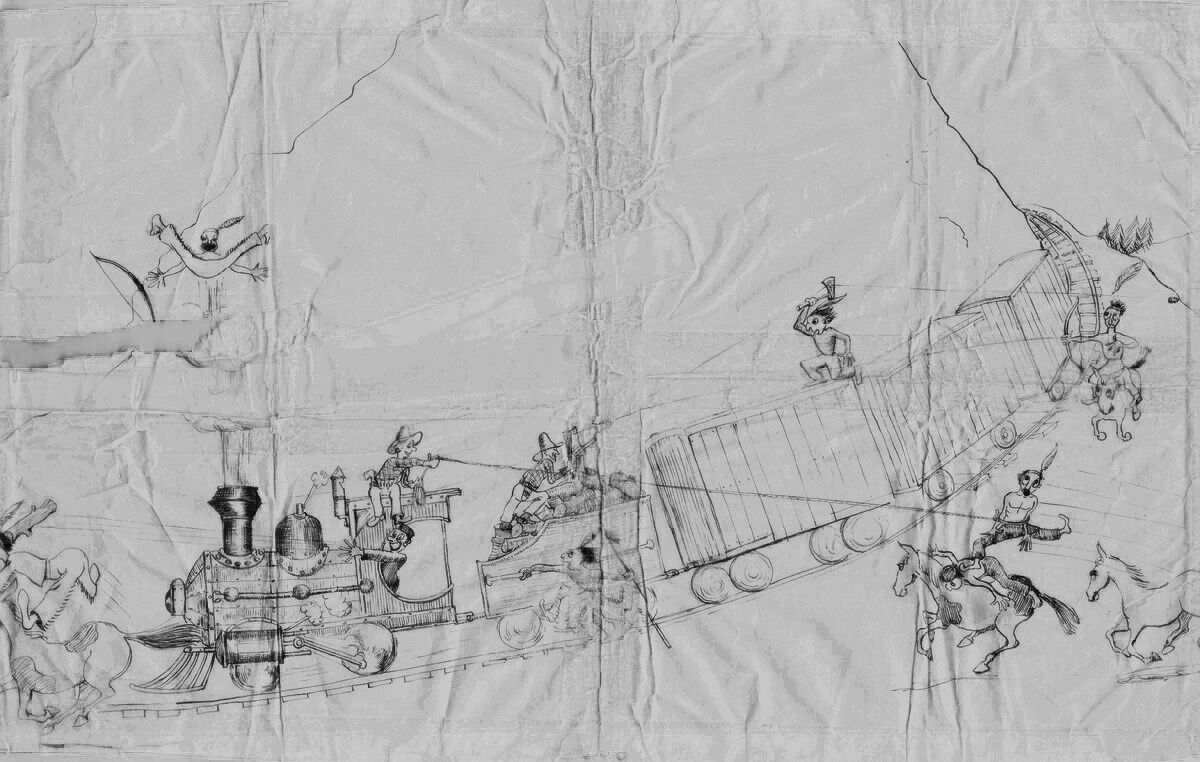
Here is something I came up with. Several steps were taken to get here. Main one was copying the red chanel and layering it over a white layer then cleaning it up using a mask and painting out unwanted areas. Next Made a new combined layer. Duplicated this layer 4 times. Set each layer to multiply. Now click on the Move tool. Going to the first copy layer Hit the up key once, next layer hit the down key once, net layer left key once, next layer right key once. Grouped the four layers set the grouping to 32% opacity. To finish up I added a texture layer for the paper.
Mar 24, 2023 05:51:12 #
Mar 24, 2023 06:24:19 #
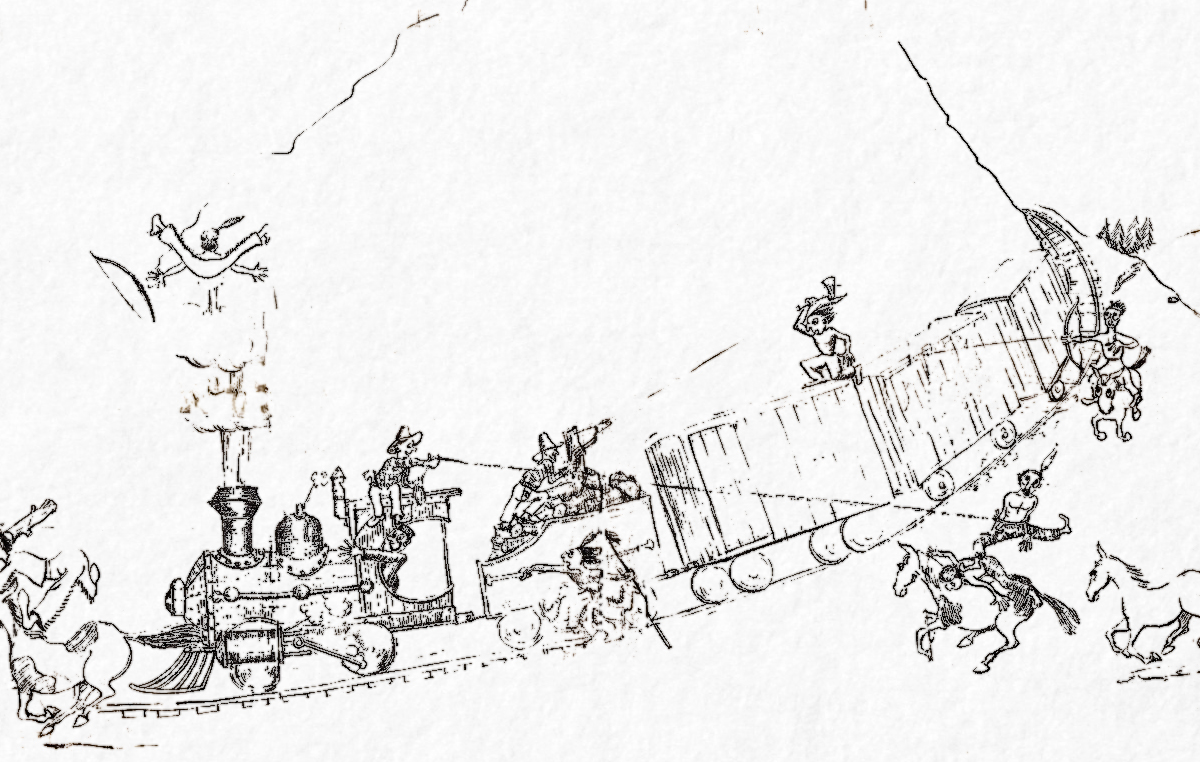
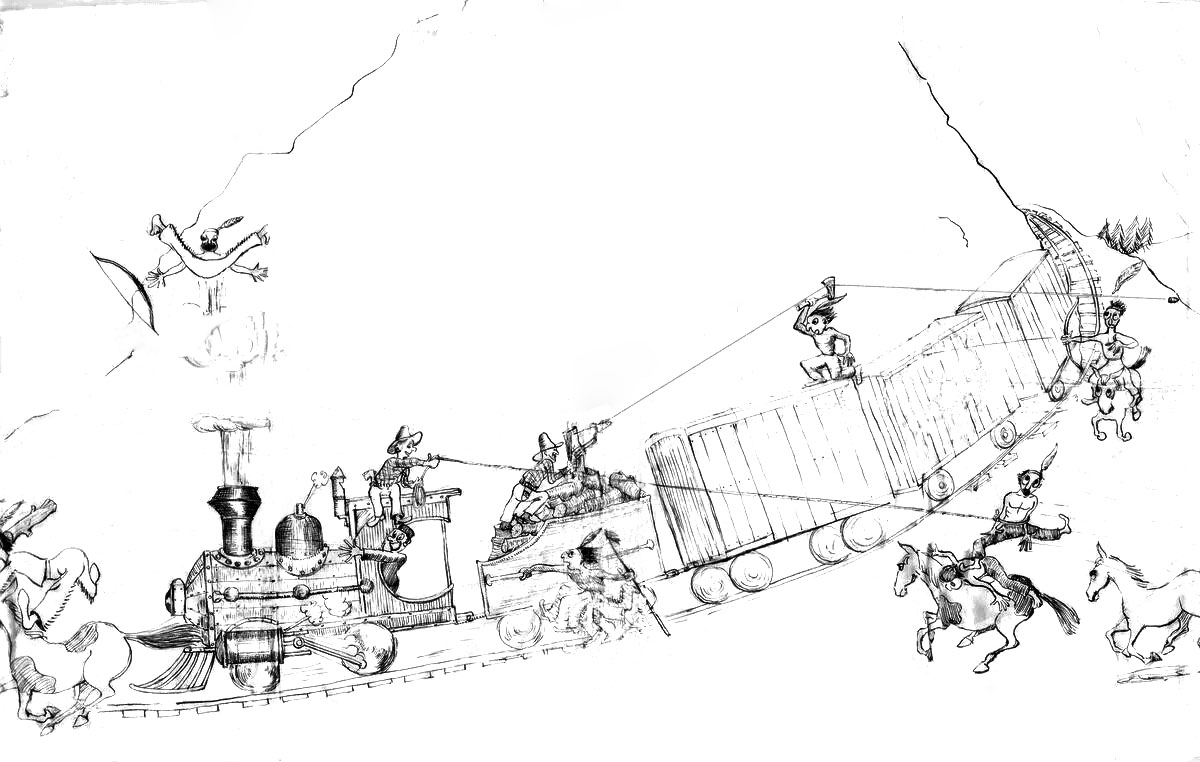
Because of the many details* that are lost using 'normal methods' I opted to just make this a B&W image after creating a color select layer.
There are ways too many JPG artifacts to really work on this at the moment.
A guy shoots from the caboose, a line goes straight to bounce off an Indian tomahawk and ends cutting the feather of another's headgear. The bullet itself is seen on the right. These details should not be lost as they tell a story.
Mar 24, 2023 09:29:20 #
Taff22 wrote:
I have 7 old drawings done by my father when my brother and I were children. These are 65+ years old and have suffered damage including sellotape stains (one attached). I would like to digitally restore them, but have no idea of the process! I have just got Photoshop, but am not confident in it's use yet. How would I go about this? Any help would be greatfully revieved. TIA. Gerry.
I think that no matter which method you use, you will have to take out all the color first, and it will take a lot of hand painting (you can just paint with white over the background areas that should be all white.) This is not a difficult project, just one that will require time and patience.
Mar 24, 2023 10:52:25 #

 's up to Jim-pops and TerryMc.
Mar 24, 2023 11:50:35 #
StanMac
Loc: Tennessee
terryMc wrote:
I think that no matter which method you use, you will have to take out all the color first, and it will take a lot of hand painting (you can just paint with white over the background areas that should be all white.) This is not a difficult project, just one that will require time and patience.
The best, most defined example yet.
Stan
Mar 24, 2023 11:52:08 #
terryMc wrote:
I think that no matter which method you use, you will have to take out all the color first, and it will take a lot of hand painting (you can just paint with white over the background areas that should be all white.) This is not a difficult project, just one that will require time and patience.
Very good job Terry.
If you want to reply, then register here. Registration is free and your account is created instantly, so you can post right away.