Single light source artificial light photography
Mar 11, 2022 14:38:01 #
Mar 11, 2022 17:05:47 #

Blenheim Orange wrote:
Thanks. It is a very simple setup. You can do a lot with reflectors and diffusion.
(I was afraid that if I posted a hot-linked image it would get duplicated if people used the quote fiction to reply. Maybe E.L. can remove it.)
(I was afraid that if I posted a hot-linked image it would get duplicated if people used the quote fiction to reply. Maybe E.L. can remove it.)
The image can not be edited out. Don't worry, it's not a big problem.
Mar 12, 2022 11:17:40 #
srt101fan wrote:
Wow! Hard for me to imagine how the lighting for this shot could have been improved with more sophisticated gear. Can you please elaborate on what you mean by an "ACE hardware metal reflector"? Actually, I would also be interested in more detail on the location of the lamp and how you supported the subject. I've tried some simple "table-top" photography but not very successfully!
I will take a photo of the set up shortly and post it. The closer the light is to the subject. The larger the light source is relative to the subject ad the softer the shadows will be. I place the light more or less above the subject ad then move sheets of styrene around to get light to the rest of the subject.
Mar 12, 2022 11:22:04 #
Blenheim Orange wrote:
I will take a photo of the set up shortly and post it. The closer the light is to the subject. The larger the light source is relative to the subject ad the softer the shadows will be. I place the light more or less above the subject ad then move sheets of styrene around to get light to the rest of the subject.
Thanks!
Mar 12, 2022 16:24:49 #
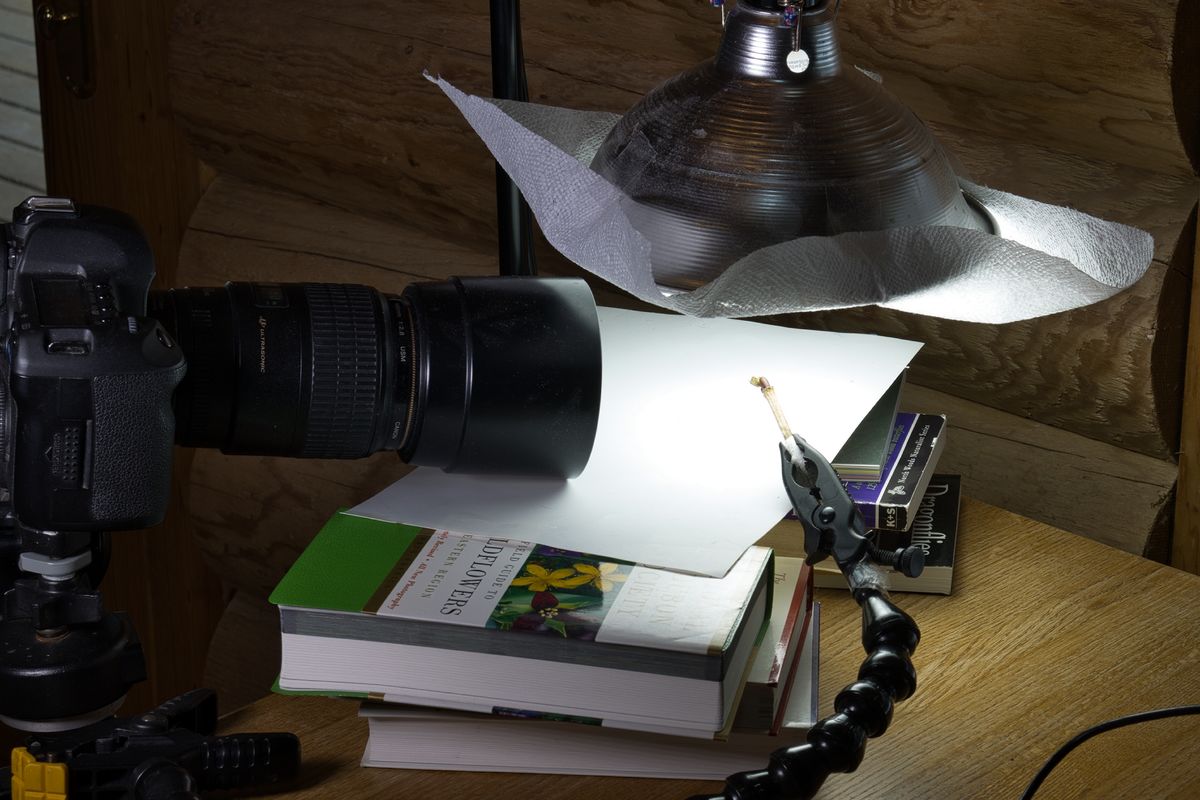
Well, now that I took a photo of the set up, it looks completely ridiculous.
You can see I am using some books here to get the reflecting sheet of white plastic up to the level I want. In actual practice I would move the sheet, angle it, curve it, add more sheets, depending on the subject and how the light looks. I use boxes, containers, or whatever is handy to configure the reflecting sheets, taping them in place. Typically I put the main light, or in this case the only light, above the subject and then bounce light to the front of the subject. The subject is really tiny, so the whole rig needs to be scaled up for larger subjects. The diffuser on the light fixture is one ply from a piece of paper towel taped in place.
This is an indoors set up, but I do more or less the same thing in the field, except that I use a battery powered LED bank and of course the sun through a diffuser for the main light, and the sky for the fill light and sometimes some white reflectors. Outdoors I also use a clear plastic thingee I made to block the wind. See - Easy project for wind control. I am using a "Plamp" to hold the twig.
The inverse square law applies - as you move the light away from the subject, twice the distance means 1/4 light intensity, four times the distance means 1/16th as much light getting to the subject.
The camera is a refurbished Canon 5DII, EF 100mm f/2.8 Macro lens, the Helicon tube for focus bracketing. The light fixture is nothing special, it has been kicking around here for decades and I am not sure where it got it. It is hanging from an old mic stand that I got somewhere. A sturdy base is important for stacking, and I am working on a heavy oak table.
Mar 12, 2022 17:05:51 #
Blenheim Orange wrote:
Well, now that I took a photo of the set up, it lo... (show quote)
Thank you for that detailed description. Very helpful.
Mar 12, 2022 17:14:28 #
Blenheim Orange wrote:
Well, now that I took a photo of the set up, it lo... (show quote)
Nothing ridiculous about that setup! Good improvisation.
Try a similar shot with the ligh coming in overhead but slightly from the back of the subject. Fill in with a simple reflector made of crushed and re-expanded aluminum foils affixed to a sheet of cardboard. Make sure partof the beam of light is directed forward so some light strikes the reflector and then can tilt the reflector and adjust the fill to find the ratio to taste.
Short story: I had a corporate client come to me through a high-end ad agency. The account executive from the agent asked if I would mind if the client could attend the product shoot we were assigned. I told him that I did not mind havg fols in on a shoot but if they see some of the contraptions I use to rig up some of the shorts, they will surely not wanna pay my high fee- they will think I am eccentric old nut- a mad scientist or something like that. Google "Rube Goldberg"! (see attached image)
OK, I have all kinds of articualred clamps and fancy stands. I buy props and background material for the Set Shop in New York, and all kinds of tables and support gear. Many times, however, nothing works or fits except old books, pieces of scrap lumber, rusty old glue clamps and things one finds in a junkyard. One client totally freaked out when he came in and say his $60,000 solid gold, diamond-encrusted Rolex watch hanging in mid-air on a strand of monofilament fishing line in front of a dingy old stained glass window. Good thing he liked the resulting shot!
Mar 12, 2022 17:30:42 #
E.L.. Shapiro wrote:
Nothing ridiculous about that setup! Good improvis... (show quote)
I suspect there are many photo enthusiasts who have never tried "table-top" photography. And some of those might think you need multiple fancy lights and other gear for it. Blenheim's description of his setup and your added comments show what can be done with minimal equipment!
Mar 12, 2022 18:09:50 #
Wasabi wrote:
Was messing around one day with a small vase on the table, just playing with it in my hand. Barbara had a bouquet with some roses. We cut a rose put it in water in the vase and started taking photos. We added a few more props, turned down the lights,found an led flashlight and kept shooting. The attached is apparently the best of the lot as it is the only one I could find. (need to work on my Lightroom skills)
Interesting treatment. Well done!
Mar 12, 2022 18:11:45 #
E.L.. Shapiro wrote:
Try a similar shot with the ligh coming in overhead but slightly from the back of the subject. Fill in with a simple reflector made of crushed and re-expanded aluminum foils affixed to a sheet of cardboard. Make sure partof the beam of light is directed forward so some light strikes the reflector and then can tilt the reflector and adjust the fill to find the ratio to taste.
Good suggestion. Thanks.
Mar 30, 2022 12:00:32 #
I was looking for info on fashion photographer Francesco Scavullo for another thread. I learned that he was considered a master of the "single light source". If you're interested, here's a link to an article about him.
https://www.anatomyfilms.com/francesco-scavullo-lighting-master/
https://www.anatomyfilms.com/francesco-scavullo-lighting-master/
Mar 30, 2022 16:13:38 #
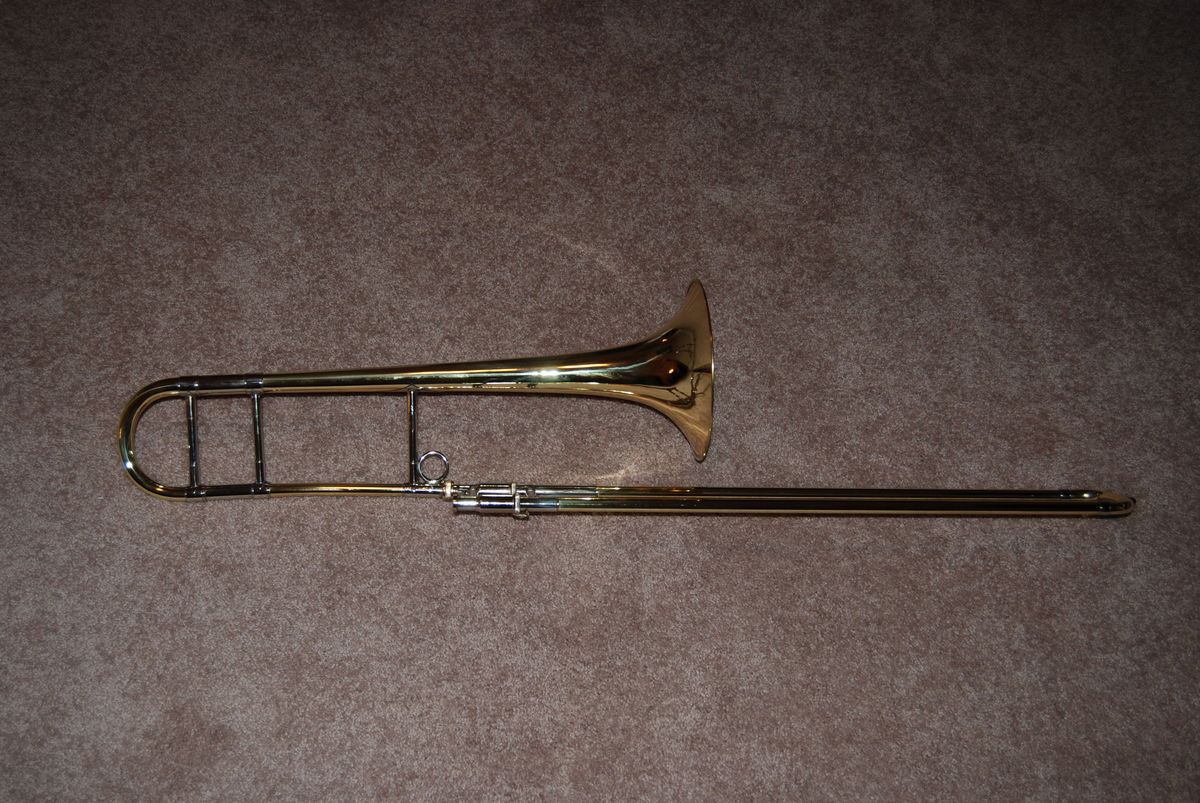
From the other end of the "not-a-studio" spectrum comes room lights with balanced flash on a carpeted floor for background.
The subject was the overall quality of the restoration of a completely trashed trombone and the thumb ring modification.
The only thing that really bugs me is the light falling off too quickly on the right.
I should have used a bigger flash than the SB-400 (My old Sunpak 555 doesn't play nice with a D80) or used a white panel to the right of the instrument, off-screen.
Mar 30, 2022 18:51:26 #
Najataagihe wrote:
From the other end of the "not-a-studio"... (show quote)
Thanks for posting that interesting subject. This is a good time to practice a new living skill for you or angels that want to shoot brass instruments or anything made of high lug polished metal.
If you have time, read my previous post on the angle of incense and dar and light field lighting.
So here is the trick. When you shoot shinney stuff or mirror-lie surfaced you are taking a pic of the reflection of the light source. If oy boun your Sunpack unit off a white ceil or a white sheet off Foam-Cor or simial material and the trombone "see that light for above, it will refl it back ofhte camera. If the unpack won't cut it, you can use more powerful continuous light sources such as a photoflood lam in a simple reflector, an old quartz movie light, and things you can white balance for.
If you do this correctly, you won't have dark spots in the metal and you will better define the contours s and shape of the instrument.
You are goi for a LIGHT field over mostof the horn. A bounce will not give you unwanted hot-spot reflections and more even light all over the format.
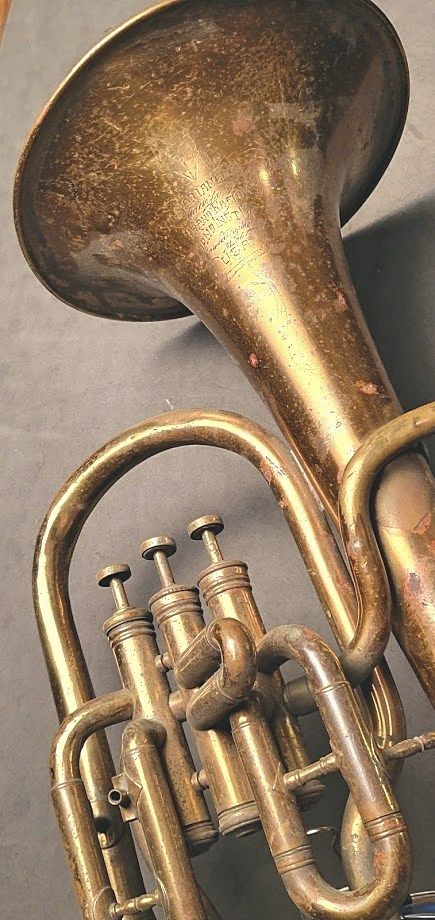
Attached is a few quick short of a dusty, rusty old what I think is a euphonium that I rescued for the junkyard. It's in rough shape, so I'm gonna clean it up, and if it works, I may have it replaced. I used to play the trumpet in high school. I think it has the same fingering and is a B-flat instrument. I try to get my LIP back if my wife does not throw me or that hor out of the house.
Back to photography! If you notice the LIGH field highlights the lines of the instrument and the dark field areas around the bell and where the light did not strike the sides of the tubing- those are the shadows that define the shape.
Once I get the old horn cleaned up, I'll do a still life with some military music sheets. If I can get it clean, I'll just use some neglected old yellowed music sheets, etc.
If you decd to try the lighting, post some shots so others can see.
Also everyone please note: In this section, there is no such thing as "hijacking" because I want to run it as a workshop kida community. So if anyone else has an old hor, power, shine toll, or whatever shiny metal object, ple post it here in this thread and we can discuss it and try differet approaches.
Horn- Preliminary test shot.
Mar 30, 2022 19:10:22 #
Mar 30, 2022 19:14:17 #
That looks more like an Eb Alto horn.
It does not play the same notes as a trumpet with the same fingerings as a trumpet.
It will play a lot of the same notes, albeit lower in range, but the fingerings and the names of the notes will be different.
That trombone picture was taken 13 years ago and has changed hands at least three times.
I snapped it to post on a different forum in about ten minutes, so it was NOT a carefully set up shot.
I may dig out one of my current horns and do it, properly!
Of course, I could always cheat and shoot a plastic trombone… :)
If you want to reply, then register here. Registration is free and your account is created instantly, so you can post right away.