Ugly Orange Tones =white balance on automatic=
Feb 1, 2022 06:52:19 #

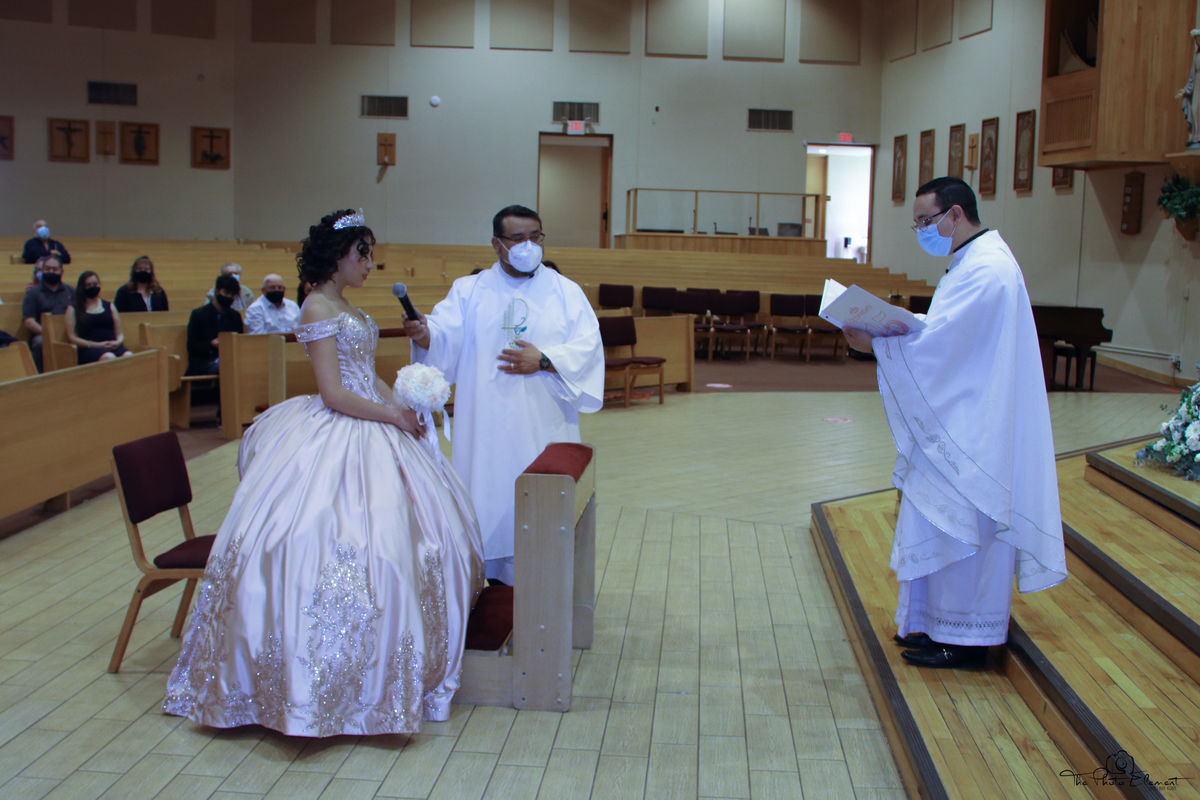
The issue is hue contamination, not white balance, per se. Here are two corrected versions. It would be helpful to know what software you use for processing. The first one is a system I concocted. The second one uses a neutralize function in Ps.
--Bob
--Bob
cony25 wrote:
So how can I get this right on the spot? and not in post-production?
Also any recommendations for post productions? getting the tones right?
Please help!
Also any recommendations for post productions? getting the tones right?
Please help!
Feb 1, 2022 08:43:09 #
Feb 1, 2022 12:16:19 #
amfoto1
Loc: San Jose, Calif. USA
E.L.. Shapiro wrote:
\...available lighting can be extremely challenging... (show quote)
I would argue that mixed lighting is exactly when a Custom White Balance is most useful. If you will be standing in one place throughout the event and shooting one location where the light will be consistent, you can just set a single CWB. If you will be moving around and shooting from different directions so that the mix of lighting will change, you may need to do "sample shots" in advance from each planned location to be able to change the CWB as you go.
You also may need to take additional sample shots during the event to use for new CWBs, if the lighting mix will be changing during the event. For example, if part of the mix is sunlight coming in windows it will change as the day goes on the color of light will change, you won't be able to match it very closely with shots taken in advance and you'll need to update CWB periodically.
Another tactic is to put your neutral target right into a series of of test shots in advance of the event (one test shot from each location you'll be shooting, in the event of variable lighting)... then shoot RAW and just sample the target shots to set a CWB in post-processing. You may still need to tweak things a little.... but should be able to get much closer color rendition. Some people like to do these shots with both a neutral target (white, gray, black... doesn't matter so long as it's truly neutral)... As well as a MacBeth Color Checker panel. Those have a series of colors that can help you decide what tweaks are needed.
Whatever route you choose to take, get to the venue early so you have time to take the prep shots that will be used for CWB or post-processing.
P.S. This is one heck of a lot easier with digital than it ever was with film! To accomplish the same thing with film and get highly accurate color rendition often involved a lot of advance work.... everything from shooting test rolls of the film you'll be using (because how it renders colors varied from batch to batch), to changing out all the light bulbs and/or providing your own lighting, to carrying around a whole bunch of color correction and color conversion filters. It's soooooo much easier today, with digital!
Feb 1, 2022 14:26:18 #
fetzler
Loc: North West PA
There are quite a a few good comments here As usual Paul has provided excellent advice.
Besides the obvious issue with mixed lighting sources, the reflections off colored walls, floor, and ceiling can alter colors. Such a color shift can be hard to compensate for. Many years ago I did some video in my parent's basement and there was an odd greenish cast to the images. (NO! there were no fluorescent light fixtures). The ceiling was not white but rather a beige color with a bit of green. If room colors are an issue then a fully satisfactory result may not be possible. About the best on can do is to try to get the whites right. Note that for a person dressed in white standing next to a red wall no exact compensation will be possible.
Besides the obvious issue with mixed lighting sources, the reflections off colored walls, floor, and ceiling can alter colors. Such a color shift can be hard to compensate for. Many years ago I did some video in my parent's basement and there was an odd greenish cast to the images. (NO! there were no fluorescent light fixtures). The ceiling was not white but rather a beige color with a bit of green. If room colors are an issue then a fully satisfactory result may not be possible. About the best on can do is to try to get the whites right. Note that for a person dressed in white standing next to a red wall no exact compensation will be possible.
Feb 1, 2022 14:29:55 #
fetzler
Loc: North West PA
CHG_CANON wrote:
Personally, my experience is all digital cameras h... (show quote)
Paul's correction here appears to be rather good and the colors are plausible.
Feb 1, 2022 18:04:27 #

amfoto1 wrote:
\ br br I would argue that mixed lighting is exac... (show quote)
I probably covered a zillion weddigs with film- at least it feels like that! In churches, I had one magazine loaded with Type S (daylight and flash balanced) film and another with Type L which is for long exposures with tungsten lighting. I made my choice based on the dominant source of light but neither of those films was actually perfectly compatible with the existing light. Making reasonably balanced colour prints was oftentimes not a lot of good fun.
In digital, I have never had any difficulty in guestimating the dominant light source, setting the WB accordingly and or just going with automatic WB. Post-processing is usually minimal.
It is, however, important to expose accurately. A seriously over or underexposed file will exacerbate colour temperature imbalances.
No matter what you do, there is some light source, especially those with discontinous spectrums, that will never yield perfect colour. If there is an uncorrectable shit, it is best to go with a warmer version. In some churches, synagogues and other houses of worship, there is colour light for stained glass windows or chandeliers with coloured glass shades, or even candlelight or electrical fixtures that simulates candlelight. I try to capture that lighting as is.
There are some venues that are very dark and flash is not permitted, I advise the client in advance, that ceremony image may be rendered in warmer colours and there might be a grainy (noisy) appearance but all that adds to the mood.
If I am shooting a church or any other interior with difficult lighting as a commercial job, I have ample time to take colour temperature readings, use filters, bring in my own lights and balance it with ambient light. Even with all that work, usually there's some further tweaking in the post.
Feb 2, 2022 07:48:28 #
St.Mary's wrote:
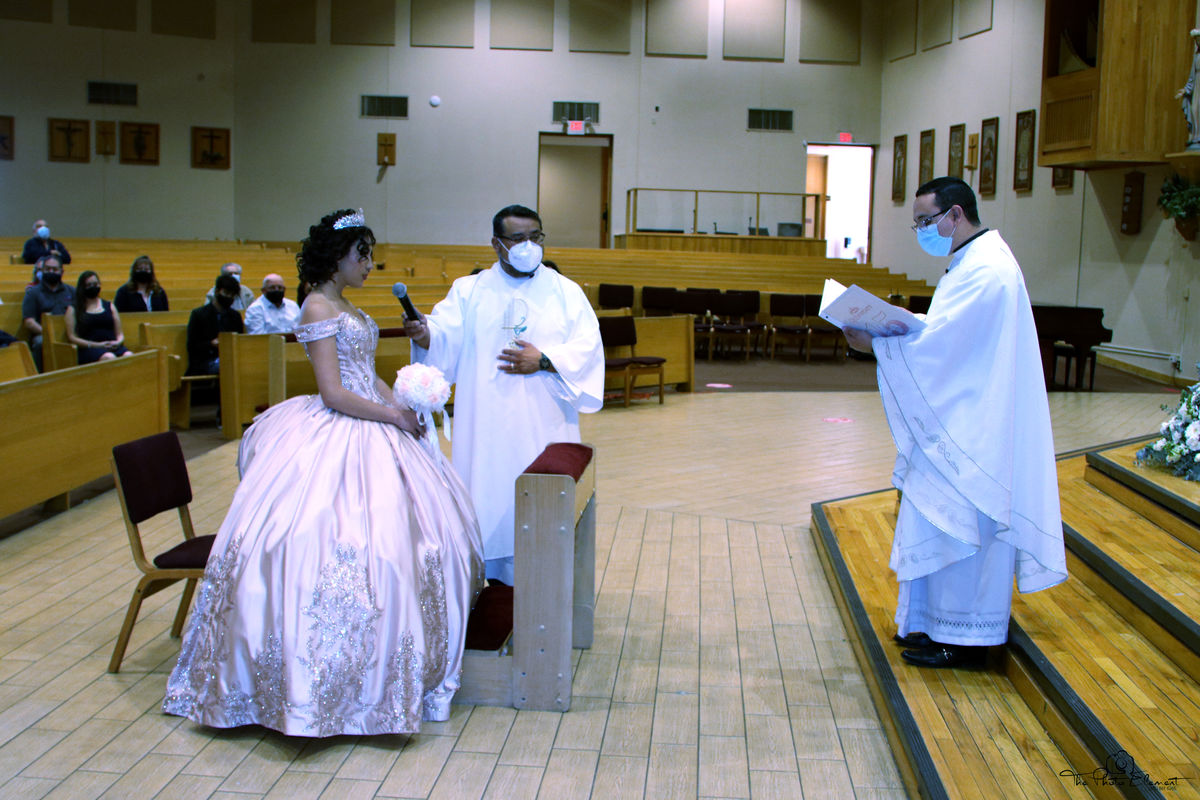
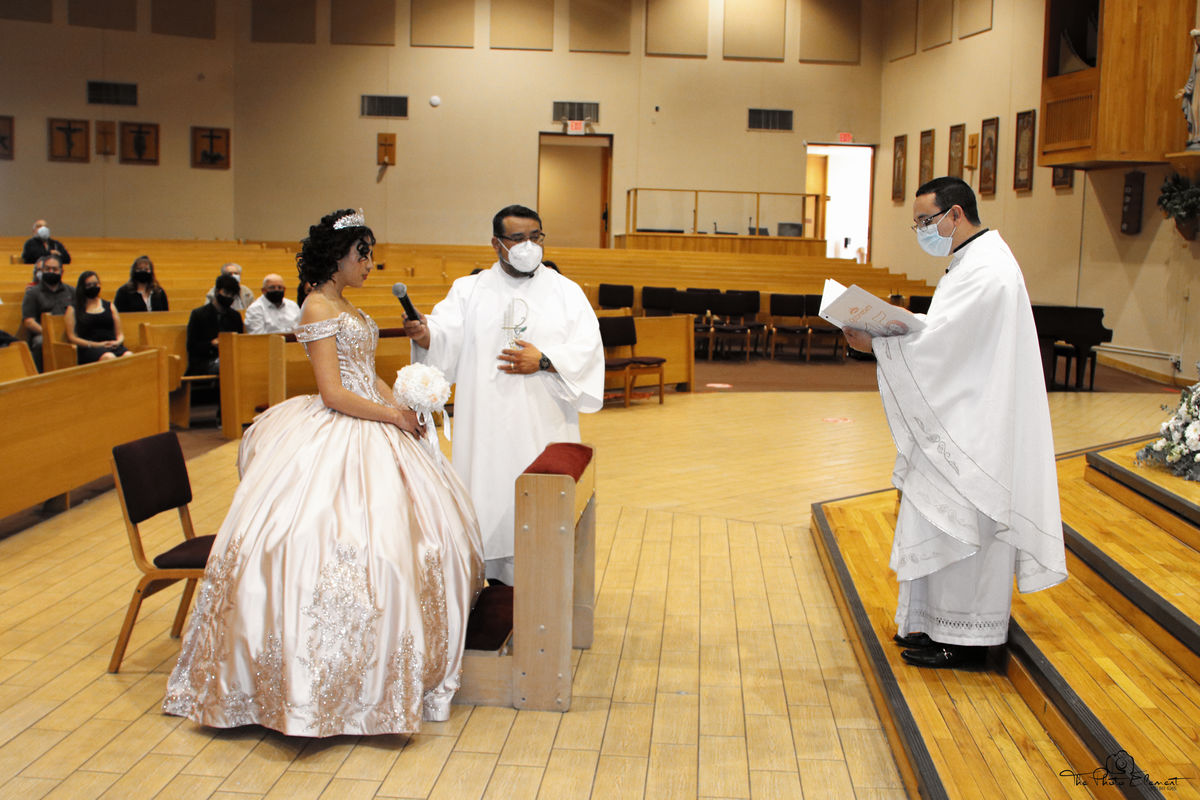
Is this a photo of a ? Beautiful custom.
I thought the same. It looks like that. The young girl now is considered a woman.
Feb 2, 2022 07:53:16 #

cony25 wrote:
My commentary to all of you is that the church did not seem this orange to the naked eye. Light just looked a little off orange. This is the trippy issue.
Because your eyes adjust to the color of the light.
Mar 15, 2022 12:02:14 #
Mar 19, 2022 07:18:15 #
catchlight..
Loc: Wisconsin USA- Halden Norway
cony25 wrote:
So how can I get this right on the spot? and not in post-production?
Also any recommendations for post productions? getting the tones right?
Please help!
Also any recommendations for post productions? getting the tones right?
Please help!
The answer is to change your auto white balance from awb to awbw. Simply click on the awb icon on your canon quick menu and choose awbw. Kind of a hidden feature. This addresses the yellow orange ambient light problem directly.
Mar 20, 2022 07:41:57 #
cony25 wrote:
So how can I get this right on the spot? and not in post-production?
Also any recommendations for post productions? getting the tones right?
Please help!
Also any recommendations for post productions? getting the tones right?
Please help!
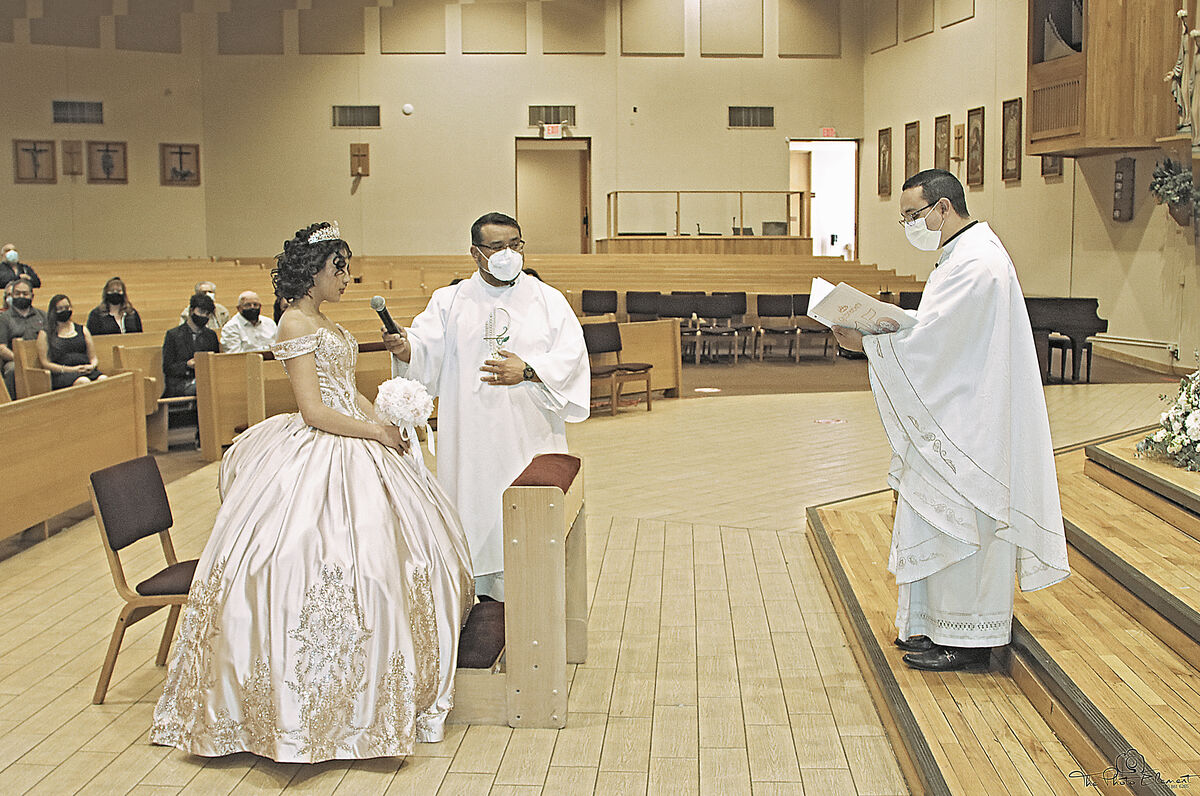
One of the reasons most wedding photographers prefer to take B/W images..... I'd be more concerned with the softness of the lens and the very shallow DoF, the young lady is out of focus which is IMHO a more concerning issue...
In Post
Id use a white neutraliser filter in Nik collection filters as you know the priests garments are White (only fact from the image that can be used as a standard) ... The filter can be used to find which way your WB has erred towards (incandescent in this incident) you could just apply the opposite of the colour wheel (blue filter) to compensate... Or neutralise the whole image with Nik software automatically as done here.
Pre settings
Take a shot then look at the back of your camera if it looks orange its incandescent and visa versa with blue.... It really is that simple... Digital has made it so easy to change on the fly or change in post.....
you will never correct mixed lighting but can use it to add drama to a photo by making sure your main subject is correct... Have added an example only as this was a shot to demo ambient light balancing to another photographer using a Rotolight....
.......
Regards
Joe
Jul 26, 2022 02:02:01 #
rcarol wrote:
I have the same issue with all of my Canon cameras. Since I shoot RAW, I choose to fix it in post. However, you can select incandescent instead of auto and that should get you closer to matching the lighting for the interior of the church.
If you're shooting RAW, color balance has no affect.
Jul 26, 2022 21:07:39 #

This is a post-production. Just too many steps to provide an explanation. Still, there is a tint of blue that I couldn't remove from the garment.
Aug 1, 2022 00:31:15 #

cony25 wrote:
So how can I get this right on the spot? and not in post-production?
Also any recommendations for post productions? getting the tones right?
Please help!
Also any recommendations for post productions? getting the tones right?
Please help!
My recommendation is called "read the fine manual." Look up white balance. Learn how to perform a custom, or manual, or preset white balance. They're all different names that different camera manufacturers use for the same concept — you use a white balance and exposure target as a reference — for the camera to first read and set normal exposure, then to base a white balance off the neutral target.
Go to B&H's website, or that of your favorite online photo retailer, and look up "white balance aids" or "white balance targets".
The simplest and cheapest is a Delta 1 Gray Card. Do NOT use a Kodak Gray Card, because they are slightly green.
The target I use most is the Photovision One Shot Digital Calibration Target.
Another interesting white balance tool is the ExpoDisc. Then there is the WhiBal, and about 70 other variations on the same tool theme...
Find one or three that make sense to you, buy them, learn how to use them, and then make the best JPEGs of your life. Most of the targets work as a "click balance" reference for eye-droppering the white balance in a raw file, too.
The key you need to learn is that not all light sources have the same spectral response, and our eyes tend to automatically find white to compensate. But cameras have really stupid automatic white balance circuits. The farther away from daylight you get, the less accurate the AWB circuit is.
Some light sources cannot be white balanced, no matter what you do. These tend to be metal halide gas discharge lamps, such as mercury vapor or sodium vapor. Other light sources can be white balanced for some, but not all colors. In these cases, the lights produce DISCONTINUOUS spectra. They do not generate all colors between infrared and ultraviolet. They have enormous spikes at certain frequencies, while big sections of the rainbow are completely missing. That's when you need to reach for auxiliary lighting instruments...
Aug 1, 2022 00:35:34 #
Another note about getting good color is to learn about ICC color management. Learn about device calibration and device profiling — two completely different concepts that must go together to allow computers to "match" the color capabilities of one device to the color capabilities of another device.
If you want to reply, then register here. Registration is free and your account is created instantly, so you can post right away.