converting negatives
Sep 26, 2021 07:02:58 #
billnikon
Loc: Pennsylvania/Ohio/Florida/Maui/Oregon/Vermont
PGJR wrote:
I don't know which forum to ask this. Is it possible to convert film negatives to positives at home? If so, what do I need & how do I do it? I just want to clearly see who or what's on them. I don't have PS or LR but I do have Affinity.
Thanks, Paul
Thanks, Paul
Film scanner will do the job.
Sep 26, 2021 08:36:40 #

PGJR wrote:
Thanks, we have lots of color negatives. We talked about the time involved & feel that it'll be worth it. Almost all of the negatives are in sleeves. I like your idea of a flat piece of glass on a light box, I thought of that but I didn't know about the orange mask. We don't have the expertise for color correction. I believe that the cost of a good scanner would be a lot less than having them scanned professionally so I will be looking for an Epson V-600.
Even with the negatives in sleeves now, you may find that they will not lay flat on the scanner. Even in the holder, I found they were not completely flat.
From a picture-framing shop I bought a piece of non-glare glass. I covered the edges with strong packing tape (the kind that looks like there are strings of thread woven into it), just so I wouldn't cut my fingers when using it. On the corners I let the tape stick out about an inch or so, to have tabs to easily pick up the glass from the scanner again.
So, the film goes on the scanner, then the piece of glass on the film and then close the lid.
BTW, I haven't used this for about 3 years or so now, but I seem to remember that there was a setting for scanning negatives directly on the scanner glass, or in the provided holder. There is of course a slight difference in distance between the negatives and the part of the scanner that records what is on the negative.
Sep 26, 2021 09:09:25 #
PGJR
Loc: 33868
Morning Star wrote:
Even with the negatives in sleeves now, you may fi... (show quote)
Thank you for this information, it makes a lot of sense. I will pay close attention to the results of my scans. May I ask what kind of scanner you used?
Sep 26, 2021 09:15:02 #
PGJR wrote:
Thank you for this information, it makes a lot of sense. I will pay close attention to the results of my scans. May I ask what kind of scanner you used?
I have the Epson PerfectionV700 Photo.
Not a cheap machine, but I did have the money at the time and have never regretted buying this one.
Sep 26, 2021 09:33:21 #
Sep 26, 2021 09:37:10 #
PGJR wrote:
Wow! $900 refurbished. Sounds great but out of my affordability.
Wow!! That really has gone up in price. I don't remember exactly when I bought mine, likely some 5-8 years ago, and I paid around CAD 750 for it then - and new, not refurbished.
Sep 26, 2021 09:42:37 #
aflundi
Loc: Albuquerque, NM
PGJR wrote:
I don't know which forum to ask this. Is it possible to convert film negatives to positives at home? If so, what do I need & how do I do it? I just want to clearly see who or what's on them. I don't have PS or LR but I do have Affinity.
Thanks, Paul
Thanks, Paul
I just digitized over a thousand negatives using the Nikon ES2 slide/negative attachment on a 60mm macro lens and a D600 using a tracing panel as a backlight, and using the 'negadoctor' module in Darktable (freeware). With that you take a picture of a blank frame in the roll to find the film stock base color which the negadoctor module uses for a color adjusted black point for the rest of the roll, and then inverts the images. It made quick work compared to inverting the image and then trying to color adjust (which is a lot harder and time consuming than I though it would be).
Sep 26, 2021 10:22:55 #

PGJR wrote:
I don't know which forum to ask this. Is it possible to convert film negatives to positives at home? If so, what do I need & how do I do it? I just want to clearly see who or what's on them. I don't have PS or LR but I do have Affinity.
Thanks, Paul
Thanks, Paul
I converted all my old negatives that were worth keeping. I have an Epson V550 Photo Scanner which does an excellent job. It also scans positive printed photos. Takes quite a bit of time since you can only scan a few at a time. But it gets the job done.
Sep 26, 2021 11:44:54 #

PGJR wrote:
I don't know which forum to ask this. Is it possible to convert film negatives to positives at home? If so, what do I need & how do I do it? I just want to clearly see who or what's on them. I don't have PS or LR but I do have Affinity.
Thanks, Paul
Thanks, Paul
Yes. I wrote a white paper on the subject. Here is a PDF file of it. Click Download to read it:
Sep 26, 2021 12:29:02 #
PGJR
Loc: 33868
burkphoto wrote:
Yes. I wrote a white paper on the subject. Here is a PDF file of it. Click Download to read it:
That sounds good but to me it looks like more expense (no Macro) and more work. I think an Epson V-600 will do more than I need. Thanks for your suggestion though, you put a lot of effort to create all that and write a good PDF.
Sep 26, 2021 12:42:54 #
PGJR wrote:
That sounds good but to me it looks like more expense (no Macro) and more work. I think an Epson V-600 will do more than I need. Thanks for your suggestion though, you put a lot of effort to create all that and write a good PDF.
Correct. If you don't already have the requisite camera gear, it is more expensive. My justification is that I have oodles of old slides and negatives to digitize. My wife says she does, too, "somewhere."
The V-600 is quite decent for the price. I got rid of mine when I learned that Digital ICE could no longer be supported on the newer all-64-bit MacOS versions, because it was written as a 32-bit application. Applied Science Fiction, its authors, went out of business when parent company Kodak declared bankruptcy. If you have a Mac, Epson does offer a free download of SilverFast SE from their website, which uses the hardware in the scanner to remove dust and scratches (in place of Digital ICE).
Flatbed scanners are slow, but they get the job done.
Sep 26, 2021 12:49:13 #
therwol
Loc: USA
PGJR wrote:
That sounds good but to me it looks like more expense (no Macro) and more work. I think an Epson V-600 will do more than I need. Thanks for your suggestion though, you put a lot of effort to create all that and write a good PDF.
Pay attention to Page 10 of Burkphoto's pdf. Cleanliness is extremely important, even if you use a scanner. You are always going to pick up defects in the negatives such as scratches, fingerprints and other crud, but it pays to minimize that. I have digitized thousands of negatives, both black and white and color. There is ALWAYS some crud on them. At the very least you should get the Rocket Blower and anti-static brush that he recommends and apply them after you put your negatives into the film holder of the scanner. (I do it before and after. I don't need crud carried over to the film holder.) Pec-12 is useful for wet cleaning fingerprints and ink, but in some cases, those will have etched themselves into the film. You will ultimately have to clean up any remaining defects in your photo editor. Even the Microsoft Photos app has a Spot Fix function that works quite well once you get the hang of it. (You have to zoom the picture in and out to change the size of the area it works on, and this takes some practice.)
Sep 26, 2021 12:53:55 #
therwol
Loc: USA
Morning Star wrote:
Even with the negatives in sleeves now, you may fi... (show quote)
I have an Epson V800 scanner. It does have an option for scanning negatives directly on the glass. It has a dual lens system and changes focus if you specify that your film is on the glass when you scan it. It's a setting in the Epson software. I've used this function to scan negatives that don't match any of the sizes of the supplied film holders, 127 being one of them. I think you can go to around 8x10. I don't think that the lower Epson models have this feature, but I could be wrong.
Sep 26, 2021 12:58:07 #
PGJR
Loc: 33868
therwol wrote:
Pay attention to Page 10 of Burkphoto's pdf. Cle... (show quote)
Another great point I must consider, thank you. I do have a large Rocket Blaster & I should be able to get an anti-static brush & Pec-12. None of my negatives that are in sleeves have never been out of their sleeves & rarely looked at. That should help with any fingerprints. Thank you.
Sep 26, 2021 13:00:08 #
Johnnyt
Loc: keizer Oregon
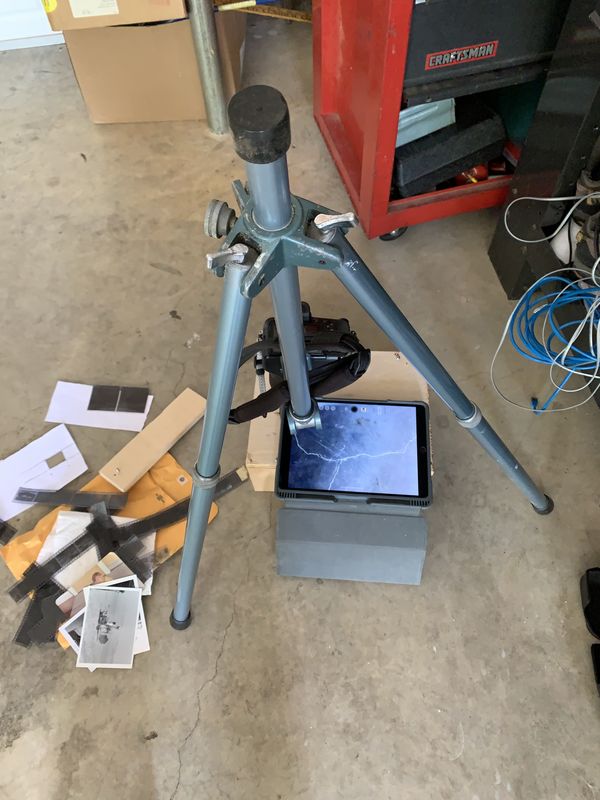
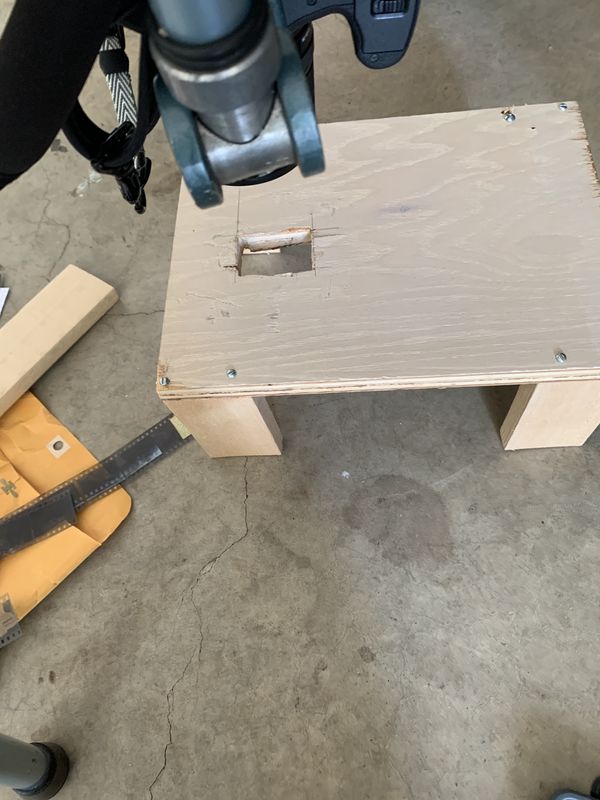
If you don’t mind a little graininess and you have an iphone, ipad and a digital camera that is macro capable. You will also need a tripod. I made a setup to hold the photo and then you can take the photo with the camera. For the negatives you can use an iphone to illuminate them. The ipad is used to focus on the negatives. The ipad must be camera invert capable. You make a template to make it so only one negative is illuminated for the photo. you should put a piece of glass on top of the negative to flatten it. You put the Iphone under the wood base with the photo lined up under the hole so you can focus on it with the ipad or/and the camera. Then you put the setup(like the one I made) it is simple to make. on top of the iphone and photo. Put the ipad on it (in classic invert mode) You put the camera on the tripod and put it into macro mode, turn off the image stabilization.then using delayed shutter take the photo.You can edit it in photos on ipad or whatever you want.
You can use the same setup for b/w , color negatives. You can use it for copying slides without the ipad, using the iphone or whatever you have. The program I use to illuminate the negatives and slides is isoftbox on the iphone. I do not know what Android uses.
I am going to include some photos of my setup.
If you want to reply, then register here. Registration is free and your account is created instantly, so you can post right away.