Help! I'm lost as to how to fix this...
Aug 1, 2021 09:54:36 #
Raybo
Loc: George Town, Grand Cayman
E.L.. Shapiro wrote:
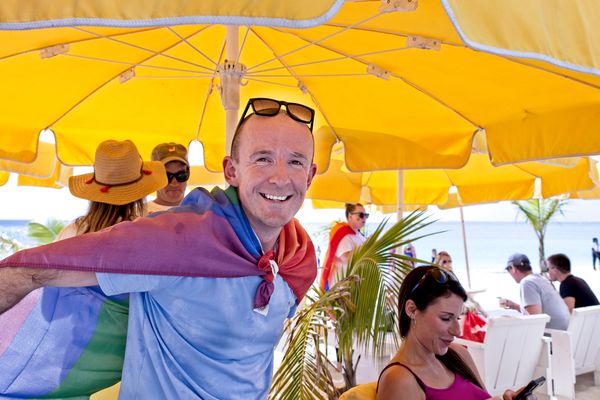
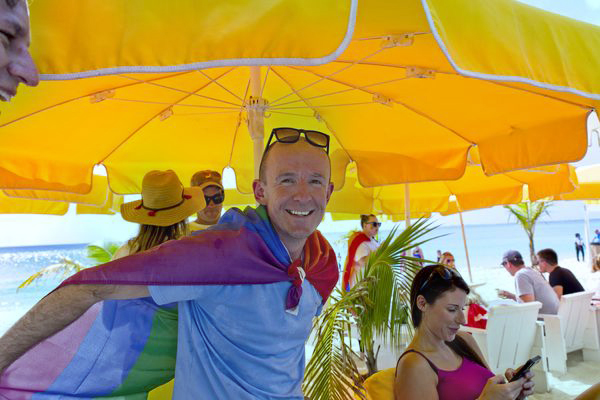
That is not a "yellow shadow'. The large umbrella acted as a giant yellow scrim.
yes, that's exactly what it was. That shot was taken almost due west late in the afternoon. Sun was pretty much directly above it. I'm mostly in to landscape and wildlife, so have somewhere between little and no experience with "skin". Especially in this kind of setting. Live and learn as they say. That's actually the reason I went to this. Just to get some experience...

And although I greatly appreciate all the replies, I'm nowhere near good enough with processing to even think about trying mess with the colors...


So I slept on it, and ended up just warming the overall WB a bit, desaturating the whole photo, and lightened up and adjusted the subject a little.
Thanks for all the replies and suggestions. Always good to get other ideas.
Aug 1, 2021 13:57:57 #
He's under a yellow umbrella. He should look yellowish. He does. Perfectly normal - looks fine as it is.
Aug 1, 2021 16:39:08 #


Aug 1, 2021 21:03:10 #
AirWalter
Loc: Tipp City, Ohio
CO wrote:
Use photo software that has U-point or Control point technology. I used Nikon Capture NX-2 for the photo I corrected. DxO PhotoLab has control point technology. To use control points in DxO PhotoLab, you need to load the RAW file. Since I didn't have the RAW file of your photo, I loaded one of my RAW files and did a screen shot. I applied just one control point but you can apply as many as you want. With control points, you can also vary how far the effect reaches.
Thank you for the tutorial. I never have the time to learn this software like I wanted to when I bought it!


Aug 1, 2021 22:38:54 #
Raybo wrote:
... Any suggestions would be much appreciated.
As you can see there are a whole variety of solutions to your problem. I'm just adding another one for you to consider. All I did was to create a hue/saturation layer in PS/PSE. I reduced the master saturation to a level that I felt made the skin look much more natural. Along with reducing the saturation in the faces and clothing under the umbrella, it also reduced the highly saturated yellow umbrella to a more natural color. I felt there was still a little too much red in the faces, so I selected the red channel in the HSL panel and reduced the red saturation.
This edit could have been done in LR by adjusting only 2 sliders, the saturation and the tint sliders.
Hope this helps give you additional ideas for your edit.


Aug 1, 2021 22:39:57 #
Raybo wrote:
I got this shot this afternoon of a friend of mine. I use ON1 for PP.
Didn't see it in the VF when I took it, but got back home and that yellow umbrella cast a nasty shadow that i have no idea how to correct.
Any suggestions would be much appreciated.
Didn't see it in the VF when I took it, but got back home and that yellow umbrella cast a nasty shadow that i have no idea how to correct.
Any suggestions would be much appreciated.
Just a quick dip on Photoshop.
1. Copied the layer and made that active.
2. Adjusted the Color balance (image/adjustments/colorbalance)
3. Adjusted the Channel Mixer ((image/adjustments/channel mixer)
4. Adjusted the layer to50% opacity
5. Added masking to adjust other areas not needing much adjustment.
This is just a quick rough color adjustment. Follow the steps and finalize to your liking.
.
Original colors
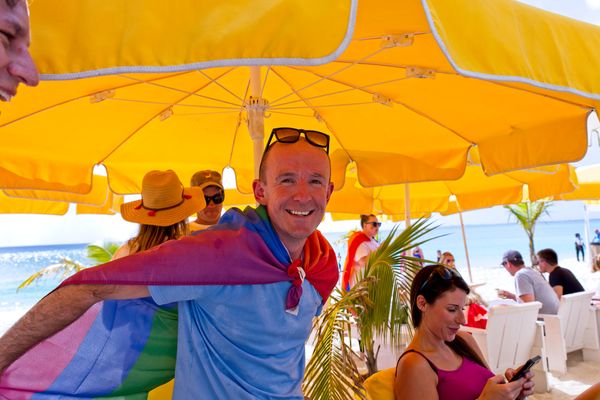
Adjusted
If you want to reply, then register here. Registration is free and your account is created instantly, so you can post right away.