Help! I'm lost as to how to fix this...
Jul 31, 2021 19:40:01 #
Raybo
Loc: George Town, Grand Cayman
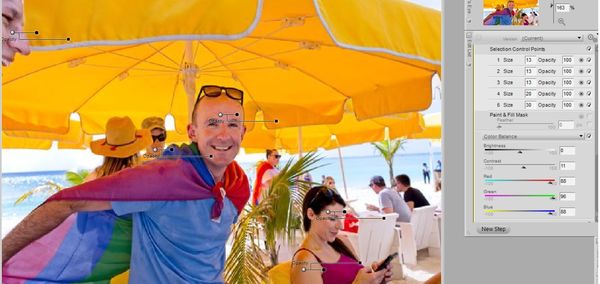
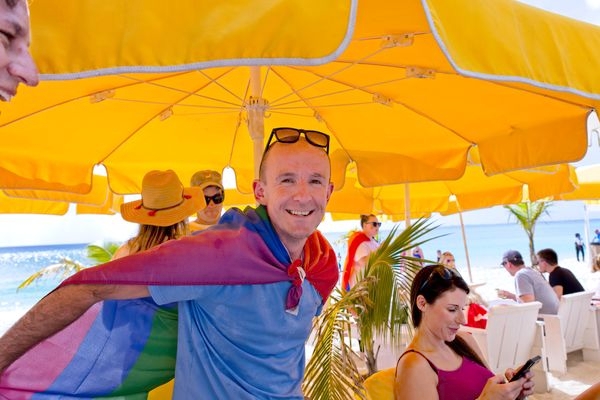
I got this shot this afternoon of a friend of mine. I use ON1 for PP.
Didn't see it in the VF when I took it, but got back home and that yellow umbrella cast a nasty shadow that i have no idea how to correct.
Any suggestions would be much appreciated.
Didn't see it in the VF when I took it, but got back home and that yellow umbrella cast a nasty shadow that i have no idea how to correct.
Any suggestions would be much appreciated.

Jul 31, 2021 19:49:03 #

Jul 31, 2021 19:51:52 #
Without the download it's hard to say but doesn't look bad as is. Maybe try different WB.
Don
Don
Jul 31, 2021 19:59:36 #

Raybo wrote:
I got this shot this afternoon of a friend of mine. I use ON1 for PP.
Didn't see it in the VF when I took it, but got back home and that yellow umbrella cast a nasty shadow that i have no idea how to correct.
Any suggestions would be much appreciated.
Didn't see it in the VF when I took it, but got back home and that yellow umbrella cast a nasty shadow that i have no idea how to correct.
Any suggestions would be much appreciated.
If you add a download, there are lots of good folks here on UHH who will send you a variety of edits.
Jul 31, 2021 20:00:58 #
Raybo wrote:
I got this shot this afternoon of a friend of mine. I use ON1 for PP.
Didn't see it in the VF when I took it, but got back home and that yellow umbrella cast a nasty shadow that i have no idea how to correct.
Any suggestions would be much appreciated.
Didn't see it in the VF when I took it, but got back home and that yellow umbrella cast a nasty shadow that i have no idea how to correct.
Any suggestions would be much appreciated.
Try the white balance.
Jul 31, 2021 20:24:54 #
The white balance seems correct. Everything outside of the umbrella looks good.
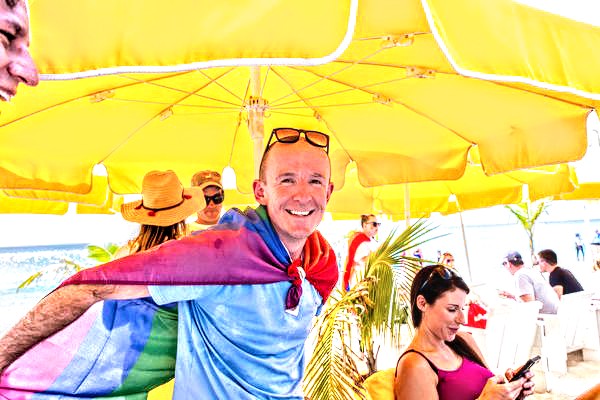
I used five control points only on the people under the umbrella and the fellow in the upper left. I shifted the color to make their skin tones look better.
I used five control points only on the people under the umbrella and the fellow in the upper left. I shifted the color to make their skin tones look better.

Jul 31, 2021 20:32:22 #
I would select the guy in a new layer and adjust the white balance in just that layer.
Jul 31, 2021 21:30:06 #

That is not a "yellow shadow'. The large umbrella acted as a giant yellow scrim. So, if the camera's white balance was set for "daylight" you got a serious colour shift. I don't have the data but the file was probably underexposed as well. It all combined to cause a red/yellow shift.
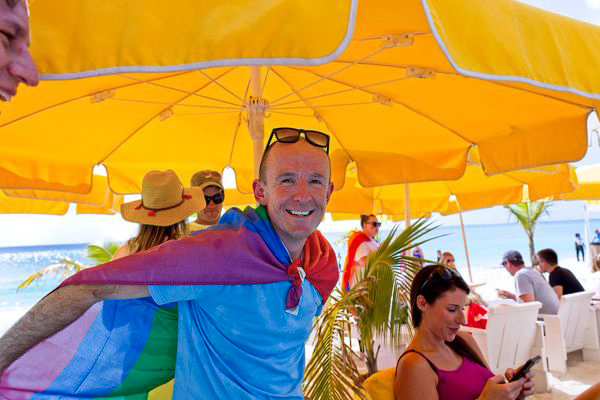
If you wanted to work for a couple of hours, you could post-process with many layers and try to correct skin tone by sketching the subject's face and arms. I just did a quick global colour correction and reduced the density. The yellow umbrella and blue shirt were saturated enough to retain some of their colours.
It ain't a post-processing masterpiece but the subject no longer has a lobster-lie skin colour and it is not quite as dark and muddy.

Jul 31, 2021 23:49:41 #

Raybo wrote:
I got this shot this afternoon of a friend of mine. I use ON1 for PP.
Didn't see it in the VF when I took it, but got back home and that yellow umbrella cast a nasty shadow that i have no idea how to correct.
Any suggestions would be much appreciated.
Didn't see it in the VF when I took it, but got back home and that yellow umbrella cast a nasty shadow that i have no idea how to correct.
Any suggestions would be much appreciated.
You can play around with colors a bit but even if corrected it is a nice shapshot. I recently did the same thing at a birthday party ....except the color was red...not a lot of correction was available, but we have the pics for posterity.
Aug 1, 2021 05:24:43 #
Might sound corny, but carry a defuse/reflector this way you can reflect more light onto the subjects face. All else fails you could have covered the canopy with a blanket or tarp.
Aug 1, 2021 07:03:43 #
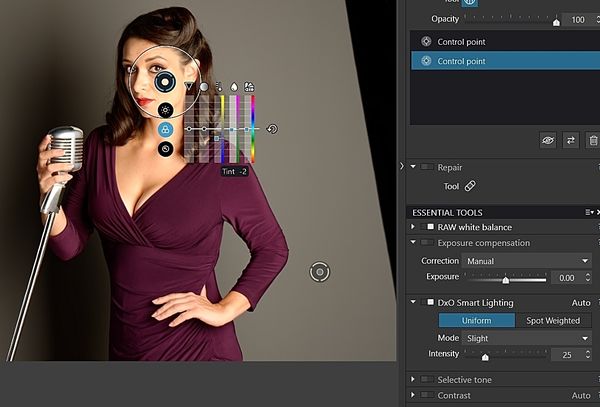
Use photo software that has U-point or Control point technology. I used Nikon Capture NX-2 for the photo I corrected. DxO PhotoLab has control point technology. To use control points in DxO PhotoLab, you need to load the RAW file. Since I didn't have the RAW file of your photo, I loaded one of my RAW files and did a screen shot. I applied just one control point but you can apply as many as you want. With control points, you can also vary how far the effect reaches.
Control point in DxO PhotoLab3 (The circle is not an indication of the exact area that will be changed. It's a strength meter that determines the reach of the adjustments) Add as many points as needed
(Download)
Control points in Nikon Capture NX2
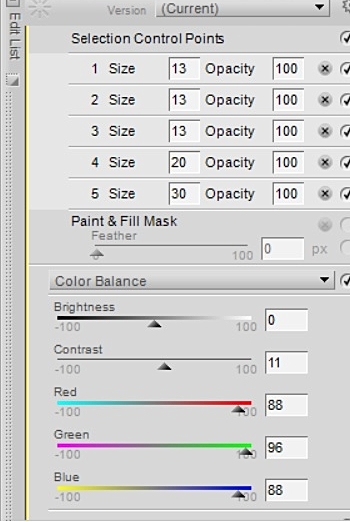
After applying five control points and using color balance settings above. I adjusted the reach of the changes so that it would not alter the scenery in the background
Aug 1, 2021 07:10:45 #

Aug 1, 2021 07:53:51 #
People are making global changes but why? If you look at the area in the background, the color balance seems fine.

Aug 1, 2021 08:08:18 #
DirtFarmer wrote:
I would select the guy in a new layer and adjust the white balance in just that layer.
Finally got a half minute to do that.
Photoshop.
Magic wand selected the guy and the two people behind him under the umbrella.
Select and mask.
Filter => Camera Raw
White balance eyedropper on the guy's teeth.
Export as jpg.
About 45 seconds.
Aug 1, 2021 08:34:59 #
DirtFarmer wrote:
Finally got a half minute to do that.
Photoshop.
Magic wand selected the guy and the two people behind him under the umbrella.
Select and mask.
Filter => Camera Raw
White balance eyedropper on the guy's teeth.
Export as jpg.
About 45 seconds.
Photoshop.
Magic wand selected the guy and the two people behind him under the umbrella.
Select and mask.
Filter => Camera Raw
White balance eyedropper on the guy's teeth.
Export as jpg.
About 45 seconds.
 The magic wand tool in Photoshop is great. I use it when doing selections for background replacements. It can be used for a variety of applications as you have shown here.
If you want to reply, then register here. Registration is free and your account is created instantly, so you can post right away.