Ok, so this one is a real challenge...
May 12, 2021 18:37:07 #
Rongnongno wrote:
I will not give you any instruction.
There is no right or wrong as usual.
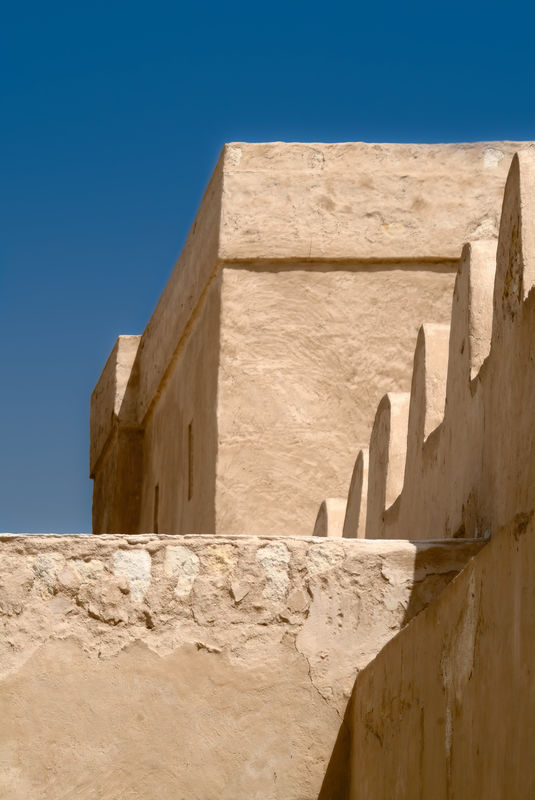
Bahrain, 2004
Fuji Pro IIs.
There is no right or wrong as usual.
Bahrain, 2004
Fuji Pro IIs.
Here's another version
May 12, 2021 19:15:47 #


May 13, 2021 12:38:58 #
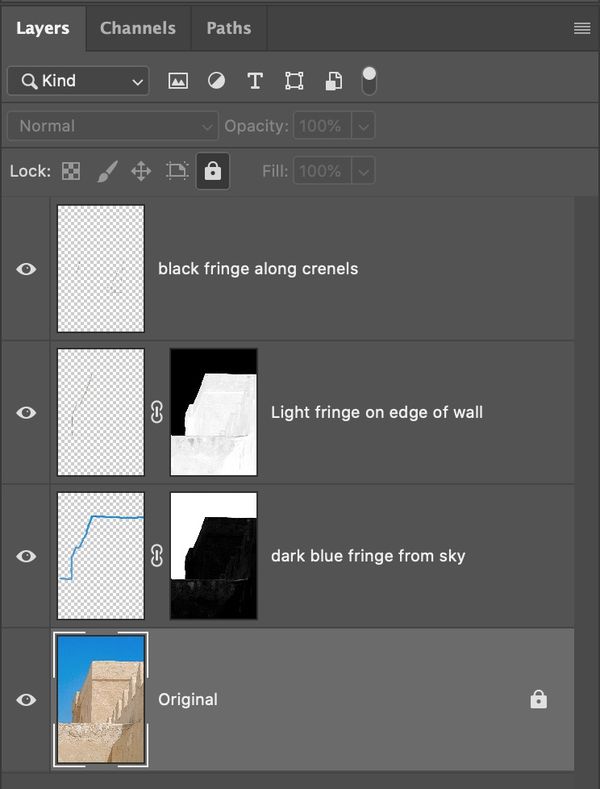
'My' solution.

PS CC

Issues:
Artifacts on top of the wall (left side)
Dark fringe between the sky and the wall
Dark fringe on the crenels
PS CC
Issues:
Artifacts on top of the wall (left side)
Dark fringe between the sky and the wall
Dark fringe on the crenels
May 13, 2021 16:23:46 #
Rongnongno wrote:
'My' solution.
Issues:
Artifacts on top of the wall (left side)
Dark fringe between the sky and the wall
Dark fringe on the crenels
Issues:
Artifacts on top of the wall (left side)
Dark fringe between the sky and the wall
Dark fringe on the crenels
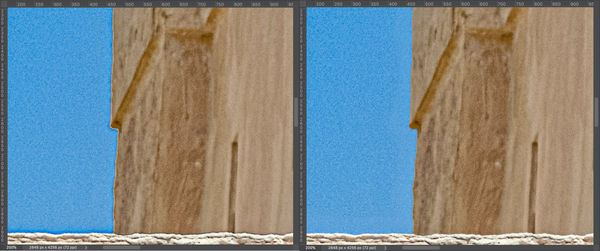
There are many easy ways of resolving your issues. Here's just one way.
.
1) Remove the dark blue fringe from the sky. Create an empty layer and set the blend mode to 'lighten'. Using Color Range, create a mask of the sky. The mask just ensures that the fringe edit doesn't bleed into the walls. Using the Clone Stamp tool, select an area of sky near but not too close to the part of the fringe you want to remove and paint over the fringe.
2) Remove white fringe along the edge of the wall. Create another blank layer and set the blend mode to 'darken'. Copy the mask from the previous layer to this layer and invert it. The selects everything except the sky, almost. Without adjusting the mask, you'll be left with another white fringe, albeit smaller. To correct the mask, select Filter|Other|Maximum and increase the mask size by 0.5 pixels. You can see the mask on your image by pressing the '\' key. Then using the Clone Stamp tool, select an area very close to the white fringe and paint over the fringe.
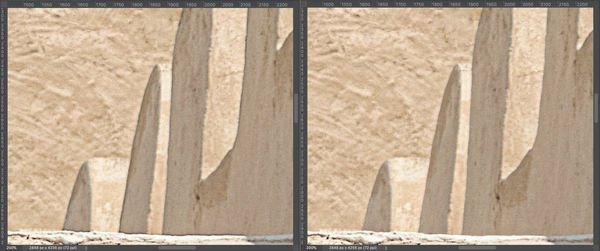
3) Remove the dark edges on the crenels. Create another blank layer and set the blend mode to 'lighten'. Again using the Clone Stamp tool, select an area near the fringe and in the shadow. Paint over the dark fringe. The highlight area is lighter than the shadow area so the blend mode block the edit into the adjacent highlight area.
No more issues. This only took about 5 minutes to fix, but a lot longer to explain.
I could have used a selection rather than creating a mask, but it would have been harder to show in the attached image, than masks. And this edit is a non-destructive method.
Hope this example helps others.
Mike
PS Steps
(Download)
Before and after removing the sky and wall fringes
(Download)
Before and after removing the dark fringe along the crenels
(Download)
If you want to reply, then register here. Registration is free and your account is created instantly, so you can post right away.