Digitizing film
Mar 15, 2021 14:23:21 #

burkphoto wrote:
That sounds like a good plan!
Most modern digital cameras are more than capable of resolving everything in a 35mm negative of ISO 100 or higher. I've generally had better results from camera scans than from flatbed scans.
I miss the Kodak Bremson HR-500+ lab scanners, though. They were made for scanning extreme detail, and they came with Digital ICE.
The only fly in the ointment is that you are now using two camera lenses in the process, the one you used to capture the image on film and the macro lens you are using to photograph the negative or slide. That macro lens has to be the sharpest lens you can find or it will degrade the digital capture.
I covered this in [too much] detail in the PDF Photographic System Resolution.
A film scanner can still capture more information if you are using medium or large format film. I can get about 70 MP scanning 6x6cm film at 4000 ppi and over 100 MP scanning 4x5 film at 2400 ppi.
Mar 15, 2021 18:06:13 #

selmslie wrote:
The only fly in the ointment is that you are now u... (show quote)
Yes, for 6x7 and larger formats, a scanner is probably best.
However, for small to 6x4.5 cm formats, I've found the macro photography method to yield far better results than any flatbed I've tried. One important key is keeping the film perfectly flat and parallel to the sensor, so the entire field is in sharp focus.
Some of the higher megapixel "pixel shift" modes provide 80MP files (or more). The Lumix G9 and Olympus OM-D E-M1 Mark III do this really well. I know there are others, but have not seen results from them. These cameras may be useful for extracting more detail from larger-than-35mm films.
Mar 16, 2021 12:37:03 #
selmslie wrote:
Once I get the bugs worked out I will use my A7 II (monochrome) on some B&W negatives, same resolution without the Bayer array. Then I’ll try the Z7 for color.
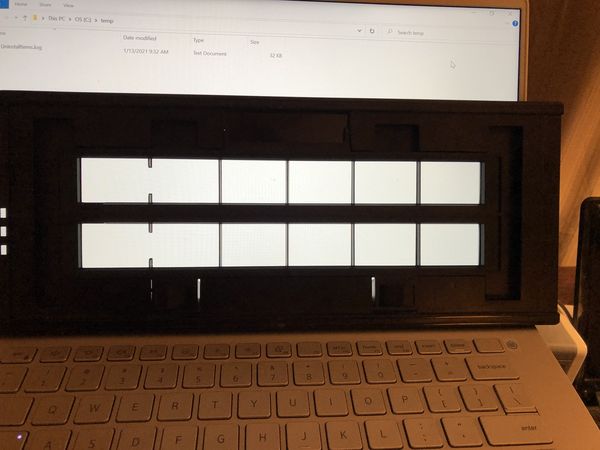
While I am waiting for Amazon to deliver a shadow box so I can move the film away from the display I decided to see what I could do with a color negative.
Here is my setup:

The lens is set to 1:1 macro and I focus by sliding the PC back and forth.
The camera/tripod is still a little wobbly so I took five quick shots using Live View and picked the one with the least blur.
The tricky bit was to get Capture One to do the negative-positive inversion because that's not built into the program yet. But some research showed me how to do it, by switching the black and white levels in the Levels section. Unfortunately this wreaks havoc with some of the basic controls. Highlights are now shadows, whites are now blacks and the Exposure slider works backwards. But if I can get used to that I should be able to work with the result.
Because the display is still showing through the white areas the only usable gray tone was the surface of the rear tire so I clicked there to get the colors balanced.
Raw image as captured
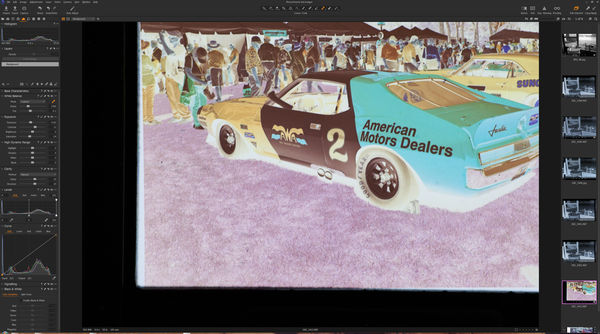
(Download)
Converted to positive and color balanced
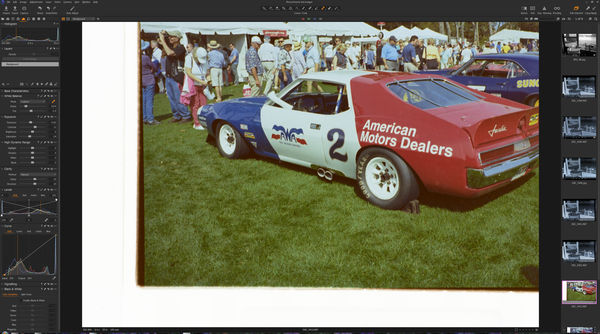
(Download)
Scanned in 2016 with the Coolscan 9000 with a little editing in Picture Window Pro
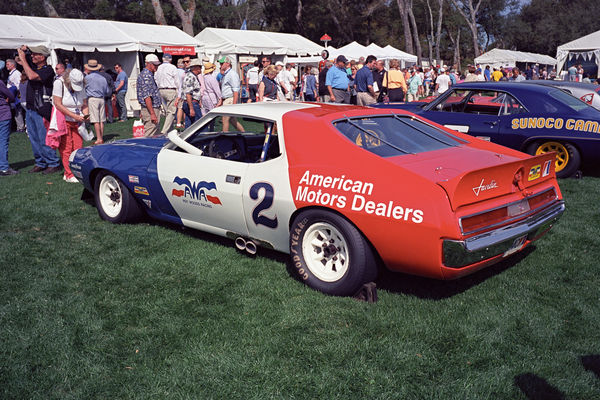
(Download)
Mar 16, 2021 13:56:18 #
selmslie wrote:
While I am waiting for Amazon to deliver a shadow ... (show quote)
I actually tried processing this in Negative Lab Pro, but discarded it because the grass looks so unbelievably dark. My result looked much like your Coolscan file, but the red I got was a totally darker, more saturated shade. What sort of film is this?
Yes, you can get used to the sliders being reversed. Lightroom Classic works that way, even after inverting the negative in NLP.
NLP is a huge timesaver, which is why I bought it. It only took me half a dozen color negative conversions without NLP to convince me I needed something better. It still isn't perfect, but it gets most of the way there in just a few menu clicks. Then you can use its sliders and those in LrC to make the final tweaks.
Mar 16, 2021 14:23:04 #
burkphoto wrote:
I actually tried processing this in Negative Lab Pro, but discarded it because the grass looks so unbelievably dark. My result looked much like your Coolscan file, but the red I got was a totally darker, more saturated shade. What sort of film is this? ...
It's Kodak Ektar 100.
I try to do as much processing as possible during the raw conversion in Capture One because the process is non-destructive and easily revered.
The reliance on plug-ins is one of the reasons I have stayed away from Photoshop. The plugins seem to be based on raster editing, after the raw conversion has created a JPEG or16-bit TIFF which just seems like an unnecessary extra step.
Occasionally I might do some noise reduction to a completed image with Neat Image but I would rather do it in Capture One since I can do it to only part of the image via a layer.
Mar 16, 2021 14:58:31 #
selmslie wrote:
It's Kodak Ektar 100. br br I try to do as much p... (show quote)
Negative Lab Pro is 100% non-destructive. It works only in Lightroom 6.14 (the obsolete stand-alone version) and the current Lightroom CLASSIC (NOT Lightroom). It cannot work in any other application at this time.
Conversions done in NLP and LrC are completely reversible with a couple of clicks, just like anything else done in Lightroom. There is no raster editing involved.
Sending TIFFs to another app such as Photoshop DOES involve raster imaging, though. Ideally, I do everything I can in Lightroom before passing my images to another app as 16-bit TIFFs in ProPhoto RGB color space. Even then, I'm only passing copies to another app. The original file stays put, and never gets altered. I can alter a file exported to another app and re-import it into Lightroom for cataloging or for further adjustments, but it's a new file at that point.
This is one of the most important distinctions between Photoshop and Lightroom Classic. Lightroom displays proxies, and saves all your changes as database entries in its "catalog," or as sidecar .xmp text instruction files. You're just creating a formula for export, or for printing, or for upload to the web, or for page layout in a photo book. No real changes are made to originals. Everything you see or send out of LrC is a copy, so you can go back and change your mind up to that point. You can save multiple virtual originals, too, for different uses or for comparison purposes.
Mar 16, 2021 17:58:10 #
selmslie wrote:
While I am waiting for Amazon to deliver a shadow box so I can move the film away from the display I decided to see what I could do with a color negative.
....
....
I tried another one but it's starting to look like the laptop screen is not a suitable light source. I can't quite match the scanned image.
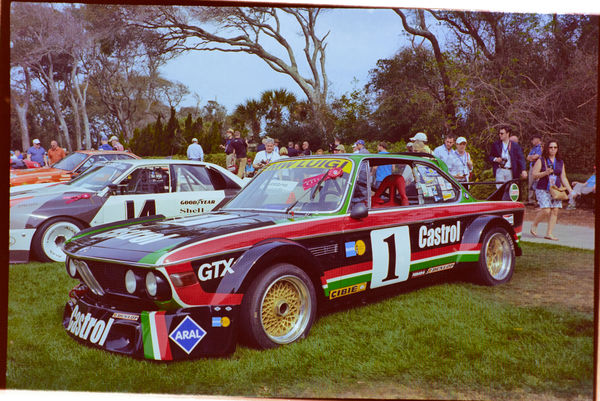
The stripe on car #1 is supposed to be red-orange. It came out of the scanner correctly without any color adjustment. The deep green grass is also correct. But I could not quite match the colors in the macro copy.
I will have to find a better light source.
Mar 16, 2021 18:34:41 #
selmslie wrote:
The stripe on car #1 is supposed to be red-orange. It came out of the scanner correctly without any color adjustment. The deep green grass is also correct.
That's no accident.
The negative film holder has frame separators to help keep the 35mm film flat. But there is a gap between frames 1 and 2 and another one between 7 and 8. The Coolscan bases its white balance on the unexposed film between those frames. It also uses the gaps to read the film base+fog in order to set the exposure.
Mar 16, 2021 21:31:19 #
selmslie wrote:
I tried another one but it's starting to look like the laptop screen is not a suitable light source. I can't quite match the scanned image.
The stripe on car #1 is supposed to be red-orange. It came out of the scanner correctly without any color adjustment. The deep green grass is also correct. But I could not quite match the colors in the macro copy.
I will have to find a better light source.
The stripe on car #1 is supposed to be red-orange. It came out of the scanner correctly without any color adjustment. The deep green grass is also correct. But I could not quite match the colors in the macro copy.
I will have to find a better light source.
Here it is,
Viltrox L-116T
https://viltroxstore.com/products/viltrox-l116t-ra-cri95-super-slim-led-light-panel-3300k-5600k-led-video-light-panel-lcd-display-screen-color-temperature-and-brightness-can-be-adjusted-with-np-f550-lithium-battery?variant=32046545993794
Essential Film Holder review (This guy also uses the Viltrox light with the EFH system):
https://youtu.be/hqSvTJ0s5MM
Mar 17, 2021 05:03:53 #
burkphoto wrote:
Here it is,
Viltrox L-116T
https://viltroxstore.com/products/viltrox-l116t-ra-cri95-super-slim-led-light-panel-3300k-5600k-led-video-light-panel-lcd-display-screen-color-temperature-and-brightness-can-be-adjusted-with-np-f550-lithium-battery?variant=32046545993794
Essential Film Holder review (This guy also uses the Viltrox light with the EFH system):
https://youtu.be/hqSvTJ0s5MM
Thanks. That should solve my light issue.
Mar 17, 2021 10:21:46 #
selmslie wrote:
Thanks. That should solve my light issue.
Both items solved my issues. I have a very clean light source, great diffusion, flat film, and a much speedier workflow than I had with my homemade rig.
Mar 20, 2021 10:14:18 #
selmslie wrote:
It's Kodak Ektar 100. ...
One of the challenges I faced was how to convert a negative image to a positive in Capture One since it's not a built-in option like it is with some other programs.
I tried a couple of Rube Goldberg approaches that seemed to work but they screwed things up by reversing the direction of the Exposure, Brightness, Highlight, Shadow, White and Black sliders. That made it difficult to coordinate any of those adjustments.
I finally came across a much simpler approach which doesn't screw anything up. Import the attached style into Capture One you will get the style I saved for my Ektar 100 image.
A different film might need some tweaks to the white balance, etc. Once you get everything working for a particular film just save your modified style with a new name.
Mar 20, 2021 12:46:32 #
There are many, many answers to questions regarding "camera scanning" and "flatbed scanning" in the blog:
https://forums.negativelabpro.com
https://forums.negativelabpro.com
If you want to reply, then register here. Registration is free and your account is created instantly, so you can post right away.