Digitizing film
Mar 13, 2021 13:41:24 #

My focus on film is digitizing it. I no longer expose it, but I do plenty of macro photographing slides and negatives.
I was a yearbook photographer in junior high and high school. In preparation for my 2023 50th reunion, I’m doing a retrospective show. So I’m going through ALL my film from 1968 to 1973 (and beyond), and copying all the good stuff to digital files for a video.
So if anyone has an interest in how... or stories to tell about how you do it... feel free to post here.
Mar 13, 2021 14:33:34 #
I burned through 40-50 rolls of Ektachrome per month from around 1980 through 1987, as an AV (multi-image) producer. Most of it, my assistants and I processed ourselves in a 5-gallon tank, dip and dunk sink line. It had nitrogen burst agitation and a temperature control unit, up to 20 rolls per batch.
I do not miss the stench of the formaldehyde in the stabilizer, or the skin peeling off my fingers from latex glove allergies. I don't miss mounting slides in Pakon plastic mounts, only to edit them and re-mount the best of them in Wess glass mounts for projection.
Sadly, nearly all my Ektachromes have lost their red layers and some of their green layers. My Kodachromes are ALL intact, virtually as good as when first exposed.
So for those with big collections of film, if you want to preserve it for posterity or for printing, scan it or digitize it sooner than later!
One of the beautiful things about digital scanning and digitizing via macro photography is the ability to capture the full range of tones in a slide or negative, then adjust it in Lightroom Classic or Photoshop (etc.) and present great digital images on monitors, or make prints that look their very best.
Mar 13, 2021 14:41:00 #

I'll start a separate thread on Epson V600 parameters I've used with success. If not later today, tomorrow or soon.
Mar 13, 2021 15:04:15 #
CHG_CANON wrote:
I'll start a separate thread on Epson V600 parameters I've used with success. If not later today, tomorrow or soon.

It's probably the most popular scanner used by UHHers, so that will be great. I had one for a short time.
I was spoiled in the Herff Jones Photography scan lab I ran (2000 to 2005), where we had nine Kodak Bremson HR-500 high speed, high resolution scanners. Those were $50K each, plus 18 networked PCs and a room full of matched monitors for color adjustment. We scanned millions of portraits on them.
I'm in the middle of re-working my digitizing setup. I've ordered an Essential Film Holder from the source in England — https://clifforth.co.uk . I just grabbed a light source for it, and I'm building a copy stand to be used for prints, slides, and negatives. I'll post a parts list for it and a picture of it when done. Now if I can pry my camera kit out of my kid's apartment... He's been making films for UNCG with it.
I use this for digitizing negatives photographed with my macro setup: https://www.negativelabpro.com (It's a plug-in for Lightroom 6.14 and Lightroom CLASSIC).
Mar 13, 2021 17:44:09 #

CHG_CANON wrote:
I'll start a separate thread on Epson V600 parameters I've used with success. If not later today, tomorrow or soon.
I have had a V750 since it came out. I think that the results are pretty much the same as the V600 but the V750 is larger, cost more and can scan two 4x5 negatives at once plus multiple strips of 120 and 35mm film.
The optical resolution for each of them is about the same (about 2400 ppi) although both will produce a much finer scan without really improving on their optical performance. I have used several different types of scanning software (Silverfast, Vuscan) but the Epson Scan is just as good and is easier to use.
I have also been using a Nikon Coolscan 9000 since 2010. It cost more than 2x as much as the V750 and has a true resolution of 4000 ppi. Too bad it is no longer made. As with the V750, the supplied Nikon Scan software is as good or better than the other two. It only scans 35mm and 120 film. It also uses a Firewire cable so it required a separate card to connect to my Microsoft computers. And the Nikon Scan software is not compatible with anything newer than Microsoft Vista so it needed a kludge to get it to work with the newer operating systems. I have used it to scan more than 35,000+ images and it needed only one trip back to Nikon for repair. But it's on borrowed time and there are lots of less expensive alternatives available.
Both the Coolscan and the Epson have enough resolution to record the grain in all but the very finest (and slowest) film so you should not need to break the bank to get there.
One of the promising possibilities is to use a good macro (1:1) lens with a suitable holder and light source. It may seem more cumbersome than simply loading a strip of film into a holder but it looks like it will actually be faster and it will produce as much resolution as your camera can muster. I would like to hear from anyone who has tried this approach to see what is the best rig available.
Mar 13, 2021 19:24:39 #
selmslie wrote:
I have had a V750 since it came out. I think that... (show quote)
“Camera scanning” is what I do. I’ll be publishing a thorough description of my methods here, soon.
Mar 13, 2021 20:17:03 #
Mar 14, 2021 16:50:47 #
Fundamentally, "camera scanning" is simply macrophotography of film with a digital camera.
From bottom to top:
> A light source (preferably one with a full spectrum output, high CRI Ra, (or better, R1 to R14) https://www.waveformlighting.com/tech/what-is-the-difference-between-cri-and-ra ) I use a Viltrox L-116t, available on Amazon for about $40 or less, plus a $15 12-volt DC 2A power supply.
> A color-neutral diffuser (such as milk Plexiglas or Perspex, spaced at least an inch or more above the light source) (included with the film holder mentioned below)
> A film holder that keeps the film FLAT (preferably without glass) I recommend the Essential Film Holder, which is a good compromise between professional industrial quality and hobbyist affordability. https://clifforth.co.uk/
> A black shroud of some sort to keep stray light from flaring the lens (I use black Velcro)
> A macro lens, a flat field enlarging lens on a bellows, or some other high quality close-up lens (If possible, avoid "all-purpose" zoom lenses with built-in macro capabilities.) The lens should be capable of at least 1:1 reproduction.
> A digital camera with at least 12MP resolution (If it's a dSLR with mirror lock-up, USE the mirror lockup to avoid mirror shock. If it's mirrorless, USE the electronic shutter instead of the mechanical shutter, to eliminate shutter shock. If the camera has a "pixel shift" feature for high resolution still life work, so much the better!)
> A cable release, or a remote electronic release, or a self timer, or a remote smartphone app to control the camera (I use a smartphone app or 2-second self timer)
This is the complete "camera stack" that mounts on some sort of copy stand. Various instructions for home brew stands may be found on YouTube and other sites, or you can pay a lot of money for one on Amazon or through Alzo Digital or B&H or Adorama.
You will also need:
> Various film cleaning supplies (Consider a Rocket blower bulb first, then a CLEAN camel's hair brush, then a StaticMaster brush (NOT cheap!), then an Ilford AntiStaticum cloth, then Photosol PEC-12 film cleaning solution and PEC-Pads. You will need at least one of these to clean your slides and negatives.)
> A clean, relatively dark area in which to work (ALL stray light should be kept away from the front element of your lens. The lens should be SPOTLESS, front and rear.)
My next post will concentrate on the macro copy photography. Subsequent posts will concentrate on post-processing.
Mar 15, 2021 11:51:50 #
Here is a quick test I did as a proof of concept with the equipment on hand.
I used a D610 with a 105mm f/2.8 macto (Lester Dine) on a tripod. For a light source I used my Inspiron 5402 with a calibrated screen (Datacolor Spyder X) displaying an empty white folder. I laid a 35mm scanner film holder against the surface of the screen and focused the macro on the film as closely as I could. The room lighting is not bright.
The focus on the negative is a little off because both the tripod and the rolling table holding the laptop were on carpet. A firmer base will made this easier. Locking the mirror up and using the timer would also have helped.
Because the film was too close to the screen you can see the pixel pattern behind it. It would have been beyond the DOF if I had separated the film more from the screen and used a wider aperture.
I don't think that color should be a problem since the calibrated screen provides a reasonably neutral white source.
The image of the negative was taken with Aperture priority at 1/10s @ f/8 ISO 800.
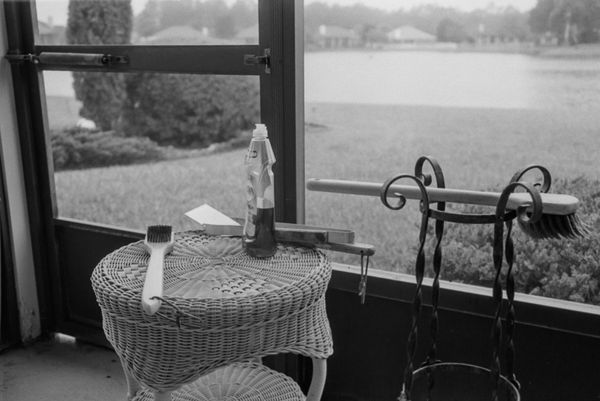
I converted the raw negative image to positive using Picture Window Pro where I also converted it from negative to B&W positive. I made no effort to adjust the contrast, highlights or shadows.
So the process works fine. All I need now is a way to separate the negative from the screen and a steadier platform for the laptop and the camera.
I just need to learn how to get the shadows and highlights right.
I used a D610 with a 105mm f/2.8 macto (Lester Dine) on a tripod. For a light source I used my Inspiron 5402 with a calibrated screen (Datacolor Spyder X) displaying an empty white folder. I laid a 35mm scanner film holder against the surface of the screen and focused the macro on the film as closely as I could. The room lighting is not bright.
The focus on the negative is a little off because both the tripod and the rolling table holding the laptop were on carpet. A firmer base will made this easier. Locking the mirror up and using the timer would also have helped.
Because the film was too close to the screen you can see the pixel pattern behind it. It would have been beyond the DOF if I had separated the film more from the screen and used a wider aperture.
I don't think that color should be a problem since the calibrated screen provides a reasonably neutral white source.
The image of the negative was taken with Aperture priority at 1/10s @ f/8 ISO 800.
I converted the raw negative image to positive using Picture Window Pro where I also converted it from negative to B&W positive. I made no effort to adjust the contrast, highlights or shadows.
So the process works fine. All I need now is a way to separate the negative from the screen and a steadier platform for the laptop and the camera.
I just need to learn how to get the shadows and highlights right.
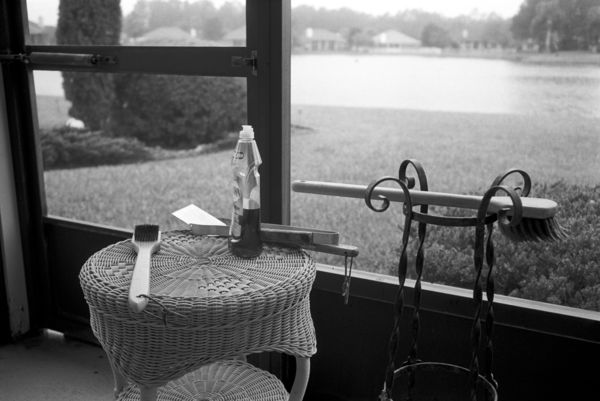
Scanned with Coolscan 9000 at 4000 ppi, 5620x3753 and developed in Capture One
(Download)
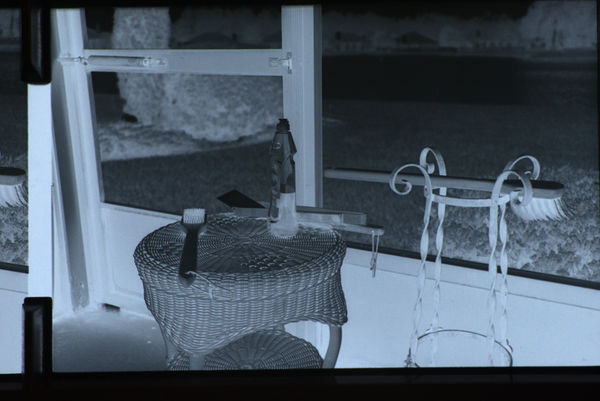
Negative image (no color adjustment), 6034x4028
(Download)
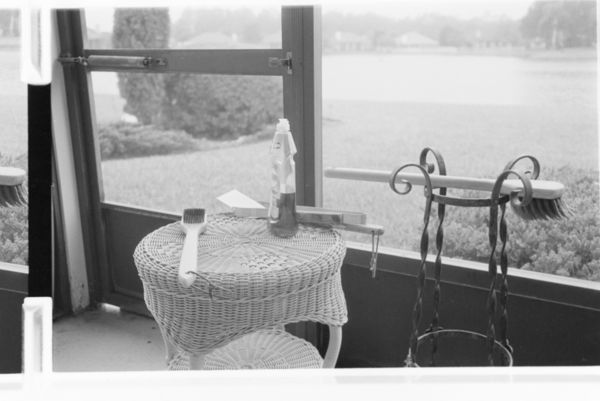
Positive image with no adjustments
(Download)
Mar 15, 2021 12:38:20 #
selmslie wrote:
Here is a quick test I did as a proof of concept w... (show quote)
Nice proof of concept!
I pulled your negative image into Lightroom Classic and ran it through Negative Lab Pro plug-in with a few tweaks. I made no attempt to match your Nikon scan, but could have come very close to it. Working from raw would have yielded substantially more detail.
My next couple of posts should clarify some things.
Mar 15, 2021 12:45:00 #
burkphoto wrote:
Nice proof of concept!
I pulled your negative image into Lightroom Classic and ran it through Negative Lab Pro plug-in with a few tweaks. I made no attempt to match your Nikon scan, but could have come very close to it. Working from raw would have yielded substantially more detail.
My next couple of posts should clarify some things.
Once I get the bugs worked out I will use my A7 II (monochrome) on some B&W negatives, same resolution without the Bayer array. Then I’ll try the Z7 for color.
Mar 15, 2021 13:13:23 #
Once you have a reasonably decent setup, comes the actual macrophotography of the negative or slide.
> CLEAN YOUR FILM. Unfortunately, there is no "Digital ICE" or infrared dust-removal mechanism here. You will have to spot out anything you didn't clean off your film before copying it. It is MUCH more efficient to get the dust, dirt, fingerprints, food, mold, or goo off the film before copying! Just be GENTLE.
> Be sure the sensor of the camera is "plano-parallel" to the film. This keeps sharpness the same across the entire image.
> Be sure the EMULSION (dull) side of the film FACES THE CAMERA. Yes, this will yield a mirror image of the negative, which you can flop in post-production software so it is "right reading" again.
WHY DO THIS EXTRA STEP? Well, all optical printing processes are "emulsion to emulsion" for a reason: You don't want a gelatin film base between your image and the sensor, the duplicating film, or the paper. It reduces sharpness! This is one of many procedures that maximize quality. There is a good chance that your camera autofocus will see the base instead of the emulsion if you are photographing THROUGH the base. That puts the emulsion (image) out of focus.
> Use your camera's best (native) ISO, which is usually the lowest one without any highlight or shadow compensation.
> Record raw files if you have the means to post-process them (which you will NEED if you work with negatives).
> Expose to the right! I like to meter through a clear piece of whatever film I'm copying, and set exposure for a histogram that spikes "up against the right wall of the graph." Then, because I'm recording raw files, I give it another half stop or more!
> Use manual focus with auto-assist, if your camera and lens allow that. Use focus peaking if you have that feature.
> If your film is truly FLAT, and your setup maintains plano-parallel alignment, then use a moderate aperture. Best results are usually 2-3 stops down from wide open.
My equipment has performed best like this:
> Full frame camera with 50mm f/2.8 EL-Nikkor enlarging lens on bellows or 55mm f/2.8 Micro Nikkor — f/8.
> APS-C Canon with 100mm macro — f/5.6.
> Micro 4/3 Lumix with 30mm f/2.8 — f/4.
WHY SUCH WIDE APERTURES? I've seen diffraction limit sharpness at much smaller apertures (f/16, f/11, f/8, on those formats, respectively). Most lenses resolve their best, with fewest issues (coma, astigmatism, vignetting, flare, chromatic aberrations, and diffraction) at one to three stops down from wide open. Call me picky, but between copying tens of thousands of slides in the 1980s and doing lots of "camera scanning" work since the dawn of the digital age, these apertures have become the rules of thumb for me.
> Lock up the mirror if using a dSLR with mirror lockup feature. This avoids vibration from mirror slap.
> Use the "silent mode" electronic shutter if using a mirrorless camera with that feature. This gets rid of mechanical shutter shock entirely.
> Use the self timer, a smartphone app, a remote control, or a cable release to avoid camera vibration.
> Be sure your rig is rock-solid.
> Shroud the area below the lens with black cloth or something that keeps stray light from glancing off the film into your lens.
> Include a little clear film base beside the image, if your negative holder allows. This is important for white balancing in post-production, especially when using Negative Lab Pro plug-in in Lightroom Classic.
> I generally use the SAME exposure for every negative on a roll, unless there is severe overexposure. Remember, what is dark on the negative will be a highlight or white in your final image, so avoid underexposure when copying negatives. Expose to the right.
WHY ALL THE SAME? This is a habit from the days when I copied thousands of color slides onto Kodak Ektachrome 5071 duplicating film. To make accurate copies of originals, the exposure and color filtration of the light had to be calibrated to a slide of a 21-step gray scale with RGBCMY color patches. Once I had the exposure and filtration correct, all copies made at those settings matched as closely as possible. The same logic appears applicable to digital, even though we have the greatly expanded latitude of raw capture.
> I usually perform a custom white balance through a clear piece of the same developed film I'm copying, ESPECIALLY if I'm making quick JPEGs of slides. With post-processing in Lightroom, I'll get better color if I start closer to best!
Copying film goes quickly, once I get into a rhythm with it. After setup, it becomes "Clean, insert, focus, expose, remove, repeat."
More to come on post-processing.
Mar 15, 2021 13:58:05 #
burkphoto wrote:
> Expose to the right! I like to meter through a clear piece of whatever film I'm copying, and set exposure for a histogram that spikes "up against the right wall of the graph." Then, because I'm recording raw files, I give it another half stop or more!.
The following is based on what we learned from Fred Picker who taught us how to make a "proper proof".
If you have a calibrated light source, you can set the exposure so that whatever comes through the film base+fog ends up at the highest raw value. That's not going to change from one frame to the next. RawDigger can help you get to a standard exposure for all of your images for that film and you won't need to meter it with your camera.
If you change to a different film you may need to remeasure this but it will remain the same.
And if you are using B&W film, it might be a little different with a different developer combination. And additional development might raise the level of film base+fog.
Mar 15, 2021 14:08:18 #
selmslie wrote:
Once I get the bugs worked out I will use my A7 II (monochrome) on some B&W negatives, same resolution without the Bayer array. Then I’ll try the Z7 for color.
That sounds like a good plan!
Most modern digital cameras are more than capable of resolving everything in a 35mm negative of ISO 100 or higher. I've generally had better results from camera scans than from flatbed scans.
I miss the Kodak Bremson HR-500+ lab scanners, though. They were made for scanning extreme detail, and they came with Digital ICE.
Mar 15, 2021 14:15:15 #
selmslie wrote:
The following is based on what we learned from Fre... (show quote)
Exactly right! I have a Fred Picker book in my basement. His approach got me on the right path to copying slides back in the '80s. It transfers well to digital camera film scanning.
I'm amazed at how many folks set their cameras on automatic exposure plus auto white balance and copy their film, then whine about inconsistent results. They're just making extra work for themselves, while chasing their tails. Find the sweet spot, lock it down, and perhaps re-evaluate when changing emulsions.
If you want to reply, then register here. Registration is free and your account is created instantly, so you can post right away.