To FLASH or not to FLASH!
Oct 29, 2020 12:01:01 #

Oct 29, 2020 12:53:06 #
anotherview wrote:
https://www.kenrockwell.com/tech/digital-killed-my-tripod.htm
Shooting small objects like jewelry, I would rather use a tripod even if I was shooting with strobes and didn't need it to freeze motion. It's just easier to compose and focus.
Oct 29, 2020 13:16:27 #
amfoto1
Loc: San Jose, Calif. USA
Kaowdo wrote:
I'm a senior, and I'm very new to all this. I got a Canon DSLR SL1 to take jewelry photo's. I got a very nice 'light tent'...with built in lights. My Camera did not come with a flash attachment. I've been reading up on Aperatures. Less Aperatures...more light. Should I get a flash attachment, or can I make it work with using Aperatures?
Thanks in advance
Thanks in advance
You are correct that smaller lens apertures require "more light".
However, there are several ways to achieve that.... flash isn't the only option. You also can increase your camera's sensitivity and/or lengthen the exposure..
You say you'll be using a light tent that has built in lights. Those will probably be more than sufficient... HOWEVER, you will probably need to boost your ISO and/or use a slower speed.
You probably should take care not to use too high an ISO, because that will introduce digital "noise" into your images, which can make them look ugly. High ISOs also reduce the camera's effective dynamic range. So stay as close to the camera's native 100 ISO as possible, but experiment with ISO 400, ISO 800... maybe even ISO 1600 or higher. Some cameras handle higher ISOs better than others. It also depends upon how the images will be used. If they will be downsized for fairly low resolution online display, you can get away with a lot higher ISO than if you are trying to make large, high quality prints or commercial photos for use in ads.
In order to use small apertures with moderate ISOs, the best solution is probably to use longer exposure... slower shutter speeds. I believe your camera can take as long as 30 second exposures. Beyond that you'd need to set it to "B" ("bulb") and timing the exposure yourself or using some sort of timing device. It probably won't be necessary to use nearly this long exposures, though.
However, long exposures present a problem keeping the camera steady. Even if your lens has image stabilization, that can only help so much. You might be able to hand hold 1/15 second exposures (depending upon focal length and your skill holding steady shots).... but not 1 second, 2 second, 4 second and such.
GET A TRIPOD. That will be your most valuable tool doing these jewelry shots. I'd recommend investing in a quality tripod.... spending more than you would like to get a good one... because it can literally last a lifetime, serve with future cameras, serve the purpose well, hold up to regular use and will be more of a pleasure to use so you will be more likely to actually use it. There are resources online to help with tripod selection, which can cost everywhere from $25 to $2500. (Sub $100 tripods are typically junk. $101 to $200 are marginal, but might do the job with a small, lightweight camera like the SL1... I normally recommend planning to spend around $400 for a good quality tripod, but more than that for larger, heavier gear.)
Once you have a tripod to use, you'll be able to use slower shutter speeds that will solve your exposure problems.
I don't have an SL1, but all Canon I've used have had a feature called "Long Exposure Noise Reduction" (LENR). This can be used if you wish, but it's very important to understand how it works. First, when it's enabled in the menu, LENR will only work on exposures 1 second or longer. What it does is actually make two exposures.... the first one being your "standard" shot. But then the camera needs to take a second "blank" exposure with the shutter closed. This second shot is used to identify noise in the image which it will subtract from the first image. But a lot of people get confused what their camera is doing when they have LENR enabled. It's easy to forget you turned it on, too, since doesn't do anything when shooting with more "normal" shutter speeds faster than 1 second. You have to trip the shutter twice when LENR is activated. In the case of a 1 second shutter speed, it will make two 1 second shots... first the normal shot, then the "blank" shot. Don't forget this is happening and wonder why you only have half the shots you thought your were taking. Also, IF YOU FAIL TO TAKE THE SECOND SHOT, the first shot is discarded and you'll be scratching your head about why you have no images. But, sometime you may wish to stop the process (and discard the first image), so be aware LENR can be cancelled after the first shot by powering off the camera or removing the battery.
Another thing... You don't mention what type of lights your tent uses. But in most cases you will probably need to set a Custom White Balance. This insures accurate color rendition under those particular lights. It's really pretty easily done.... You simply take a test shot of a plain white card or neutral gray card under the lighting, then tell the camera to use that as a reference for it's white balance settings (color temp AND color tint... cyan/yellow axis AND magenta/green axis). There are a number of white balance "presets" on the camera (daylight, flash, tungsten, etc.), but those are just "best guesses" and rounded off settings. I don't recommend using them in most situations. Auto WB works well outdoors in full sun and with flash, but probably won't give very satisfactory results under your tent's lighting. Auto WB can be too cool in shady situations, too. I recommend you BUY a Kodak Gray Card (or similar) to set Custom WB. One side is gray, the other is pure white. Both sides can be used as a Custom WB target. Personally I prefer to use the gray side because it also helps me set an accurate manual exposure.
You'll need to check your camera manual (which can be downloaded from the Canon website if you don't have one) to see how to set exposure, LENR, Custom WB.
I assume your tent has "continuous lighting". One advantage of that over flash is that WYSIWYG... Continuous lights make it easy to preview how the image will look. It's a lot more difficult to predict your results with flash... and sometimes there are unpleasant surprises! There are various types of continuous lights that fall into two general categories: hot lights and cool lights. For example, tungsten and halogen lighting is "hot"... it literally gets hot the longer it's on. Cool lights are LEDs and fluorescent.... they actually warm up a bit after being on for a while, but not to the extent that the others do. If yours are "hot" lights, be careful. They can cause damage to items (try photographing ice cream under them!). They also can burn skin and even start fires! Cool lights are generally safer, as well as use less power. Note: Flash has advantage of being more powerful for its size, compared to all types of continuous lighting. Flash also can overheat.
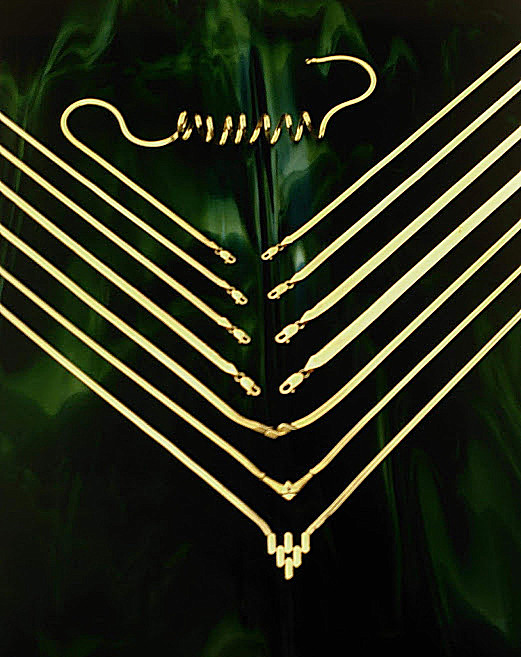
Jewelry can be tricky to photograph because it has a lot of reflective surfaces, may even use semi-transparent or transparent components (i.e., diamonds!) and part of the job photographing it is to catch the "sparkle". You'll need to experiment. I've done quite a bit of small product photography (though not a lot of jewelry) and really like to use ambient light whenever I can. I used to have a working space with wonderful north light, which is ideal for that purpose. I used various reflectors and flags to bounce or block light, as needed.
Below are a couple examples of products (soaps, in this case) shot by window north light...
 [img]https://live.staticflickr.com/8357/8344442306_ecbcd21037.jpg[img]
Below are two examples using lower power, continuous lighting with transparent objects...


The left hand image was illuminated from below, through a transparent table top. The right hand image was back lit. Both images had black "flags" off to the sides to add some dimensionality to the clear objects. White flags or reflectors can be used too. I wish I'd used one to bounce the light in the image below, to make the wine bottle stand out against a darker background (also would have opened up the shadows on the instructor's face, arm and hand).

There was an interesting article at the Petapixel website recently about using a single light for a product shot. It involved taking a number of images and then assembling them into one final image in Photoshop. Looks great, but a lot of work that a carefully planned setup using multiple light sources, flags and/or bounce cards or reflectors might have accomplished in a single shot (the way we pretty much had to do it with film!): https://petapixel.com/2020/10/22/capture-awesome-whiskey-product-shots-with-only-one-light/
There are many other product photography tutorials online that I'd suggest you start perusing. They'll be helpful. I'm sure you can find some that are specific to jewelry, though other types of products present similar challenges (hmmm.... I seem to be fixated on drinking, with the links here
 )... https://petapixel.com/2020/10/27/five-tips-for-better-beverage-photos-from-steve-giralt/ and [url]
Oct 29, 2020 13:17:24 #

JohnSwanda wrote:
Shooting small objects like jewelry, I would rather use a tripod even if I was shooting with strobes and didn't need it to freeze motion. It's just easier to compose and focus.
Exactly!
Easier to get repeatable results.
Oct 29, 2020 13:31:01 #
amfoto1 wrote:
...hmmm.... I seem to be fixated on drinking, with the links here ...
... I've always heard it's good to stay hydrated.
Oct 29, 2020 14:19:13 #

Perhaps some folks here are missing the point or not explaining things so that an inexperienced photographer can understand. There are lots of good theories and tips suggested but there are fragments of the information that the OP needs to solve her question and accomplish the task she needs to do, which is light and shoot highly polished or reflective items.
Flash is a perfectly good light source for this work providing the flash equipment used has a modelling lamp, is properly positioned, off-camera, and diffused. An on-camera or built-in pop-up flash is not applicable to this work. Other continuous light sources can be used as well such as tungsten, quartz to LED sources as long as the white balance is adjusted for that source. The modelling lamp in a monolight type flash will allow the photographer to SEE the light which is essential for this kind of work.
So, here's the nuts and bolts drill.
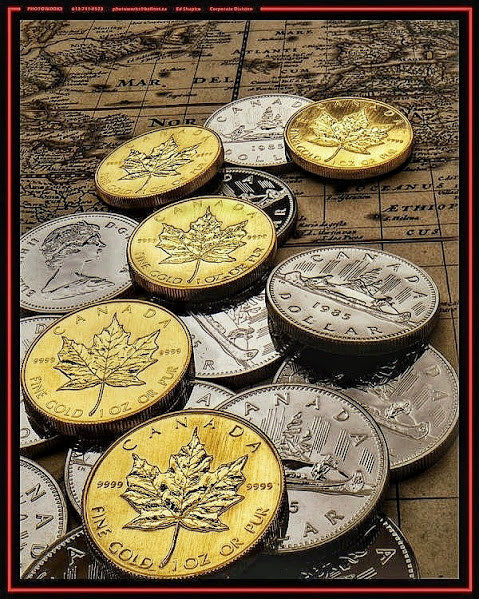
When your photography a highly polished surface or even a mirror, you are really taking a picture of the light source, or more specifically, a reflection of the light source that has to define the shape. texture and contours of the item. The only important underlying theory to grasp is the ANGLE OF INCIDENCE. The Theangle of incidence is equal to the angle of reflection. The "trick: is to place the light source and the camera in such a way that the camera SEES the reflection of the light source or NOT. Sounds weird? Let me explain. I will attach my shot of gold and silver coins to illustrate this procedure.
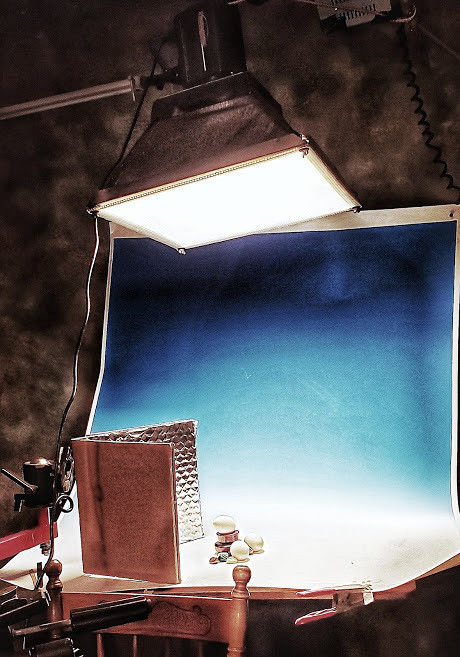
Some of the coins show as gold and silver metals- they have reflected the light source back to the camera and this is called a LIGHT FIELD. A few of the coins (underneath) did not, so they look BLACK. There is enough light to provide exposure but these coins did not reflect the image of the light source back at the camera. This is called a DARK FIELD. If I had tilted those coins slightly and altered the reflection they would have been in a light field. Sometimes as a piece of jewelry requires both fields because if it is all in a light field, you won't see its shape or might blend into a light background. I will attach a BASIC light diagram and a shot of the setup that will allow the photographer to control all of this visually and shoot successfully.
The OP mentioned that she has a "lightbox". I don't know if the means a softbox or a tent-like box intended for shooting small objects. The setup I am recommending favours a softbox because it is more compatible with the aforementioned controls.
The setup consists of a monolight in a softbox, suspended over the set and a simple reflector or two for fill in. In effect, you are creating a "ten"t but there's more control in adjusting the position of the main light. The light is placed above and slightly behind the item with the edge of the beam tilted slightly the camera so it strikes the reflector(s). For most jewelry items a 24" softbox is sufficient.
DIFFUSION: A softbox is a diffused light source. The flash is bounced from the interior of the box and is further diffused by a scrim (sometimes 2) scrims at the front of the box. REMEMBER- you are photographing a reflection, sometimes a mirror-like image of the light source. If it is not a broad and diffused source, it will appear as a hot spot or undesirable reflection in a dark field.
A monolight rated about 300 to 500 watt-seconds will produce sufficient light to accommodate stopping down the aperture for sufficient depth of filed at low IOS settings for sharp and noiseless images. When an electronic flash is the main and only light source governing exposure it will freeze any kind of vibration or camera movement.
Flash is a perfectly good light source for this work providing the flash equipment used has a modelling lamp, is properly positioned, off-camera, and diffused. An on-camera or built-in pop-up flash is not applicable to this work. Other continuous light sources can be used as well such as tungsten, quartz to LED sources as long as the white balance is adjusted for that source. The modelling lamp in a monolight type flash will allow the photographer to SEE the light which is essential for this kind of work.
So, here's the nuts and bolts drill.
When your photography a highly polished surface or even a mirror, you are really taking a picture of the light source, or more specifically, a reflection of the light source that has to define the shape. texture and contours of the item. The only important underlying theory to grasp is the ANGLE OF INCIDENCE. The Theangle of incidence is equal to the angle of reflection. The "trick: is to place the light source and the camera in such a way that the camera SEES the reflection of the light source or NOT. Sounds weird? Let me explain. I will attach my shot of gold and silver coins to illustrate this procedure.
Some of the coins show as gold and silver metals- they have reflected the light source back to the camera and this is called a LIGHT FIELD. A few of the coins (underneath) did not, so they look BLACK. There is enough light to provide exposure but these coins did not reflect the image of the light source back at the camera. This is called a DARK FIELD. If I had tilted those coins slightly and altered the reflection they would have been in a light field. Sometimes as a piece of jewelry requires both fields because if it is all in a light field, you won't see its shape or might blend into a light background. I will attach a BASIC light diagram and a shot of the setup that will allow the photographer to control all of this visually and shoot successfully.
The OP mentioned that she has a "lightbox". I don't know if the means a softbox or a tent-like box intended for shooting small objects. The setup I am recommending favours a softbox because it is more compatible with the aforementioned controls.
The setup consists of a monolight in a softbox, suspended over the set and a simple reflector or two for fill in. In effect, you are creating a "ten"t but there's more control in adjusting the position of the main light. The light is placed above and slightly behind the item with the edge of the beam tilted slightly the camera so it strikes the reflector(s). For most jewelry items a 24" softbox is sufficient.
DIFFUSION: A softbox is a diffused light source. The flash is bounced from the interior of the box and is further diffused by a scrim (sometimes 2) scrims at the front of the box. REMEMBER- you are photographing a reflection, sometimes a mirror-like image of the light source. If it is not a broad and diffused source, it will appear as a hot spot or undesirable reflection in a dark field.
A monolight rated about 300 to 500 watt-seconds will produce sufficient light to accommodate stopping down the aperture for sufficient depth of filed at low IOS settings for sharp and noiseless images. When an electronic flash is the main and only light source governing exposure it will freeze any kind of vibration or camera movement.

Oct 31, 2020 22:26:39 #

dat2ra wrote:
Agree with quix. Use your light tent. Flash will produce unpredictable reflections. And shoot from a tripod.
I don't understand what you mean about unpredictable reflections. If you use the light tent correctly using hot lights, digital or flash should NOT make any difference. The light intensity hitting the subject would all be the same. Nice diffused soft lighting with great diffusion transfer. The only reflections would come from any facets on the jewels. You control that angle of reflection by moving the jewel around. Any reflective surface will produce highlights.

If you want to reply, then register here. Registration is free and your account is created instantly, so you can post right away.