Not sure what to do here
Mar 18, 2020 12:06:00 #

I have an image that frankly, I like but that has problems. I'm working on them. For this image I've actually taken two different directions. I'd like suggestions on perhaps other routes I might take here, or what else I might try. THANKS!
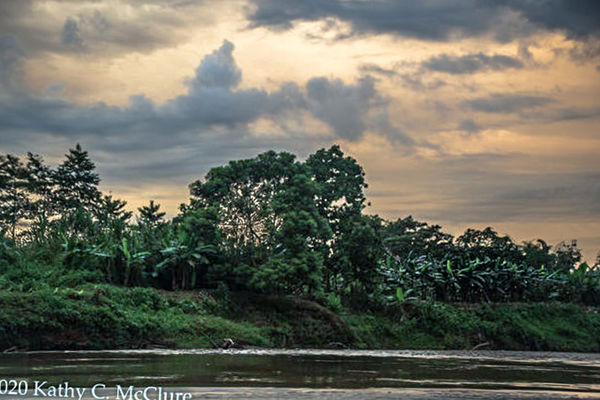
original RAW converted to jpeg with no editing
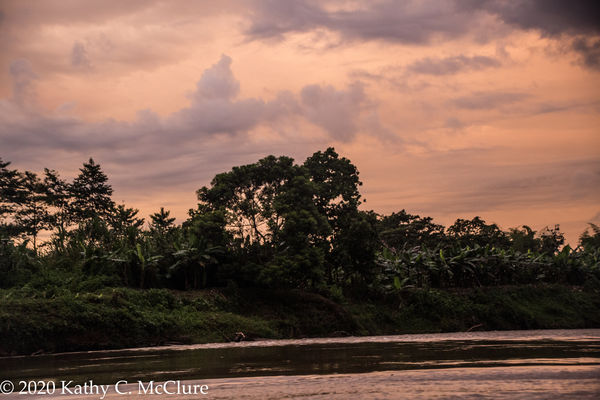
(Download)
In LR, lightened shadows, applied clarity, sharpening and contrast
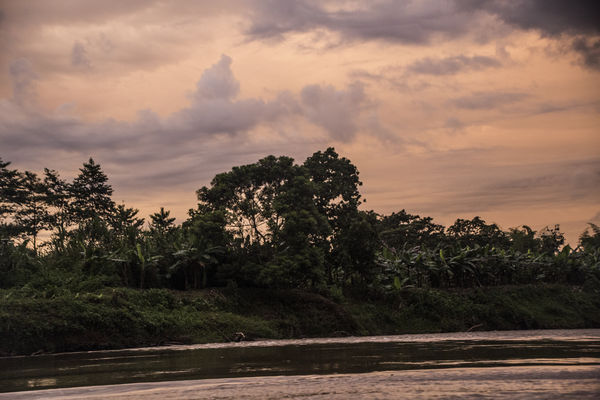
(Download)
Took LR image into NIK and applied a "dark contrasts" filter. Might now be too dark.
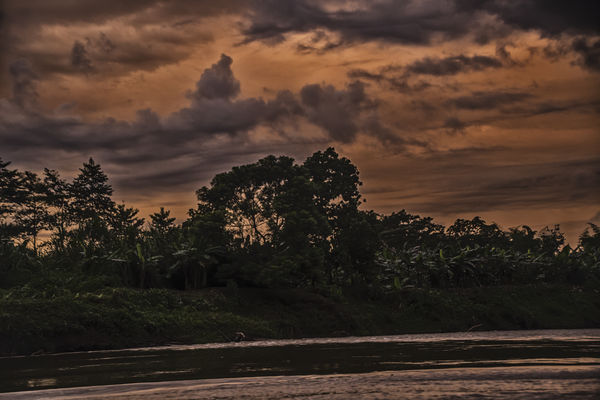
(Download)
Mar 18, 2020 12:13:32 #
AzPicLady wrote:
I have an image that frankly, I like but that has problems. I'm working on them. For this image I've actually taken two different directions. I'd like suggestions on perhaps other routes I might take here, or what else I might try. THANKS!
What is wrong in your eyes with the original RAW converted to jpeg with no editing?
Mar 18, 2020 12:15:07 #

Mar 18, 2020 12:24:49 #
Fotoartist wrote:
What is the center of your interest?
The colour in the sky
Mar 18, 2020 12:25:07 #
PixelStan77 wrote:
What is wrong in your eyes with the original RAW converted to jpeg with no editing?
Not sure. I just felt it needed something.
Mar 18, 2020 12:53:03 #

Hi Kathy. I suspect that this photo represents a memory for you that is not going to translate to others. What did that moment feel like? Was it warm and sultry, a satisfying end to a rewarding day? Sitting at the river's edge, you looked up to find this beautiful sky that seemed to reflect how you were feeling in the moment?
If any or all of that is true, then I think your dark contrasts edit is off the mark. I can post an alternate version if you give me the OK.
If any or all of that is true, then I think your dark contrasts edit is off the mark. I can post an alternate version if you give me the OK.
Mar 18, 2020 13:12:34 #
Kathy,
There is good stuff hidden in your original photo. I threw the original into Lightroom and moved a few sliders and did some dodge and burn. I'll take the liberty of showing you what's hidden. And if you PM me, I'll be glad to tell you, more specifically what I did.
Barry
There is good stuff hidden in your original photo. I threw the original into Lightroom and moved a few sliders and did some dodge and burn. I'll take the liberty of showing you what's hidden. And if you PM me, I'll be glad to tell you, more specifically what I did.
Barry
Mar 18, 2020 13:13:36 #
Linda From Maine wrote:
Hi Kathy. I suspect that this photo represents a memory for you that is not going to translate to others. What did that moment feel like? Was it warm and sultry, a satisfying end to a rewarding day? Looking up to find the beauty of nature in the sky colors that reflected how you were feeling?
If any or all of that is true, then I think your dark contrasts edit is far off the mark. I can post an alternate version if you give me the OK.
If any or all of that is true, then I think your dark contrasts edit is far off the mark. I can post an alternate version if you give me the OK.
Yes, Linda, it is a good memory, mostly of the simple beauty of the moment. By all means, post your version, but give details of what you did.
Mar 18, 2020 13:16:35 #
bbrowner wrote:
Barry, that's really pretty and a totally different mood than the actual. Yes, I would like to know what you did. Either send me a PM or simply post it here.Kathy,
There is good stuff hidden in your original photo. I threw the original into Lightroom and moved a few sliders and did some dodge and burn. I'll take the liberty of showing you what's hidden. And if you PM me, I'll be glad to tell you, more specifically what I did.
There is good stuff hidden in your original photo. I threw the original into Lightroom and moved a few sliders and did some dodge and burn. I'll take the liberty of showing you what's hidden. And if you PM me, I'll be glad to tell you, more specifically what I did.
Moderator note: in Post Processing Forum we encourage learning/teaching, so please post editing information here - for the public's benefit

Mar 18, 2020 13:21:06 #
AzPicLady wrote:
This may look too yellow for what you remember as the reality. My edits are influenced by thinking this might have been taken in Ecuador, so right or wrong, I made it lusher and warmer. Since you mentioned the sky as being most important, I cropped out the river.Yes, Linda, it is a good memory, mostly of the simple beauty of the moment. By all means, post your version, but give details of what you did.
- Two Nik Color Efex filters: color contrast range (yellow-green) and skylight.
- Separate empty layer to "dodge" some selective lightening into some of the foliage using very low opacity brush in white, with the layer set to overlay blend mode.
- Un-birds added (free from brusheezy.com)
I always place my stamp-brush birds, trees and other stuff on separate layers for easy removal, re-size, flipping orientation etc.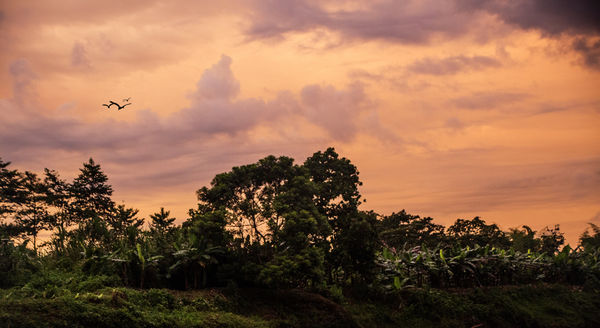
Mar 18, 2020 13:22:18 #
bbrowner wrote:
Barry, in Post Processing Forum we encourage learning/teaching, so please post your steps here - for the public's benefit ... if you PM me, I'll be glad to tell you, more specifically what I did.
Mar 18, 2020 13:31:34 #
AzPicLady wrote:
Barry, that's really pretty and a totally different mood than the actual. Yes, I would like to know what you did. Either send me a PM or simply post it here.
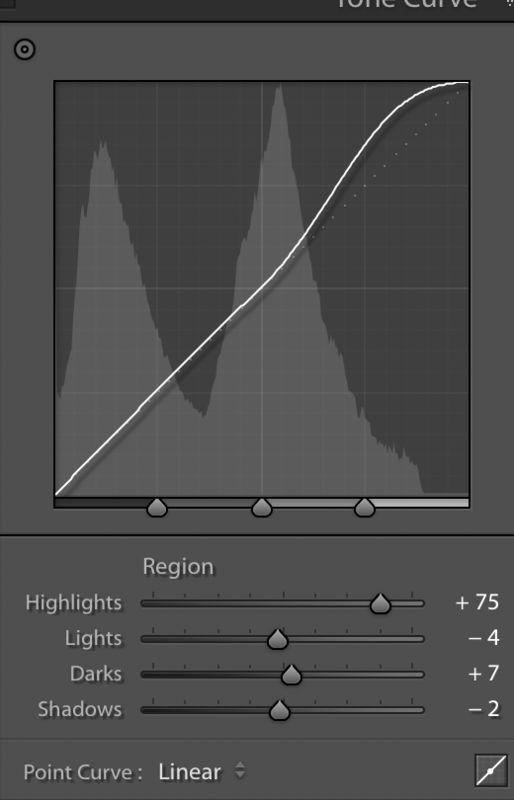
Of course, I don't know the atmosphere that you saw. But here are a couple of screen shots of my LR sliders (Basic & Tone Curve) after I played with it. I also used the local adjustment brush to dodge & burn different areas. It's not any better than yours... but it's my work flow. I wasn't there!
Oh yes... I used the White Balance eye dropper to get close to mid-70s (R,G,B) as I could find.
Barry
Mar 18, 2020 13:32:23 #
Cany143
Loc: SE Utah
Countless ways to go to where you want to get, Kathy, but only one of those will be right for you. An image -- a photograph-- doesn't necessarily need to have a center of interest, or even have an ostensible subject (and by 'subject,' I mean person, place or thing) for it to be descriptive, emotive, or even evocative of a subjective experience. Sometimes, all that's required is composition and color.
I rather like your unedited raw version. I like it because of its uniform, and somewhat muted, palette. True, I'd like to see the shadow areas lifted a bit, but locally, and mainly in the trees/foliage --and potentially only much, much less in the sky or the water--, though not as much as you had in your first edit. Again, any number of ways to do so, but if you did nothing more than apply #2 as a layer over #1, then either mask or color select the tree portion, possibly increase the contrast a bit, and decrease #2's opacity, I think you'd be there.
#3 does not work at all. Its not so much a matter of its darkness or contrast, its the halo-ing that has resulted.
Mar 18, 2020 13:48:59 #

I'm assuming that what you saw was a rich sunset. Even if realism is your preference, sunsets usually benefit from having things ramped up a bit. To cut a long story short, my ramping up didn't look right until I desaturated and lifted the shadows in the right hand side of the sky.
Sometimes that's the way to go - do your ramping up until most of the pic looks OK then mitigate in the areas where it doesn't look OK. Pushing and mitigating will get you closer to an optimised shot - much better than pushing until the first sign of trouble then backing off.
.
Sometimes that's the way to go - do your ramping up until most of the pic looks OK then mitigate in the areas where it doesn't look OK. Pushing and mitigating will get you closer to an optimised shot - much better than pushing until the first sign of trouble then backing off.
.

Mar 18, 2020 17:28:20 #
AzPicLady wrote:
I have an image that frankly, I like but that has problems. I'm working on them. For this image I've actually taken two different directions. I'd like suggestions on perhaps other routes I might take here, or what else I might try. THANKS!
I liked your original sky In the first image. On my screen I see something happening to the sky any you've lost some depth.
I played with it a bit but I will let you decide the proper moves as i mention my steps.
I don't think you like Photoshop and layers but here is one that I think I can walk you through.
I am writing this up directed at a photoshop beginner. You might not be and it will be very basic to many readers but for anyone new to layer it might help them understand why they might want to learn Photoshop.
Start in Lightroom go to Edit in>Photoshop
Your photoshop will open and you will see your first layer marked Background
If you don't see layers go to Window> and click layers
Now make a duplicate layer (Command J)
Now open Camera Raw Filter (Filter>Camera raw Filter)
Here I want you to only pay attention to your trees, grass and bushes. Make all the moves you would normally do in Lightroom. (Shadows, Texture, Clarity, whites and blacks) Remember everything is going to be affected but you only play attention to the green area, trees and bushes, you will see why in steps to come. Once you are happy hit OK
Here is where Photoshop show it's stuff.
Go to Select>Color Range
New screen comes up use the eyedropper and click on the bushes. Not everything will be selected yet. Click the eyedropper with the +. Click on some additional areas in the green area. Set your Fuzziness: to 105. Click OK
Now what you will see is called marching ants. At the lower right you click on the box with the circle in it. This will make a mask and only show the correction on your trees and bushes.
Now click your paint brush on the left side. Click the letter D this will set your color to white or black.
You want a black brush and your brush should be soft round at 85% You can see this is you click on the third icon from your top left. Hope you found it.
Now move over to the Black and white mask and click. On your image you will want to paint over a couple of the areas that had changed but you don't changed. Paint over the top right in you picture and as you do you will see the same are but white on the mask start to fill in. I also suggest you paint over all the water it was fine in the first picture.
As you paint remember white reveals and black conceals.
You're done. if you save at this point it should save automatically to your Lightroom as a duplicate file. This file will be a .psd file (Photoshop) but that's ok you can export in any format you need in Lightroom
I'll be happy to show my edits if you would like.
Jim
If you want to reply, then register here. Registration is free and your account is created instantly, so you can post right away.