How would you change this poor capture into something of some interest?
Feb 1, 2020 12:58:10 #

I took this capture in 2013.
Context:
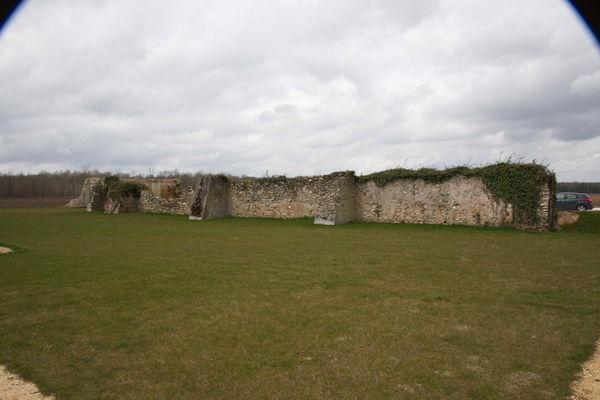
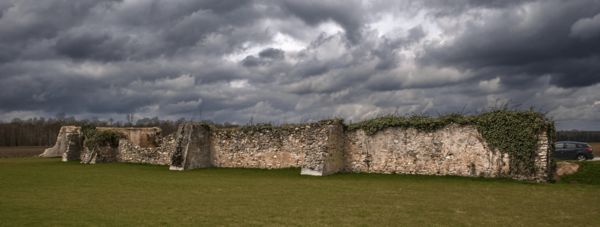
WWi memorial.
This is what is left of farm that was the HQ for an Alabama division that was decimated in the fields surrounding the area. Over 15,000 soldiers died, both Allied and German.
Leave the car as it has a 'hidden value'. It was driven by a family member of a person who died not far from here.
Tech data:
D800e with a messed up 28~200mm lens
Overcast, after a rain storm
The light, from very diffused sun rays, came at an angle.
Issue, beside the messed up lens: Dust on the sensor.
Challenge:
Make the farm stand out.
Link to raw file (73MB)
Highly compressed JPG sample. Do not use it for modification.
-
Context:
WWi memorial.
This is what is left of farm that was the HQ for an Alabama division that was decimated in the fields surrounding the area. Over 15,000 soldiers died, both Allied and German.
Leave the car as it has a 'hidden value'. It was driven by a family member of a person who died not far from here.
Tech data:
D800e with a messed up 28~200mm lens
Overcast, after a rain storm
The light, from very diffused sun rays, came at an angle.
Issue, beside the messed up lens: Dust on the sensor.
Challenge:
Make the farm stand out.
Link to raw file (73MB)
Highly compressed JPG sample. Do not use it for modification.
-
Feb 1, 2020 13:40:05 #
Not quite "garbage in, garbage out" if you know what you are doing.
But yes, if the capture had been sharp, the only issue. This lens messed up 75% of the captures I did on this trip. The other 25%? A different prime lens.
But yes, if the capture had been sharp, the only issue. This lens messed up 75% of the captures I did on this trip. The other 25%? A different prime lens.
Feb 1, 2020 14:06:41 #

Feb 1, 2020 14:22:02 #

Two Nik Color Efex filters: Sunlight and Tonal Contrast, both at 60% opacity, and masked from much of the sky. PS Elements Unsharp mask at slider level 35, applied to just the building. I'll probably revisit after the bright sunlight leaves my own living room.
Thanks for the practice, Jacques.
Thanks for the practice, Jacques.
Feb 1, 2020 14:26:27 #

Rongnongno wrote:
......Challenge:
Make the farm stand out.......
Make the farm stand out.......
I don't see the result having much value, even with a successful edit. The shot may have documentary value, but only with a title and/or explanation. Apart from that there's not much visual interest and it's not particularly photogenic.
If your main interest is a more prominent wall it's a simple enough procedure to select it and add vividness. Another issue I see on closer inspection is colour noise, but that's easy enough to deal with if you have the appropriate tool.
Feb 1, 2020 14:38:06 #

Linda From Maine wrote:
Two Nik Color Efex filters: Sunlight and Tonal Contrast, both at 60% opacity, and masked from much of the sky. PS Elements Unsharp mask at slider level 35, applied to just the building. I'll probably revisit after the bright sunlight leaves my own living room.
Thanks for the practice, Jacques.
Thanks for the practice, Jacques.
Does that car belong in the edited result?

Feb 1, 2020 14:39:06 #
CHG_CANON wrote:
I'm simply following OP's instructions: Leave the car as it has a 'hidden value.' It was driven by a family member of a person who died not far from here.... Does that car belong in the edited result?
Feb 1, 2020 14:41:25 #
Linda From Maine wrote:
I'm simply following OP's instructions: Leave the car as it has a 'hidden value' It was driven by a family member of a person who died not far from here....
You can see I'm not following this one very closely. When I'm working on silk purses, the partially cut-off modern cars in historical settings go away.
Feb 1, 2020 15:09:51 #
kpmac wrote:
I don't see much to work with. Sorry.
That was my initial take six years ago.
Now? I see it quite differently.
Feb 1, 2020 15:12:24 #
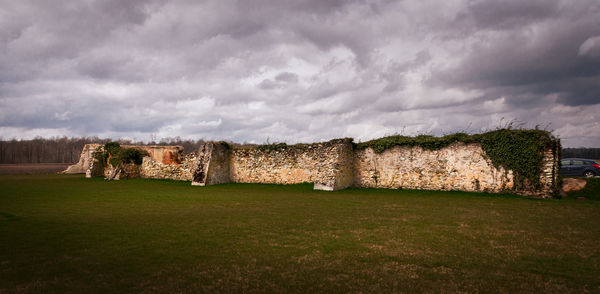
Given the gravity of the place, a bit of moodiness may be in order...
Feb 1, 2020 15:15:00 #
Since you folks are lacking some vision, let me give you a hint of what you can pull out of an image that initially has no value per the initial estimation - and mine at the time.
When I offer something there is a reason and here it is.
I will offer a how to later on, I am about to go on a date with my better half.
-
-
When I offer something there is a reason and here it is.
I will offer a how to later on, I am about to go on a date with my better half.
-
-
Feb 1, 2020 15:17:11 #
fuminous wrote:
Given the gravity of the place, a bit of moodiness may be in order...
And you are very close to what I had in mind.
Feb 1, 2020 15:21:05 #
fuminous wrote:
Now I see that my attempt to change the weather was very, very wrong Given the gravity of the place, a bit of moodiness may be in order...
 Great work, Stephen.
Feb 1, 2020 20:31:50 #
The process used in this capture is simple and complex at the same time.
It includes 6 pixel layers, 3 level layers and ACR filter used three times on different layers. Only two basic layer masks are used.
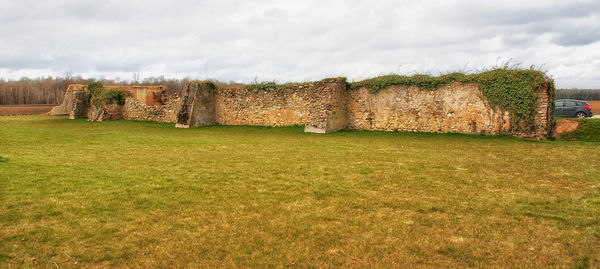
Initial perception:
- Crop
- The sky has to change, there is a potential in there.
- The wall is drab, it needs to stand up more, possibly warmer
- The grass has to change if the wall changes but not the same way
- The car? An argument to remove might be there but it is an integral part of the scene as explained in the initial post. It needs to be there and survive 'intact'.
Process making the selections:
- Duplicate the background layer. Correct color defringe using ACR
- Select the sky and isolate it meaning the sky will be a separate layer with its own adjustment.
- Select the wall and only the wall for the same reason as the sky (Layer)
- Select the grass... Actually I did not. I used the sky selection to create the grass selection (inverted the sky selection) Layer
Working on each selection...
- Sky
- All layers are active
- Create a dust removal layer first and use it to remove the flaws non destructively
- Create a sky level tied to the layer below it. Adjust as needed while looking at the overall effect (hence the all layers active)
- Grass
- The wall layer is not active
- Create a level layer tied to grass layer. Adjust as needed.
- Create a mask on the grass layer, not the level layer. Mask out the fringing and the car area.
- Wall
- All layers active
- Use ACR to sharpen the wall
- Create a level layer tied to the wall layer, Adjust as needed.
- On the level layer create the mask to remove fringing
Done
Are there flaws in There?
Yes.
- One is the line of trees in the background. It seems to give depth to the tree line (layered height) in reality these are the same tree with a fringe. It works with the image so I left that alone.
- Second there is some fringing on the wall due to an imperfect sky selection. Even at 100% this is not visible unless pointed out so, is it worth the effort to correct this? Not in my opinion.
- I am sure you will find more flaws but think 'Is it worth the effort to correct them?'
Anyway, from a so-so capture to a relatively decent image one can learn quite a bit.
Link to PSD file (500MB)
It includes 6 pixel layers, 3 level layers and ACR filter used three times on different layers. Only two basic layer masks are used.
Initial perception:
- Crop
- The sky has to change, there is a potential in there.
- The wall is drab, it needs to stand up more, possibly warmer
- The grass has to change if the wall changes but not the same way
- The car? An argument to remove might be there but it is an integral part of the scene as explained in the initial post. It needs to be there and survive 'intact'.
Process making the selections:
- Duplicate the background layer. Correct color defringe using ACR
- Select the sky and isolate it meaning the sky will be a separate layer with its own adjustment.
- Select the wall and only the wall for the same reason as the sky (Layer)
- Select the grass... Actually I did not. I used the sky selection to create the grass selection (inverted the sky selection) Layer
Working on each selection...
- Sky
- All layers are active
- Create a dust removal layer first and use it to remove the flaws non destructively
- Create a sky level tied to the layer below it. Adjust as needed while looking at the overall effect (hence the all layers active)
- Grass
- The wall layer is not active
- Create a level layer tied to grass layer. Adjust as needed.
- Create a mask on the grass layer, not the level layer. Mask out the fringing and the car area.
- Wall
- All layers active
- Use ACR to sharpen the wall
- Create a level layer tied to the wall layer, Adjust as needed.
- On the level layer create the mask to remove fringing
Done
Are there flaws in There?
Yes.
- One is the line of trees in the background. It seems to give depth to the tree line (layered height) in reality these are the same tree with a fringe. It works with the image so I left that alone.
- Second there is some fringing on the wall due to an imperfect sky selection. Even at 100% this is not visible unless pointed out so, is it worth the effort to correct this? Not in my opinion.
- I am sure you will find more flaws but think 'Is it worth the effort to correct them?'
Anyway, from a so-so capture to a relatively decent image one can learn quite a bit.
Link to PSD file (500MB)
Feb 1, 2020 20:34:18 #

Rongnongno wrote:
The process used in this capture is simple and com... (show quote)
Thanks for telling us how you did it.
If you want to reply, then register here. Registration is free and your account is created instantly, so you can post right away.