Please help me sharpen these
Jan 24, 2020 17:52:51 #

In PS Elements is an "Adjust Sharpness" window with sliders I never tried 'til a few days ago. In the past I either used the sharpen tool selectively in small areas, or went with my preferred softer, glowing, texturized artsy look 
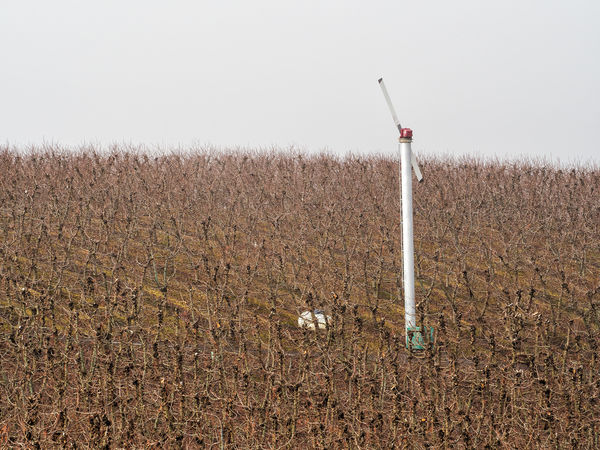
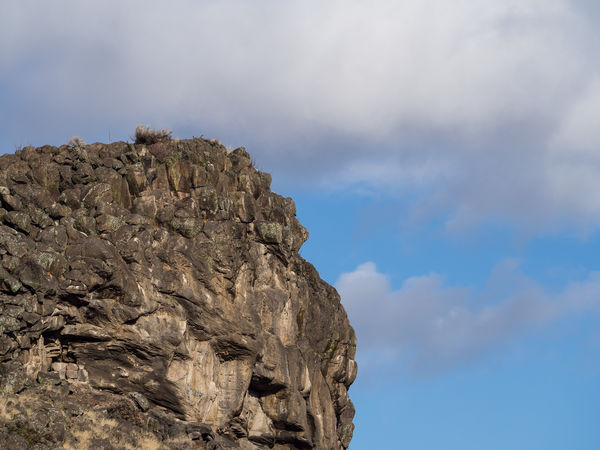
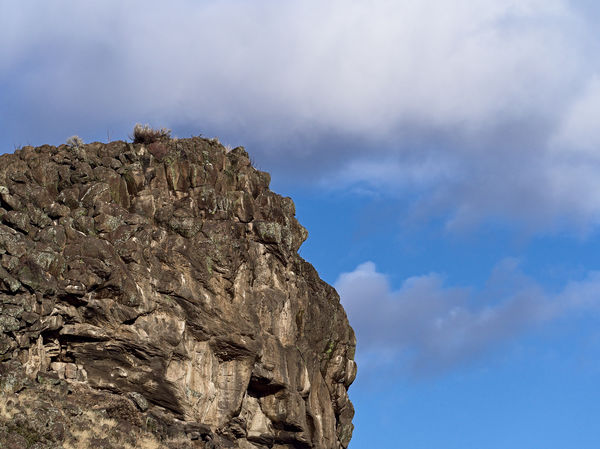
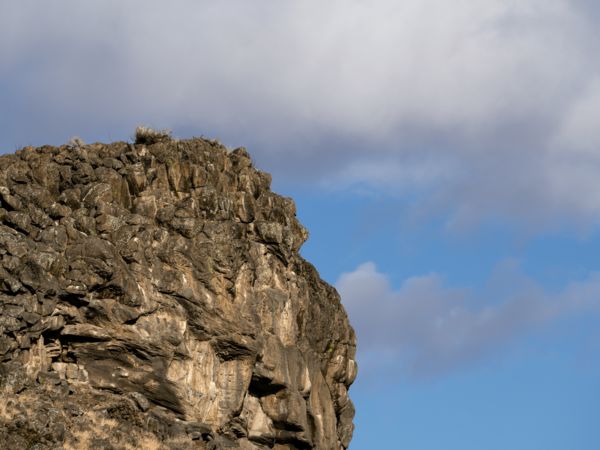
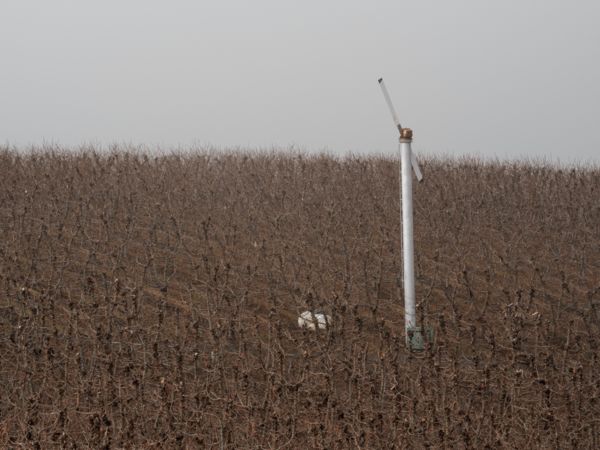
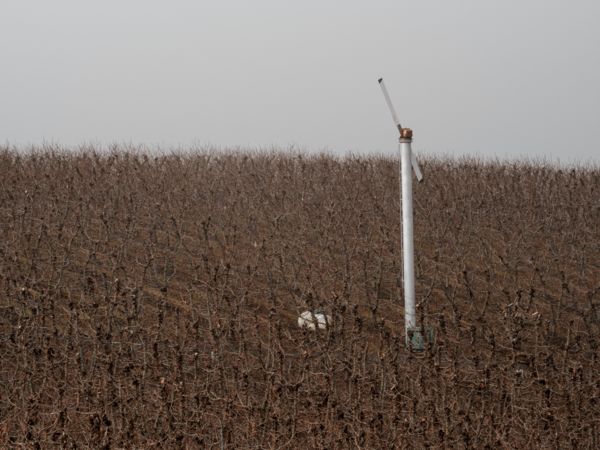
Below are my best attempts at sharpening two telephoto shots from today, with Olympus EM10 M4/3 camera and 75-300 mm lens. On #1 I also used Nik Tonal Contrast. On #2 I masked the sky from the sharpening. They both also have a little sharpening from ACR raw editor defaults.
Please edit the raw files (linked below each jpg), doing your favorite sharpening techniques and repost here with information on how you accomplished. I'd like to learn a bit more about this aspect of editing.
Many thanks!
For the diffraction discussion: f/8, 117 mm
(Download)
Attached file:
(Download)
For the diffraction discussion: f/6.7, 100 mm
(Download)
Attached file:
(Download)
Jan 24, 2020 18:42:50 #
I would like to see what people do., but they look plenty sharp to me already. Nice shots, by the way. Pear trees, maybe?
Mike
Mike
Jan 24, 2020 18:48:34 #
Blenheim Orange wrote:
Thanks Mike. In #2 I was quite impressed by how the lichens "popped" with my sharpening I would like to see what people do., but they look plenty sharp to me already. Nice shots, by the way. Pear trees, maybe?
Mike
Mike
 I'm also so impressed with this camera and lens when I am not shooting in low light/high ISO situations.
Not sure about pear; there are blocks of apple trees beside that area and around that stretch of road. Remind me in July to check.
Jan 24, 2020 18:59:54 #
Linda From Maine wrote:
Thanks Mike. In #2 I was quite impressed by how the lichens "popped" with my sharpening I'm also so impressed with this camera and lens when I am not shooting in low light/high ISO situations.
Not sure about pear; there are blocks of apple trees beside that area and around that stretch of road. Remind me in July to check.
I'm also so impressed with this camera and lens when I am not shooting in low light/high ISO situations.Not sure about pear; there are blocks of apple trees beside that area and around that stretch of road. Remind me in July to check.
Pear trees are always the ugliest. They grew a lot of pears in the Wenatchee valley where I worked.
Mike
Jan 24, 2020 19:29:00 #
I played with them some but honestly I don't think I was improving them. 😳
Jan 24, 2020 20:07:01 #
Jim-Pops wrote:
LOL, well I appreciate your effort, Jim, and it makes me more confident about my own process I played with them some but honestly I don't think I was improving them. 😳

Jan 24, 2020 20:14:08 #

We can post them and really boost your confidence :)
I took a swing at the second one and couldn't get near your example. Thank you for helping me push past some barriers I had with knowledge of post-processing and my software. I learned a few things today for sure.
I took a swing at the second one and couldn't get near your example. Thank you for helping me push past some barriers I had with knowledge of post-processing and my software. I learned a few things today for sure.
Jan 24, 2020 20:27:59 #
johngault007 wrote:
Thank you, John. That's sweet of you to offer We can post them and really boost your confidence :)
I took a swing at the second one and couldn't get near your example. Thank you for helping me push past some barriers I had with knowledge of post-processing and my software. I learned a few things today for sure.
I took a swing at the second one and couldn't get near your example. Thank you for helping me push past some barriers I had with knowledge of post-processing and my software. I learned a few things today for sure.
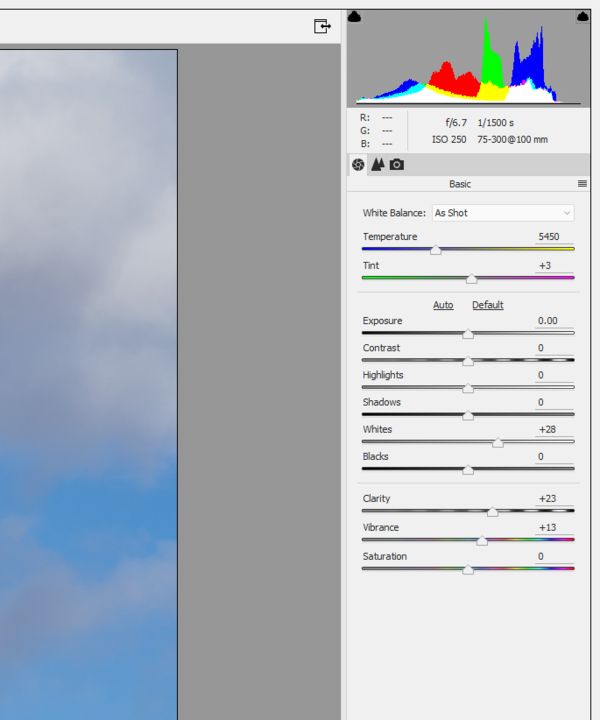
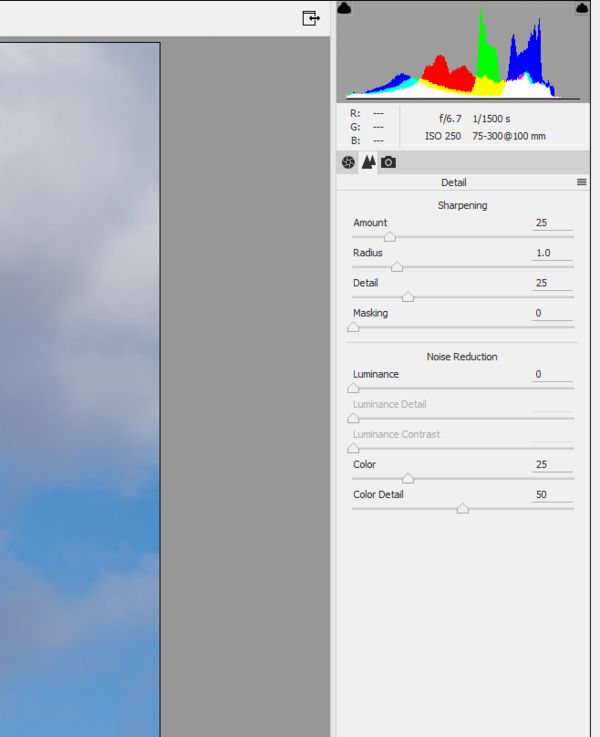
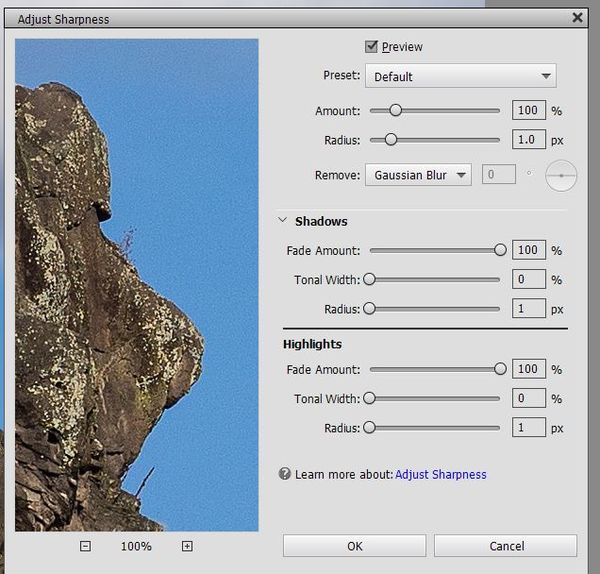
When you opened the raw, did you see some sliders already moved? Here are the screenprints from ACR (PS Elements).
#3 is the "adjust sharpness" window in the main editing workspace. I used the default. This weekend the plan is to learn what those all do!
(Download)
2. This is the default for sharpen and noise in ACR and I rarely touch them.
(Download)
(Download)
Jan 24, 2020 21:01:34 #
Ok, what the heck, I'm not scared of critique
I used DarkTable 3.0.0, so I can't translate the ACR sliders, so I've attached the xmp file for anyone that is interested.
I think when I applied De-noise, I didn't really spend much time getting tweaked, and that may have effected the overall sharpness. I'll go back and keep playing because It's a great exercise for me to dive deeper into the modules and learn.
Jan 24, 2020 21:09:52 #
johngault007 wrote:
Looks great to me, some really nice pop! Thanks so much.Ok, what the heck, I'm not scared of critique im... (show quote)
Jan 24, 2020 23:31:39 #
I decided to try one more thing Linda.
This is done with LAB Color in Photoshop and then separating the brights and darks with curves and masks.
No normal sharpening has been done just changing the look with levels of contrast. I think sometimes people describe sharping with contrast. What do you think?
This is done with LAB Color in Photoshop and then separating the brights and darks with curves and masks.
No normal sharpening has been done just changing the look with levels of contrast. I think sometimes people describe sharping with contrast. What do you think?

Jan 25, 2020 03:48:29 #
Linda From Maine wrote:
In PS Elements is an "Adjust Sharpness" ... (show quote)
Hi Linda, So, another challenge, late at night and without enough coffee
. In this exercise, I'm not going to address anything more than sharpening. I'll leave contrast, color and exposure adjustments alone so not to confuse the results. I don't have PSE so I can't evaluate the 'Adjust Sharpness' feature, so I used your jpg as the adjust sharpness result. I only looked at your second file since it had all the elements to show differences in the sharpening methods I use.My general workflow is to denoise, if needed, as one of the first steps in my PP steps. There wasn't a lot of noise in your raw file, but some sharpening methods will amplify the noise already there. This wouldn't be obvious to most, but the pixel-peepers (like me) would probably notice it. I would then selectively sharpen as I edit the image with final sharpening at or near the end. To sharpen, I zoom to see the fine detail and apply sharpening up to the point when fringing occurs, then back off until I'm satisfied with the image. If I need sharpening that results in white fringing, then I'll defringe the image as my last step.
If I'm using LR with a sharp raw image, I'll use LR's sharpening. Otherwise, I'll go to PS. I used to use the Unsharp Mask (USM) but I've found that the high-pass filter (HPF) generally works better. I routinely use the 'overlay' blend mode, but it can slightly reduce color saturation but using 'hard light' better preserves your initial colors. Now, my goto tool in PS is, either, Topaz Denoise AI or Topaz AI Sharpen depending on the image. Both work similarly, but you have better sharpening tools in AI Sharpen. With the apps, you get a 2fer, NR and sharpening with one edit.
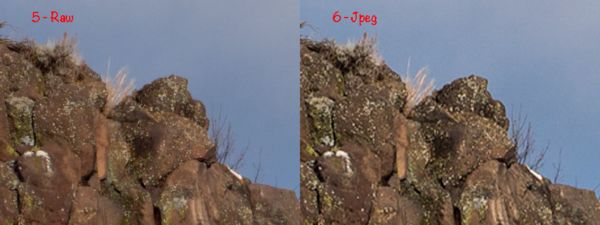
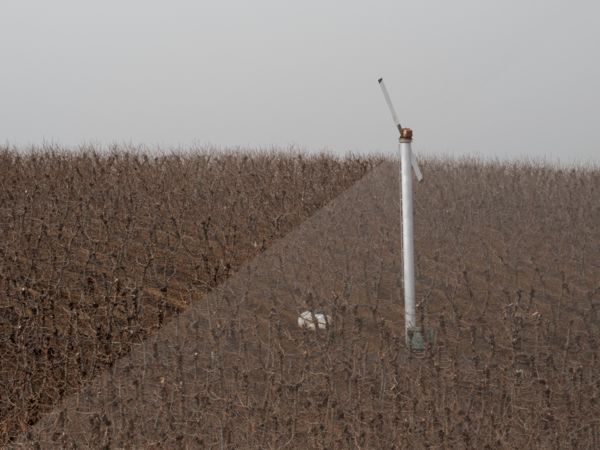
Now back to your image. I compared your 'Adjust Sharpening', i.e. your jpg, to your raw. I then compared your raw against 4 other sharpening methods that I routinely use. Each produced an image sharper than the raw, except the jpg.
Comparing your raw and jpg, I first zoomed into an area that includes a lot of detail that shows the effect of sharpening. Slide 1 compares your jpeg to your raw file. I found that the jpg was less sharp than your raw. Your jpg was more contrasty, but lost sharpness. I also saw that your sharpening/PP resulted in fringing along your sharp edges.
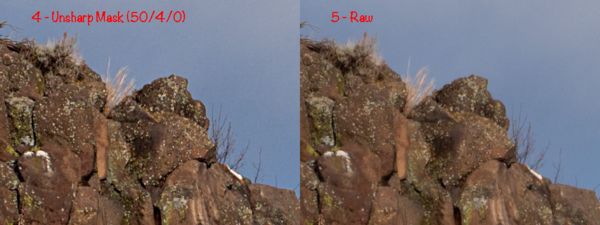
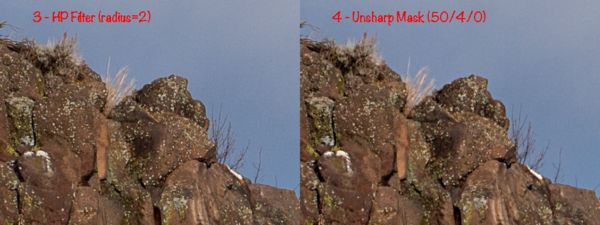
Slide 2 compared your unedited raw to a sharpened raw using the USM in PS/PSE. I found that the [Amount/Radius/Threshold] = [50/4/0] improved sharpness of the raw without fringing.
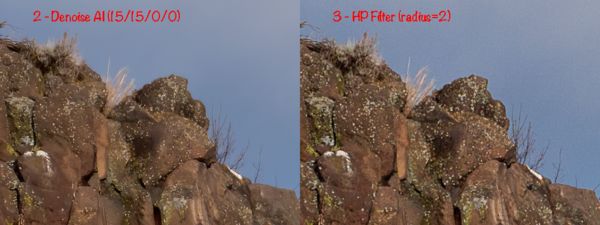
Slide 3 compared the sharpened raw using USM to your raw sharpened with the HPF. While they were close, the HPF provided a slightly sharper image without fringing. You can see that the sharpening increased the noise in the clear sky. If the noise is unacceptable, masking out the sky would be needed.
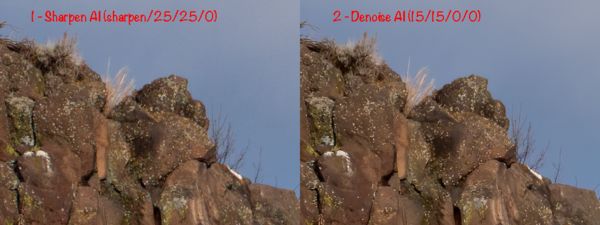
Slide 4 compared the sharpened raw using the HPF to your raw sharpened with Topaz Denoise AI. Denoise has, both, sharpening and NR features, but the sharpening is not as effective as their Sharpen AI. I found that [NR/Sharpening/Recover Detail] = [15/15/0] sharpened better than the HPF and reduced noise at the same time. But increasing these values began to show artifacts in the fine detail so I stopped there. But only a pixel-peeper would notice the artifacts and only in a large print.
Slide 5 compared Denoise AI to AI Sharpen on your raw. Using AI Sharpen, I found that [Mode/Sharpen/NR/Grain] = ['Sharpen'/25/25/0] sharpened better that Denoise. It also did a good job of denoising the image at the same time. AI Sharpen has two additional modes, 'Stabilize' and 'Focus' that provides even better sharpening for those more pesky problems, but can easily generate unwanted artifacts if your not careful.
So, here's a summary in order of what I found in sharpening efficiacy:
1) Topaz AI Sharpen (also denoised)
2) Topaz Denoise AI (also sharpened)
3) High Pass filter in PS/PSE
4) Unsharp Mask in PS/PSE
5) No sharpening
6) Adjust Sharpness in PSE
Download the slides to see the differences in sharpening. You may need to zoom further depending on your monitor. If there's an interest, I can also make the psd accessible from dropbox.
.
Slide 1 - Unsharpened Raw vs Adjust Sharpness
(Download)
Side 2 - Unsharpened Mask vs Unsharpened Raw
(Download)
Slide 3 - High-Pass Filter vs Unsharp Mask
(Download)
Slide 4 - Denoise AI vs High-Pass Filter
(Download)
Slide 5 - AI Sharpen vs Denoise AI
(Download)
Jan 25, 2020 05:05:34 #

There is no need to sharpen anything.
I do not know what ACR for PSE offers but...
Open the file with ACR, all ACR sharpen set to 0. You do not need it. (If anything sharpening in ACR will augment the noise unless you use the masking option and selectively sharpen... Too much trouble)
PS CC 2020
- Adjust levels first.
- Create a selection covering the rock
- Contract the selection -1 (avoids potential fringing issue)
- Duplicate the selection (Ctrl-J)
- Select focus area (this will prevent trying to adjust the non focused area and create a potential mess)
- Magnify 100% onto new selected area
- Use ACR filter
- Adjust Dehaze, Clarity and Texture sliders in order to adjust the contrast (each slider really deal with contrast, not sharpening - trick on the eyes)
You are done.
----------------------------------
Notes:
- Color balance is in the eye of the beholder and depends on too many things. I never try to adjust it, the closest to the original is usually the best - in my opinion.
- Some ***** painted on the rock by the way.
-
Jan 25, 2020 05:20:11 #
Basically the same process with 'small tweaks'
ACR is still the key.
Something I forgot to add...
In both cases using the opacity AND fill sliders on the 'ACR layer' allows to dial down the visual impact.
-
ACR is still the key.
Something I forgot to add...
In both cases using the opacity AND fill sliders on the 'ACR layer' allows to dial down the visual impact.
-
Jan 25, 2020 06:18:41 #
Can't really see what the problem is, Linda. I don't much care for the Orchard shot but it does look respectably sharp to me. As the cliff - I'd be very happy with that.
Some software gives you an UNSHARP option for sharpening. This gives you finer control over your sharpening. When I use it, I look at 100% view and just nudge the sliders a bit either way to avoid halo's and things. I think I'm right in saying it'll only work on a raw file.
Some software gives you an UNSHARP option for sharpening. This gives you finer control over your sharpening. When I use it, I look at 100% view and just nudge the sliders a bit either way to avoid halo's and things. I think I'm right in saying it'll only work on a raw file.
If you want to reply, then register here. Registration is free and your account is created instantly, so you can post right away.