Tamron 18-400
Nov 13, 2019 10:29:59 #

mborn wrote:
The Tamron 18-400 is a great all-round lens. Use it on my D500
Since I answered originally from my Ipad I did not load an image here is clouds over Leonard Pond
1/250, ISO 100, F/10 38 mm HH

Nov 13, 2019 10:34:27 #
Strodav
Loc: Houston, Tx
If you are using a dslr then take some side by side shots in Live View and AF with the aperture wide open. I'd start at 400mm, but try a few different zoom factors. LV uses contrast detection where AF uses phase detection. IF the LV shots are sharper than the AF shots, then you might benefit from tuning. If they are the same (or close enough for you), then you are good to go.
Nov 13, 2019 11:36:13 #
buckscop wrote:
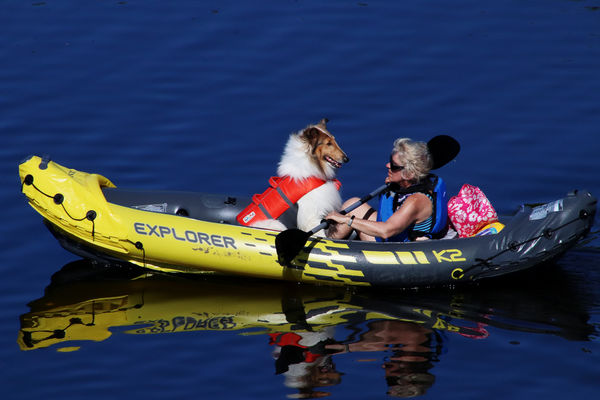
For those considering the Tamron 18-400, this is a sample of an image taken at 400mm (AP, 1/640, f18, ISO 1250 auto). The image is the full non-cropped shot from my Canon T7i, with a Polarizing filter. I was pleased with the quality.
For posts discussing photo quality / sharpness, it would be good to include original and clipped / zoomed portion. I use Picassa for that, creating a "poster" with multiple pages at 400%. (If I can prinnt a 44" wide print with good detail, that would be beyond any reasonable expectations.) This approach lets me get the same "enlargement" every time where simple cropping won't do that.
I first used this approach with a picture from a Canon 70D that was 5472x3648 pixels. The poster page that was created was only 1368x913. Assuming 200 DPI is required for printing this would only be a 7" wide print. However, I wasn't unhappy with a 11" print of the page. Examples are attached.
My lens developed a focus problem, and I'll either be getting a new one back tomorrow or have the focus motor replaced. I have high hopes for the lens, and it will be interesting to see how much tuning is needed. I should be able to provide an update soon.


Nov 13, 2019 11:51:52 #

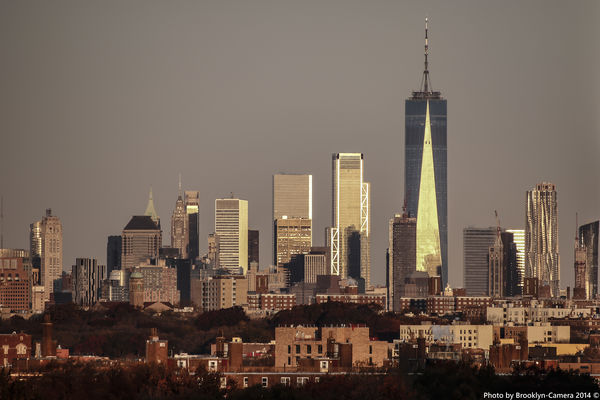
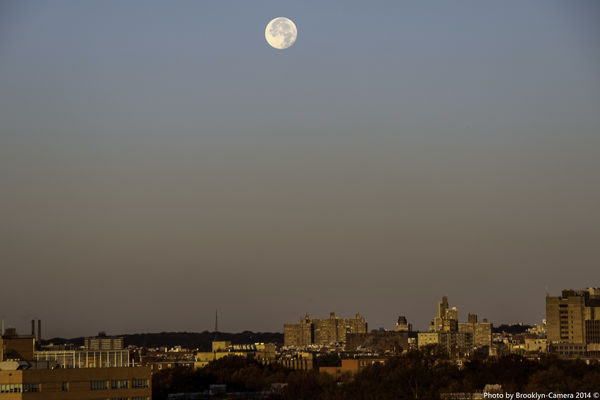
Tamron 18-400mm on a 7DMKII, these are good enough for me. I don't pixel peek at all. Shot today 11/13/2019 @ 0700 hrs.
WTC = ISO 100 300mm f/6.3 1/100 sec
MOON SHOT = ISO 100 128mm f/6.3 1/100 sec
WTC = ISO 100 300mm f/6.3 1/100 sec
MOON SHOT = ISO 100 128mm f/6.3 1/100 sec
Nov 13, 2019 14:24:21 #
amfoto1
Loc: San Jose, Calif. USA
buckscop wrote:
Still new to the non-auto world, still learning. It was set for aperature priority, so the cam picked the other 2. Polarized filter is always on my lenses. This was shot early in the pic session, and did not remember to rotate it for effect until later. Don't know if it had a positive or negative effect on this pic. The reason for my post is that others on UHH have questioned on the quality of this lens.
That lens is surprisingly good... for an "all in one zoom" and especially for one with the widest focal length range of all zooms of that type.
Actually you are quite far from the "non-auto world" that you say you're learning about.
First, it's probably not a very good idea to use Auto ISO with anything other than Manual exposure mode (which makes it no longer manual... makes it auto exposure just like Av, Tv and P). In my opinion, it serves no purpose to have Auto ISO in conjunction with those other auto exposure modes. In fact, it may be confusing, using sort of a "double auto" mode.
Auto exposure (AE) modes include:
- Av is Aperture Priority.... where you select the ISO and the aperture, leaving the camera to choose what it deems to be an appropriate shutter speed to make a "correct" exposure. Use this when you want to control depth of field.
- Tv is Shutter Priority... where you select the ISO and the shutter speed, while the camera chooses an aperture for a correct exposure. Use this when there is a concern about freezing subject movement with a fast shutter, or desire to deliberately cause movement blur with a slow shutter speed, or when there is concern about a sufficiently fast shutter speed to prevent camera shake blur, or a desire to create camera movement blur effects such as with panning.
- P is Program Mode... where you select only the ISO and the camera chooses both shutter speed and aperture size to make a correct exposure. I think most would only use this AE mode when they don't have much concern about either depth of field or subject movements.
- M with Auto ISO... where you select both aperture and shutter speed, while leaving it to the camera to choose an ISO that will make for a correct exposure. This can be used when both depth of field and subject movement are a concern.... but may allow for high ISOs that cause digital "noise" in images if you aren't careful.
"M" and "B" without Auto ISO are the only truly manual exposure settings, where you make all the choices yourself. "M" provides shutter speeds from 1/4000 to 30 seconds on your camera. "B" allows shutter speeds longer than 30 seconds.
Some people might try to tell you that you should "only shoot manual" mode. First, that's utter bunk. The various AE modes have their purposes. In fact, if you tried to shoot everything fully manually, you would miss a lot of types of shots. It's fine advice for working in a studio or shooting landscapes slowly and deliberately. But "fully manual" is problematic for a lot of other types of photography... sports, editorial, action of various sorts all can, at times, demand some sort of auto exposure if you are going to "get the shot". Second, if you have Auto ISO enabled, you're actually not "shooting manual" mode.
Not to pick on you and the image you've shared, but to discuss it and make some suggestions...
As others have stated, using a super small aperture such as f/18 is problematic. The issue is "diffraction", an optical effect that robs images of fine detail. With a 24MP APS-C camera such as yours, the "diffraction limited aperture is around f/5.6. This is the smallest aperture where no diffraction will occur when an 8x10" print is made from the image (only cropped to make the 3:2 aspect image fit 5:4 aspect print). Now, diffraction increases as the size of lens apertures is reduced. There's very little of it occurring at f/8. More, but probably not very much diffraction at f/11 either. But beyond that... at smaller apertures such as f/16, f/18, f/22 and smaller it's going to start to become more and more apparent. Prints larger than 8x10" where the image is more magnified also will show diffraction more obviously on close inspection. Images that are heavily cropped will, too.
The thumbnail of your image looks fine. Clicking through to the larger version it also looks pretty darned good... until it's further magnified. At the maximum viewing level here on UHH, there's apparent a lot of loss of fine detail in the image... probably much of which was caused by using such a small aperture. (It also might be partially caused by the lens' resolving abilities. Higher ISOs also reduce dynamic range and resolution to a degree... The ISO in this example is not terribly high... but could have been lower if a less extreme aperture had been used. While it's good for an "all in one" zoom, there are sharper (and much more expensive) lenses... Canon's EF 100-400mm "II", for example, is certainly sharper at all the focal lengths they share. Of course, it also doesn't have near the range or "all in one" convenience of the Tamron. Plus it's a lot bigger, heavier and costs almost 3X as much! The Canon EF 400mm f/5.6L is also exceptionally sharp, but far less convenient than either zoom.... and larger, heavier, more than 2X as expensive as the Tamron. The Canon 400mm f/4L also lacks images stabilization.
For best results, experiment with your lens. Do some careful test shots at different focal lengths and, especially, different apertures. Most lenses are "at their best" at a middle aperture... not "wide open" nor overly "stopped down". Likely you will find the sharpest shots at around f/5.6 or f/8... maybe f/11 in some instances. I know the Tamron 18-400mm's max aperture at 400mm is f/6.3, so you will probably need to try f/8 or f/11 at that focal length. With your camera's sensor size and resolution, I'd only rarely use f/16 and never use any smaller than that.
For more information about diffraction, visit: https://www.cambridgeincolour.com/tutorials/diffraction-photography.htm
Compare magnified test shot images from Tamron 18-400mm with Canon 100-400mm II: https://www.the-digital-picture.com/Reviews/ISO-12233-Sample-Crops.aspx?Lens=1145&Camera=963&Sample=0&FLI=5&API=1&LensComp=972&CameraComp=963&SampleComp=0&FLIComp=4&APIComp=1
Compare magnified test shots from the 18-400mm with Canon EF 400mm f/5.6L: https://www.the-digital-picture.com/Reviews/ISO-12233-Sample-Crops.aspx?Lens=1145&Camera=963&FLI=5&API=1&LensComp=278&Sample=0&CameraComp=963&FLIComp=0&APIComp=0
Again, the Tamron 18-400mm is pretty amazing for a zoom of that type. It is an excellent choice for versatility and more than capable of making images of sufficient quality for a lot of purposes.
A detailed and thoughtful review of the Tamron zoom, with its exceptional zoom range, can be seen here: https://www.the-digital-picture.com/Reviews/Tamron-18-400mm-f-3.5-6.3-Di-II-VC-HLD-Lens.aspx
Finally, your has plenty of fine detail to make an 8x12", 11x14" or even a 13x19" print. Any larger than that, it starts to show some lack of fine detail. Regarding using a Circular Polarizer... it appears to have deepened the blue of the water... but it also might have reduced the reflections of the subject in the water. Still, that's clearly visible so the filter likely did no harm... but it did block some light, probably at least 1.5 stops worth and maybe as much as 2.25 stops. Without the filter you could have used a lower ISO. Or, should I say, the camera probably might have selected a lower ISO.... or it might have used a faster shutter speed... who knows! (Hence the problem using two forms of auto exposure at the same time.)
The image is a bit underexposed. It could well be that you aren't aware of it, because many computer monitors... if not calibrated... are excessively bright for accurate photo editing. That causes people to make their images too dark. This shows up when prints are made or when other people view the image with a monitor that's been calibrated for photo editing.
I hope you don't mind... I made a couple quick adjustments in Photoshop to your image just to see how it would look. I primarily used a curves adjustment to brighten it and boost contrast a bit. I also sharpened it a little using a high pass filter overlay, which also increases micro contrast.
I think these improved it... at least on my calibrated computer monitor. It's a good shot... A fun image that would make a very nice, moderate sized print...
Nov 13, 2019 14:33:47 #
Kozan
Loc: Trenton Tennessee
imagemeister wrote:
F18 with a polarizer ?? that's a little under exposed - ALL lenses will look good at f18 !
.
.
Making sure the dog was properly exposed was more important than making sure the lady was properly exposed.

Nov 13, 2019 15:21:51 #
My Tamron 18-400 is my goto lens for the outdoor sports of my 6 grandchildren. Getting good shots indoors is a tuff road to hoe though.
Nov 13, 2019 15:48:06 #

amfoto1 wrote:
That lens is surprisingly good... for an "all... (show quote)
As usual Alan, you blow my mind with the treasure of information you share. Always an education to read your posts.
Bill
Nov 13, 2019 15:55:42 #

Nov 13, 2019 15:56:57 #
WDCash wrote:
As usual Alan, you blow my mind with the treasure of information you share. Always an education to read your posts.
Bill
Bill
He must be a very GOOD typist ! 8-)
Nov 13, 2019 16:02:05 #

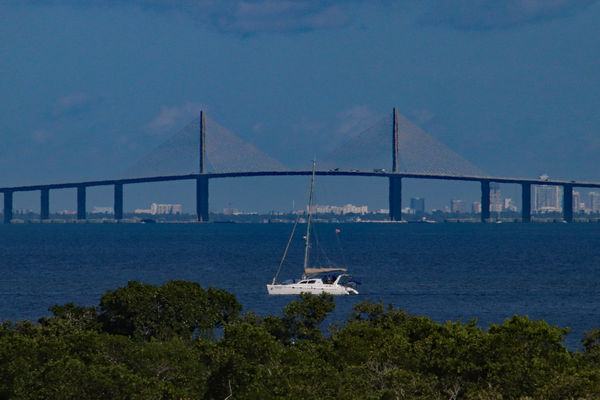
First let me thank all that replied, especially Alan for the time it took for that reply, very helpful. The reason for f18, was that I was at a preserve in Florida, and among other things, was hoping to get pics of the eagles and ospreys, who often sit on distant trees from the walking paths. Additionally, the park has a tower that overlooks not only the estuary where the women was, but in the distance (see attached pic) was the Tampa Skyway Bridge (f18 @265mm). I was shooting the bridge when the women appeared out of the mangroves, and amateur as I was, did not think of an aperture change.
Regarding the filter. I was led to believe that having a filter helped 'protect' the lens. Out of the ones suggested, polarizing was one. Since I'm a 'blue sky' guy ;), I went with the polarizing one and basically leave it on all the time. To those more learned, is this not really suggested for the reasons already given?
Thanks all, learning alot.
Nov 13, 2019 16:20:35 #
Nov 13, 2019 16:27:14 #
jsfphotos
Loc: New York, NY
Strodav wrote:
Have the Nikon version of the Tamron 18-400mm and ... (show quote)
I have this lens and find it is often slow to focus and focus works very poorly in low light conditions. Would fine-tuning help with that at all? Also, where do you take lens to be fine-tuned? I bought it at B&H and there is a Nikon Repair shop near there. Do you think they'd do it or do I have to send to Tamron? Thanks!
Nov 13, 2019 16:35:35 #
jsfphotos wrote:
I have this lens and find it is often slow to focus and focus works very poorly in low light conditions. Would fine-tuning help with that at all? Also, where do you take lens to be fine-tuned? I bought it at B&H and there is a Nikon Repair shop near there. Do you think they'd do it or do I have to send to Tamron? Thanks!
I have it and that is just the way it works. Slow focus for sure....no good for sports, not just sharp enough. Have to use L glass for sports. I shoot 7DMKII and 6DMKII.
Nov 13, 2019 16:43:27 #
jsfphotos wrote:
I have this lens and find it is often slow to focus and focus works very poorly in low light conditions. Would fine-tuning help with that at all? Also, where do you take lens to be fine-tuned? I bought it at B&H and there is a Nikon Repair shop near there. Do you think they'd do it or do I have to send to Tamron? Thanks!
Check for front / back focus before reaching any conclusions. That is documented in many places, and not all that hard to do. (Infinity is a bit tougher than 1.5 and 8 feet -- and is where mine failed. Fixed lens or replacement arrives tomorrow).
You can also try live view vs viewfinder. The auto focus mechanism is different, and live view should be better - but slower.
If you want to reply, then register here. Registration is free and your account is created instantly, so you can post right away.