Explain Yourself
Sep 10, 2019 12:08:46 #
JFCoupe wrote:
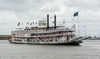
I like you B & W conversion. When subjects or compositions have the right contrast, B & W really works.
Thanks for viewing and commenting.
Sep 10, 2019 14:14:44 #
Anhanga Brasil
Loc: Cabo Frio - Brazil
katu41 wrote:
I am going back to re-edit for the halo effect. I promise to do better in the future. If I had a photoshop teacher, I would fire them. However, as I am self taught, I will put the blame on myself.
No no one's to blame. It is simply a matter of personal preference.


Sep 10, 2019 19:26:41 #
Another reason to love digital photography. Can play all day long until it looks right. Color to B&W, crop move this slider, move that slider, doesn't matter, just one big experiment.
You got it right with the B&W version katu.
Don
You got it right with the B&W version katu.
Don
Sep 10, 2019 19:27:08 #
PAR4DCR wrote:
Another reason to love digital photography. Can play all day long until it looks right. Color to B&W, crop, move this slider, move that slider, doesn't matter, just one big experiment.
You got it right with the B&W version katu.
Don
You got it right with the B&W version katu.
Don
Sep 10, 2019 22:42:29 #
PAR4DCR wrote:
Another reason to love digital photography. Can play all day long until it looks right. Color to B&W, crop move this slider, move that slider, doesn't matter, just one big experiment.
You got it right with the B&W version katu.
Don
You got it right with the B&W version katu.
Don
Still a tough call between the color and B&W. About 50-50 split from the hogs and I can still go either way.
Sep 11, 2019 00:19:17 #
Timmers
Loc: San Antonio Texas.
This will not be the usual response. You are doing this like a game of checkers, digital and the post world of Photoshop is more like the game of chess.
First, the image is captured in a color technology, use it to your advantage. Color is still not properly understood, thus the color wheel and the sleep of Newton. With Photoshop we have a different mantra, it is Red Cadillacs BY GM (GM=General Motors).
SO, RED CADILLACS is RED and CYAN
The word by is BLUE and YELLOW
GM is GREEN and MAGENTA
For photographers this means that these pairs, when totally in balance will become neutralized, photographers call this Neutral Density, or simply density, NOT gray.
That is enough color theory for our purposes.
What you have is a neutrals density building in the for front, and a warm colored building that you want to suppress. So here are your steps.
One, drop as much contrast in the scene, you can always add contrast at the last stages, but you must manage your contrast in the beginning as it will build as you take steps to create the image.
Second, it is a color image. You want to SUPRESS the warm colored building in the rear so convert the color (manage it) by suppressing it. Do this by shifting the full color image to the cold direction. The rear building is mostly YELLOW, so shift the balance to the blue (BY = BLUE and YELLOW) a bit. The rear building is also a red artifact so increase the CYAN channel (RED PLUS CYAN equals Neutral Density).
You have a new "color balance" that will suppress the rear 'warm' colored building which when converted will render it darker than the front building.
In Photoshop you will now convert the image to a gray scale but leave the color channel active. You should now have a dark rear building (density) with a some what flat front building. You can now increase the separation of these densities by either using the BRIGHTNESS CONTRAST control, OR you could use the color balance control to increase the YELLOW or the RED channels; then convert again back to neutral no color (this will bring your 'contrast' up but you will be more in control).
As a final step you could now introduce a small shift in over all color to the cool COLOR BALANCE to give the feeling of the cool morning. Remember cool is CYAN, BLUE and GREEN. CYAN OR BLUE are the obvious choice to get a certain emotional feel to the image.
What all this will do is put you in the drivers seat as you manipulate the effect that you desire for the image's final outcome and NOT the mechanical Photoshop effects.
Sep 11, 2019 11:11:40 #
Timmers wrote:
This will not be the usual response. You are doing... (show quote)
Thanks for the color processing seminar. I want to try playing with the image per your suggestions but I am about to leave for the golf course and am also preparing for a big trip on Sunday. I will forward my revisions for your input when they are available. Did you see the revisions I made after my initial post? I think they appear on page 3 of this post.
Sep 12, 2019 21:35:50 #
Robert M
Loc: Clifton, NJ
In my humble opinion, both processed images are a distinct improvement of the original image. The B & W is outstanding! Thank you for your post. MOST appreciated...
Sep 13, 2019 10:53:37 #
Robert M wrote:
In my humble opinion, both processed images are a distinct improvement of the original image. The B & W is outstanding! Thank you for your post. MOST appreciated...
You reminded me that I learned the Color Wheel in 7th grade art class. I still remember it after all these years. I will download a copy and keep it on my desk.
Sep 19, 2019 21:41:09 #
The first PP picture is spot on all the way around. I really like it. The monochrome is a great photo. I think the difference is where are you going to hang it. Color or not I like the composition. Great job.
If you want to reply, then register here. Registration is free and your account is created instantly, so you can post right away.