Colour Negative Warning
Aug 23, 2019 11:05:50 #
Dikdik
Loc: Winnipeg, Canada
StanMac wrote:
Are you sure they were sharp to begin with?
Stan
Stan
Reasonably... there may have been an occasional 'out of focus' shot, but not an entire negative strip.
Dik
Aug 23, 2019 11:09:56 #
Dikdik
Loc: Winnipeg, Canada
Blair Shaw Jr wrote:
I highly recommend that one should do this and scan old photos as well and repeat the process for the assurance it provides on those priceless images that are irreplaceable.
I highly recommend that one should do this and scan old photos as well and repeat the process for the assurance it provides on those priceless images that are irreplaceable.
Thanks...
I just got scans from the five films (I'm still missing one film) I took of an ordination... cost me $80; I cannot afford to have all my negatives professionally scanned. They accidentally scanned it at medium resolution and not high. The V550, I'm using, does a good job for making a 'contact set' and I will select ones I really want to preserve.
Dik
Aug 23, 2019 12:18:44 #
Dikdik wrote:
My B&Ws will likely be around that long and are still OK. I took special care in processing them to make sure all the chemicals were gone/neutralised.
Thanks for the caution... hope others can learn from this discussion.
Dik
Thanks for the caution... hope others can learn from this discussion.
Dik
Yes, conventional BW negs, metallic silver images, will last. Color negatives are organic dyes and will fade and degrade as they age, same as any E-6 process slides. As for digital archives, I understand the procedure is a continous migration to newer multiple media while maintaining the software to access and read your images.
Aug 23, 2019 12:26:14 #
Aug 23, 2019 12:27:52 #

Dikdik wrote:
Of the 1000s of pictures so far, there are likely ... (show quote)
For color negatives, just get the Negative Lab Pro plug-in for Lightroom Classic or Lr6 ($99). Yes, you can individually invert and adjust the RGB curves in Lr, but it takes forever, and the results are seldom realistic. Besides, it takes too long (redundancy supplied for comic effect). Negative Lab Pro is near magic, more than worth its cost if you convert lots of negatives. It will save hours of frustration. https://www.negativelabpro.com — See it in action on YouTube. There's a link on their home page to an excellent demo.
As for sharpness, know that flatbed scanners are generally the culprit. You can't really control focus well, so you MUST sharpen the images quite a bit in post-production. That's why I personally copy my old film with a macro lens and a camera when I want maximum sharpness.
Also, you must be aware of the math involved. When you say you scan at 600dpi, that tells me nothing about the ultimate image size in pixels. For printing, you should have 240 pixels of scan per finished linear inch of print. In other words, scanning at 240 dots per inch to a reproduction size of 8x10 inches, will yield 8x240 by 10x240 pixels (1920x2400 pixels). 300 dpi is better, so you have a little room to adjust if needed.
In digital photography, whether scanning or using a camera, it's all about how many pixels you initially process into a file.
Aug 23, 2019 12:35:45 #

The only way I know to preserve any photo image long term is to make analogue B&W seperation negatives. This is an old process that was used to make dye transfers and 4 color printing. Color negs or transparencies are used to make 3 individual copies through R,G & B filters. This is not for the faint of heart, but properly processed and stored, the film should last hundreds of years--long after our PC's ability to read them.
Aug 23, 2019 12:37:59 #
Dikdik
Loc: Winnipeg, Canada
burkphoto wrote:
As for sharpness, know that flatbed scanners are generally the culprit. You can't really control focus well, so you MUST sharpen the images quite a bit in post-production.
As for sharpness, know that flatbed scanners are generally the culprit. You can't really control focus well, so you MUST sharpen the images quite a bit in post-production.
Thanks for the info.
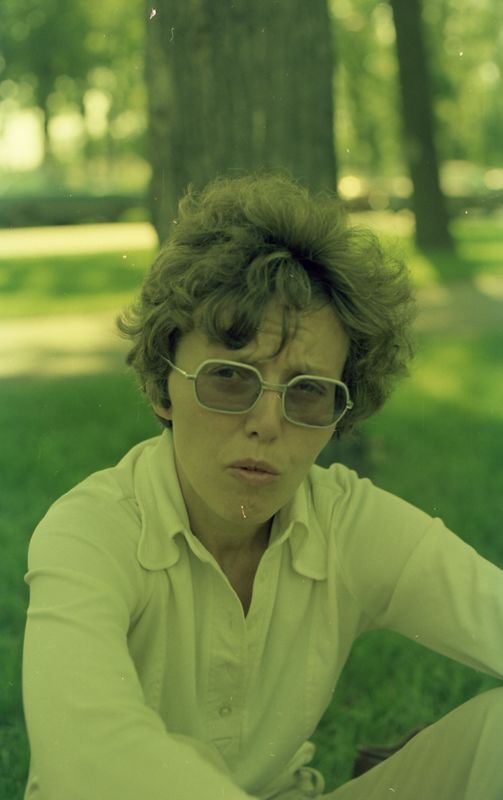
Some scans come in very clear and others not so sharp. Seems to depend on the set of negatives for the film.
I've attached a photo with a 'green' background that shows the typical clarity... some losses, some noise and some dirt.
Dik

Aug 23, 2019 12:39:47 #
Dikdik
Loc: Winnipeg, Canada
Bob Werre wrote:
The only way I know to preserve any photo image long term is to make analogue B&W seperation negatives.
I seem to recall this was used for some old Russian colour prints... image on glass, if memory serves.
Dik
Aug 23, 2019 13:13:56 #
Dikdik wrote:
Thanks for the info.
Some scans come in very clear and others not so sharp. Seems to depend on the set of negatives for the film.
I've attached a photo with a 'green' background that shows the typical clarity... some losses, some noise and some dirt.
Dik
Some scans come in very clear and others not so sharp. Seems to depend on the set of negatives for the film.
I've attached a photo with a 'green' background that shows the typical clarity... some losses, some noise and some dirt.
Dik
Since this isn't downloadable, I can't give you much commentary. But it does look like the dust is not sharp. When dust is blurry, focus is the usual suspect. Flatbed scanners are fixed focus devices, so the performance depends on where the photo emulsion is with respect to the image sensor. If not in the plane of focus, everything is blurry.
As for the color, the Negative Lab Pro software would improve that considerably.
Check your Epson Scan (driver) settings in Professional Mode for Unsharp Mask, Color Restoration, and Dust Removal check boxes. All three will help — a lot!
https://youtu.be/tqI5CHNm34k and https://www.youtube.com/watch?v=qtpmlEeJodw are worth watching. Note especially the tip about adjusting the film holder height (second video).
Aug 23, 2019 13:24:36 #
Dikdik
Loc: Winnipeg, Canada
burkphoto wrote:
Since this isn't downloadable
Didn't know how to do that... did it, and cannot remove the original.
Dik
Aug 23, 2019 13:32:44 #
Dikdik wrote:
Didn't know how to do that... did it, and cannot remove the original.
Dik
Dik
So just upload it again.
Click Choose File, and find the file you want. THEN, click the (store original) box. Then, click Add Attachment. The image will be uploaded, PREVIEWED, and then you can finally submit it.
We will see the same preview image as before, but it will have a (Download) button under it. Clicking that displays the full resolution file.
Aug 23, 2019 13:34:13 #
Dikdik
Loc: Winnipeg, Canada
burkphoto wrote:
We will see the same preview image as before, but it will have a (Download) button under it. Clicking that displays the full resolution file.
We will see the same preview image as before, but it will have a (Download) button under it. Clicking that displays the full resolution file.
Found out how... and did it... now two pictures, one downloadable.
Dik
Aug 23, 2019 13:39:55 #
In photo school in the late 60's we were required to take a Dye Transfer class. We produced 3 b&W negatives made in a studio/still situation, also from transparencies, and then original artwork (copy camera). We then made large films that we dipped in colored dyes and then transferred that film unto paper, so you rolled each color in register. Since dye transfer process died in the 80's they are rare today. However that same process is used to preserve images today, by using those same techniques. A transparency/color neg is projected unto standard B&W film (4x5/8x10/larger perhaps) using the three R/G/B filters. Film is processed and you can make color prints/ additional transparencies or have them scanned back into a digital computer image in color. The unfortunate part is the wonderful dye transfer process is gone and so is a wonderful Kodak film called Super XX which was unique in many ways.
Aug 23, 2019 13:42:31 #
Dikdik
Loc: Winnipeg, Canada
Thanks for the info... I've never heard of dye transfer. I've used Super X (XX?) fifty years back, but don't recall anything about it.
Dik
Dik
Aug 23, 2019 14:14:05 #
Dikdik wrote:
Found out how... and did it... now two pictures, one downloadable.
Dik
Dik
Okay... There is a lot more information in this than the preview suggests. Still, it looks a tad out of focus.
In the second video above, the guy demonstrates how moving or removing the pegs or feet on the bottom of the film carrier can adjust the focus. If your film carrier is the same, try it. (He's working with a V850, I think.)
That video is also a good demo of SilverFast 8. Its NegaFix feature offers some similar results to the Negative Lab Pro plug-in I mentioned earlier.
If you want to reply, then register here. Registration is free and your account is created instantly, so you can post right away.