My first stack
Jun 18, 2019 17:04:36 #
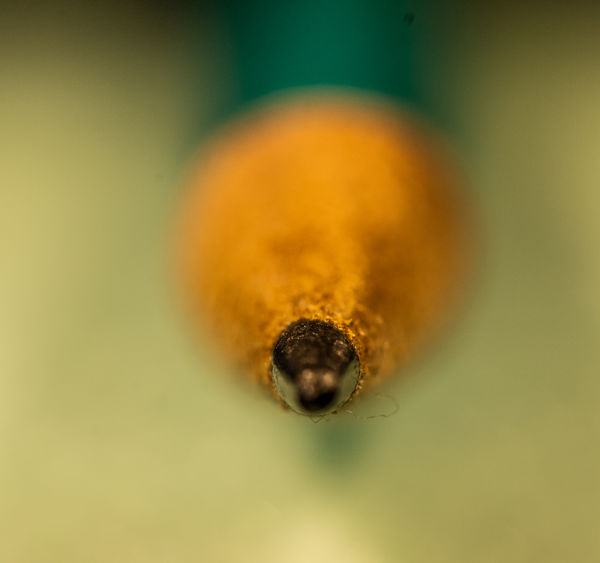
My first stack, done in Photoshop. Basic info D 7200 in manual, Remote trigger, Micro Nikkor 60mm f2.8, 1/160, f11, ISO 400, 5 shot stack. I know I need diffusers, going to try Styrofoam cups but I was in a hurry to try a shot. Photo of setup included.
Two easy questions regarding technique: What am I doing wrong. What, if anything am I doing right? All comments appreciated.
Two easy questions regarding technique: What am I doing wrong. What, if anything am I doing right? All comments appreciated.

Jun 18, 2019 17:21:20 #
I would expect to see more of the pencil in sharp focus with a five shot stack at f/11. My thoughts: use live view, zoom in on the tip and work your way back with each successive image, use a remote trigger or 2 second shutter delay, soften the lighting. Good luck.
Jun 18, 2019 17:23:16 #
Jun 18, 2019 19:36:43 #
I am not particularly qualified, but f/11 seems a bit small for stacking. I thought f/5.6 or f/8 is more like it. Those are generally when a lens is at its sharpest. ISO 200 for less sensor noise.
Jun 18, 2019 19:41:07 #
Thanks for the comments. I'll try f8 and 5.6. Dropping ISO makes sense too.
Jun 19, 2019 00:26:49 #
Neither am I particularly qualified to give stacking advice. I've sort of figured out how to do it using Photoshop CC and have developed some images I think are pretty good. Here's my most recent effort for your consideration. This was a seven shot stack using a Sigma 180 MM, f/2.8 Macro on a Nikon D810. All seven images shot at 1/25, f/11, ISO 400. I used a tripod, remote shutter device and natural light from my living room window but I was too lazy to use Live View, which I believe helps deliver the best results. I like using an aperture around f/11 to increase the dof of each shot so fewer shots are needed.

Jun 19, 2019 06:47:15 #
Was your five shot stack of images taken from one camera position, then use the focus ring to go from near to far, or did you use the focus rail to move your complete rig fore and aft to get five images of slightly different focus depths? It looks like all five were taken from the same position with no focus change or position change. Or maybe you just used way to small of increments?
Jun 19, 2019 10:36:38 #
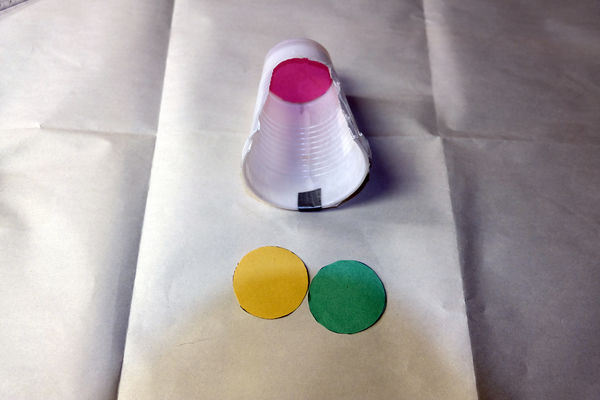
What works well for me is translucent plastic drink cups. I use two of them stacked together with a white paper towel placed between them. I use stick glue to adhere it to the cup.
I place a piece of colored paper in the bottom to provide a pastel background. Images cut out from a magazine work well too (like flowers).
I hot glue a wooden matchstick on the bottom of the cup to serve as a way to hold it over the subject. I cut out a section of the stacked cups so that it goes over the subject making a "soft light tunnel".
The camera looks into the open end of the cup and at times even goes into the cup on highly magnified shots.
Jun 19, 2019 11:22:24 #
olsonsview wrote:
Was your five shot stack of images taken from one camera position, then use the focus ring to go from near to far, or did you use the focus rail to move your complete rig fore and aft to get five images of slightly different focus depths? It looks like all five were taken from the same position with no focus change or position change. Or maybe you just used way to small of increments?
I move the camera on the focusing rail. Sounds like I erred on the side of too small increments. Thanks
Jun 19, 2019 11:29:48 #
sippyjug104 wrote:
What works well for me is translucent plastic drin... (show quote)
Thanks sippyjug, that is going to be my project as soon as I figure out how far to move the camera/lens between shots. I don't understand about the match stick and where it's placed.
Jun 19, 2019 13:58:33 #
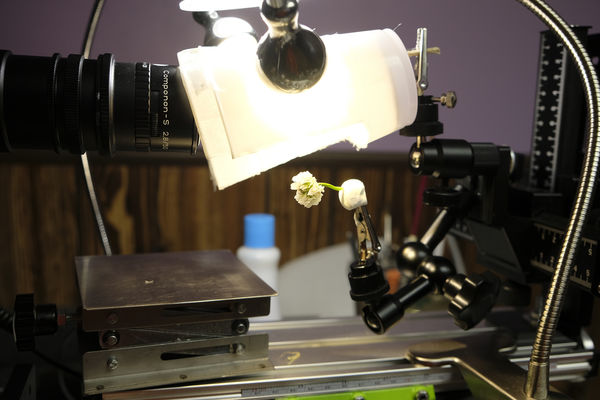
Think of it like a tail stuck on the base of the cup that an alligator clip can grab onto. Here's a picture of my setup where I use it. My go to lighting are two IKEA LED work desk lamps ($13.00 each) which are flexible gooseneck base mounted lamps. https://www.ikea.com/us/en/catalog/products/00385941/
Jun 19, 2019 14:10:21 #

Jun 19, 2019 23:34:04 #
Curmudgeon wrote:
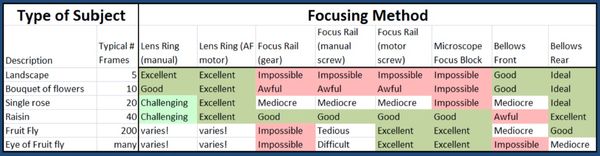
According to this table, sometimes it is better to turn the focus ring and in other instances it is better to move... something. This is from the zerene stacker web site. For the pencil tip, it looks to me like it would be better to use the focus rail.
Jun 21, 2019 07:20:05 #
To make it easier you need to either measure your increments forward or view your increments forward. Either attach some sort of ruler to the rail or use live view on your camera to actually see the area in focus. Also make sure you have a Sharp focused starting point.
F/9 or F/11 is good starting point for 1:1 as you should be able to view the areas in focus. As you progress the skies the limit. I would also make sure your lens is focused all the way down to 1:1. I love the Nikon 60mm macro lens, it's extremely sharp, but also has a very close distance to subject to obtain 1:1. You have the rig and off to a good start.......
F/9 or F/11 is good starting point for 1:1 as you should be able to view the areas in focus. As you progress the skies the limit. I would also make sure your lens is focused all the way down to 1:1. I love the Nikon 60mm macro lens, it's extremely sharp, but also has a very close distance to subject to obtain 1:1. You have the rig and off to a good start.......
Jun 21, 2019 11:43:27 #
Mark, thanks for that chart it seems that if I'm really going to get into macro seriously a motor drive focusing rail and stacking software like Zerene are going to be necessary purchases at some point.
Martin, I really like the idea of attaching a ruler to the inexpensive focus rail I am now using. Even in live view, which I use, it is difficult to see where in the image the focus moves to.
Martin, I really like the idea of attaching a ruler to the inexpensive focus rail I am now using. Even in live view, which I use, it is difficult to see where in the image the focus moves to.
If you want to reply, then register here. Registration is free and your account is created instantly, so you can post right away.