Resize image question
May 22, 2019 07:27:03 #
billnikon
Loc: Pennsylvania/Ohio/Florida/Maui/Oregon/Vermont
CindyHouk wrote:
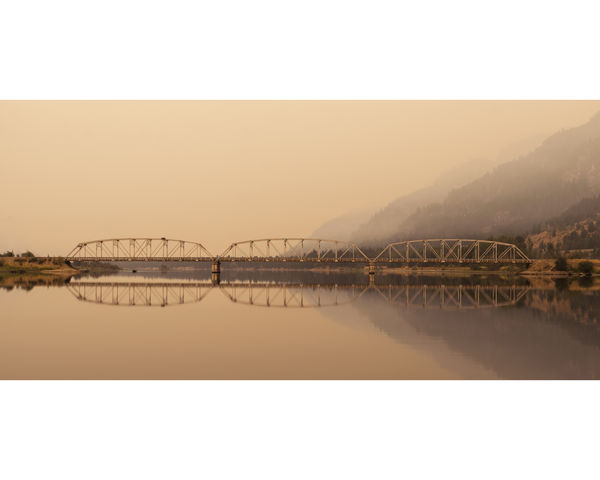
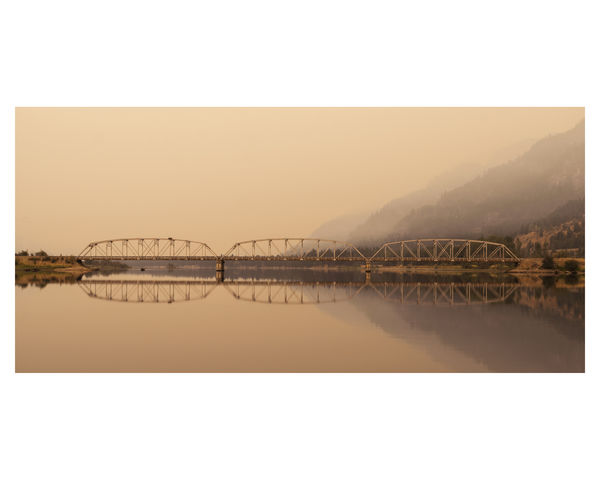
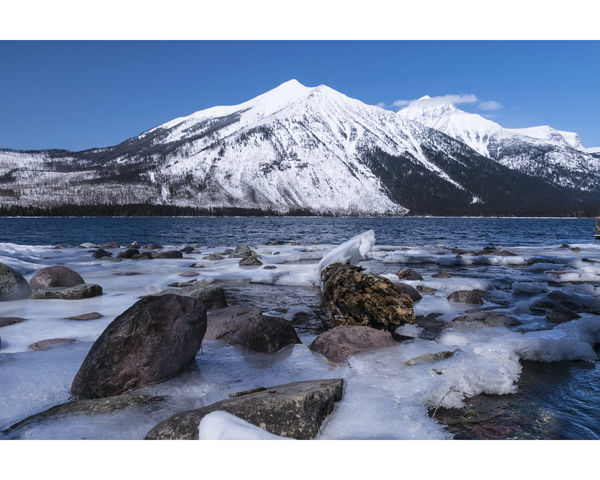
I need to learn how to resize images for printing. Take these images attached....I want to print them 8x10 without cropping them. But when I try it wants to cut off or crop the image and I don't want that. I do have LR and Photoshop but just can't figure out how to do this for some dang reason! How can I resize the canvas to a specific size without cropping the image?
Without cropping the image, which is what you want. Your final image will be 8X12. There is no getting around cropping if you want an 8X10, which by the way, was not the ratio you took the image at, that is why you have to crop it.
You need an aspect ratio of 4X5, and you shot it at an aspect ration of 2X3. On most digital camera's you can change the aspect ratio.
May 22, 2019 07:36:10 #
BassmanBruce wrote:
Linda said exactly what I was thinking, but she types Fast! 
So I’ll just add that those are two beautiful images.
So I’ll just add that those are two beautiful images.
This question has been asked and answered numerous times. I bet Linda copied and pasted her great answer from a previous thread.
I do it a similar way, but add canvas all around to make it look like it’s been matted. For more realism, I add a drop shadow to the image.
May 22, 2019 07:41:48 #

Check out this topic for easy and beautiful digital mat making using a PS action:
https://www.uglyhedgehog.com/t-588788-1.html
The action doc is attached below. Works with PS Elements also.
https://www.uglyhedgehog.com/t-588788-1.html
The action doc is attached below. Works with PS Elements also.
May 22, 2019 07:47:33 #
Linda From Maine wrote:
The issue is not re-size, it's aspect ratio.
A photo in 3:2 aspect such as your second one will fit without cropping into frames or mats sizes 4x6, 8x12, 16x24, 20x30.
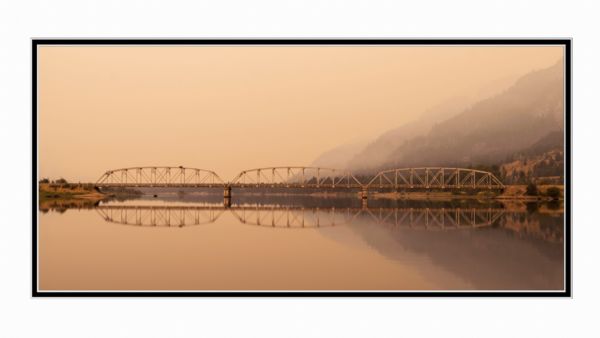
One simple way I've done is to extend canvas size to the dimensions of your frame. Below is an example of a 3:2 aspect extended with black bar at bottom to fit an 8x10 frame. Other folks will have more suggestions.
A photo in 3:2 aspect such as your second one will fit without cropping into frames or mats sizes 4x6, 8x12, 16x24, 20x30.
One simple way I've done is to extend canvas size to the dimensions of your frame. Below is an example of a 3:2 aspect extended with black bar at bottom to fit an 8x10 frame. Other folks will have more suggestions.
I do the same, put the photo on a larger "background" that is the size you want to print. I like the black ribbon on the bottom Linda, it gives you a place to attach a cut line or title.
May 22, 2019 08:56:06 #
CindyHouk wrote:
I need to learn how to resize images for printing. Take these images attached....I want to print them 8x10 without cropping them. But when I try it wants to cut off or crop the image and I don't want that. I do have LR and Photoshop but just can't figure out how to do this for some dang reason! How can I resize the canvas to a specific size without cropping the image?
The have been several good responses to your question. I'd like to add another and hope you'll think it s also a good idea.

Both of these images have 'bald skies' meaning there is no cloud detail &etc. That sky can easily be cloned using the crop tool in photoshop. Set the aspect ratio to 4X5, (then you'll have to flip it to landscape). Adjust the bottom and sides to fit the image and the frame will extend on the top side. Before hitting enter be sure that "Content Aware" in the top tool bar is checked. Press enter. That's all there is to it.
If there were clouds , then you would need to play around with the clone tools but even that is do-able.
May 22, 2019 09:13:30 #
So I was experimenting a bit more with the content aware scaling and it looks like it might help or at least be worth a try.
For the first pic you could protect the bridge from changing and just rescale the area around the bridge.
To do that you would select the bridge or a rectangle around the bridge using any selection tool, then in the select menu choose select/save selection and save to a new channel. Make sure to deselect after the channel is saved. In the edit menu choose edit/content aware scale. in the control area at the top unclick the 'chain' icon to unlock the aspect ratio, right click in the W and H box to display inches instead of pixels. In the dropdown box for 'protect' choose the channel from the selection you just saved.
In the W and H box type in widths and heights that are the nearest in the ratio you want. So if you picture is in 3 to 2 ratio and you want a 5 to 4 ratio pick the closest multiple of 5:4 that fits your picture.
For a random example, if a picture starts at 12 by 8 you might choose 10 by 8, and it will squeeze the 12 width down to 10, but leave the bridge alone. If you feel you have more to give above and below the bridge you could choose 15 by 12 and it will squeeze more of the top and bottom. Click the check box to save it.
Now that it is in the right aspect ratio you can use the crop tool as usual to get rid of the transparent areas and resize, etc.
Just typing this I know it sounds complicated. Simpler of course would be to just go to image/image size and unclick the chain for aspect ratio and allow it to stretch however it stretches without trying to protect a certain area from stretching.
For your second pic you have that featureless blue sky and there is nothing essential to the composition far left and right, so you can afford to crop a bit with the new aspect ratio, or if you do lose some of the sky you could just pick content aware in the crop tool and it will fill it up with more blue sky for you.
May 22, 2019 10:14:32 #
Thanks everyone for the links and suggestions....I am new to photoshop so it's going to take me some play time to learn how to do the suggestions...but I so appreciate everyone helping me! Especially for the bridge photo...I don't want to crop that image so will play and see if I can get it to work!
May 22, 2019 10:30:25 #
Of course places like Bay photo have many standard and custom print sizes, so you can print as is on something frameless, canvas with a stretch edge for example, or metal or acrylic, or if you want a frame you can either get a custom mat and frame made or use a standard frame and have the mat cut to be equal all around except for a bigger area at the bottom, also a classy look.
May 22, 2019 10:41:12 #

CindyHouk wrote:
I need to learn how to resize images for printing. Take these images attached....I want to print them 8x10 without cropping them. But when I try it wants to cut off or crop the image and I don't want that. I do have LR and Photoshop but just can't figure out how to do this for some dang reason! How can I resize the canvas to a specific size without cropping the image?
You have to either crop the image to the 5x4 or 4x5 aspect ratio, or you can make a new canvas that is of that same ratio and then paste your image into it. You will then have a 4x5 image with a border.
But to be honest with you, this picture doesn't work with an 8x10 frame. I believe a custom frame that fits the aspect ratio of the image would best suit this one.

May 22, 2019 11:51:30 #
May 22, 2019 11:55:14 #

jeep_daddy wrote:
....
....
But to be honest with you, this picture doesn't work with an 8x10 frame. I believe a custom frame that fits the aspect ratio of the image would best suit this one.
....
....
But to be honest with you, this picture doesn't work with an 8x10 frame. I believe a custom frame that fits the aspect ratio of the image would best suit this one.
I agree.
May 22, 2019 11:55:38 #
May 22, 2019 12:03:30 #
jeep_daddy wrote:
You have to either crop the image to the 5x4 or 4x5 aspect ratio, or you can make a new canvas that is of that same ratio and then paste your image into it. You will then have a 4x5 image with a border.
But to be honest with you, this picture doesn't work with an 8x10 frame. I believe a custom frame that fits the aspect ratio of the image would best suit this one.
But to be honest with you, this picture doesn't work with an 8x10 frame. I believe a custom frame that fits the aspect ratio of the image would best suit this one.
I too agree, the subject often dictates the matting and images like this bridge do it loudly.
May 22, 2019 12:08:49 #

Giving the image a vertical stretch in the Transform section can work well with mountains and other scenics. As noted elsewhere, stretching can be surprisingly unobtrusive, especially if there are no geometric shapes to give the game away (suns, moons, buildings etc). Mountains can look taller and more dramatic.
May 22, 2019 12:49:39 #
CindyHouk wrote:
I need to learn how to resize images for printing. Take these images attached....I want to print them 8x10 without cropping them. But when I try it wants to cut off or crop the image and I don't want that. I do have LR and Photoshop but just can't figure out how to do this for some dang reason! How can I resize the canvas to a specific size without cropping the image?
Cindy! Easy Peasy! First, some background. I use Photoshop Elements 15 and a number of other editing programs and skipped PS except for my last paid copy of Photoshop 7 (I hate layers!). I even use my favorite, Micrografx's Picture Publisher 10 from 2001 most of the time! As I have a number of laptops and desktops, they will have different versions of editing programs on them and I use them for different editing chores.
Your images are lovely and as downloaded the bridge file opens to 20" wide by 9.343" high. Open the "Image" tab on the Menu bar and drop down to "Resize." Click on "Resize Image" and a window will open with the dimensions of the file. In the "Dimension Size" box, change 20 to 10 for a 10" wide image and the height will automatically change to 4.672." All other items in this window will be at default. Click "OK" and your new image will now be at 10" wide by 4.672" high. You can save this new file size and/or go on to the next step.
Again, click on the "Image" tab and down to "Resize" but this time to "Canvas Size." In the "New Size" box, change 4.672" to 8" and then click "OK." The resultant image will now appear "letterboxed" with white borders top and bottom. You can use the "Canvas Extension Color" box at the bottom of the window to choose white, black, gray or any other color. Back in the days of my custom print lab business, this type of print was called "8x10" borderless 2 sides, utilizing the full paper at the sides (landscape orientation).
You could use the same procedure for any print or any other size by varying the "Canvas" measurements. Practice makes perfect. This technique is called "Self-Matting" and prints thus made
look great in a portfolio binder or frame without an expensive cut mat.
Have a great Memorial Day weekend. Be well. Ed
If you want to reply, then register here. Registration is free and your account is created instantly, so you can post right away.