Using multiple layers of textures - share your tips and pics!
This topic is locked to prevent further replies.
Mar 28, 2019 09:22:24 #

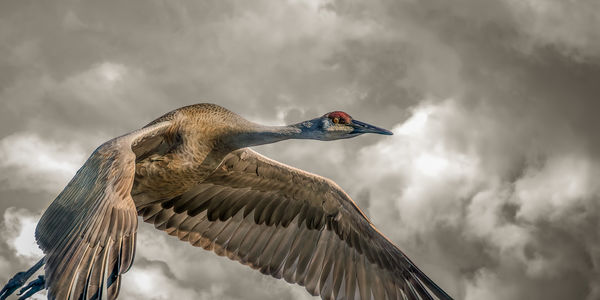
Here is one of those "delightful surprise" moments: my own de-saturated pic of clouds slapped onto Liam's bird via overlay blend mode. Bird is masked from the effect.
Anyone is welcome to use the cloud image or the swirly one below it (I can't recall what that was originally, lol, but I think doing extreme sharpening gave this effect), and remember: it's very easy to build up your own library!
Anyone is welcome to use the cloud image or the swirly one below it (I can't recall what that was originally, lol, but I think doing extreme sharpening gave this effect), and remember: it's very easy to build up your own library!


Mar 28, 2019 10:56:58 #
Guyserman
Loc: Benton, AR
Fstop12 wrote:
It's fun playing with Blend Modes. Tip: If you wan... (show quote)
Two great tips. I use both of them and anyone who doesn't know them will appreciate it. I also group layers a lot and then rename the group. It really makes things easier.
Mar 28, 2019 10:58:05 #
Guyserman
Loc: Benton, AR
Linda From Maine wrote:
I like this a lot, thanks! Which is your preference?
In this case I like the textured layers background better.
Mar 28, 2019 12:29:32 #

Linda kindly directed me to this interesting thread. I often use multiple textures, for a variety of different reasons
-add color
-add grunge
-add lighting effects with or without color
-add paper or canvas effects
-add an edge effect
-add vignette
-to enhance a sky
-as a background for a composite
-as a finishing touch to give coherence to a composite
-as a clipping mask to bring a component of a composite more in line with other elements
-to incorporate other elements that are part of a particular texture file
I use masking, blend modes, clipping masks, opacity and layer order to control effects
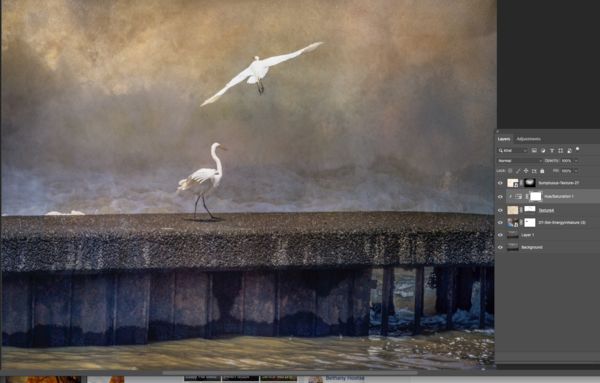
I don't usually keep the layered files once I'm satisfied because the darned things can get so big, so I had trouble finding a layered one I thought was worth sharing. So I am including one that ain't so good. I shot it yesterday, saw it was too soft as well as being dull. I was about to delete it when I thought to try something for this thread. I ran it through Photoshop's shake reduction filter, then set about to give it extra color and texture without really changing anything, just enhancing it to look more like what I shoot in this same place but in good light, and with a painterly approach.
I'm including the unedited original, and a screenshot showing the end result with layers/textures intact.
-add color
-add grunge
-add lighting effects with or without color
-add paper or canvas effects
-add an edge effect
-add vignette
-to enhance a sky
-as a background for a composite
-as a finishing touch to give coherence to a composite
-as a clipping mask to bring a component of a composite more in line with other elements
-to incorporate other elements that are part of a particular texture file
I use masking, blend modes, clipping masks, opacity and layer order to control effects
I don't usually keep the layered files once I'm satisfied because the darned things can get so big, so I had trouble finding a layered one I thought was worth sharing. So I am including one that ain't so good. I shot it yesterday, saw it was too soft as well as being dull. I was about to delete it when I thought to try something for this thread. I ran it through Photoshop's shake reduction filter, then set about to give it extra color and texture without really changing anything, just enhancing it to look more like what I shoot in this same place but in good light, and with a painterly approach.
I'm including the unedited original, and a screenshot showing the end result with layers/textures intact.

Mar 28, 2019 12:56:22 #
minniev wrote:
Thank you very much for your time, Minnie. Your dam birds are so unique to what the vast majority of us find for photo ops, and most anything you do with them creatively I've always enjoyed. This is a highly engaging result!Linda kindly directed me to this interesting threa... (show quote)
Mar 28, 2019 13:40:33 #

minniev wrote:
Linda kindly directed me to this interesting threa... (show quote)
I love your photography! And I love your artistic touch as well!
And thank you for your comment about Adobe’s Photoshake Filter.
I had totally missed that one. So thanks to you (and a YouTube tutorial), I have another powerful tool!
Thank you commenting!
Mar 28, 2019 15:06:25 #
Linda From Maine wrote:
Thank you very much for your time, Minnie. Your dam birds are so unique to what the vast majority of us find for photo ops, and most anything you do with them creatively I've always enjoyed. This is a highly engaging result!
Thanks Linda.
Mar 28, 2019 15:08:34 #
Crichmond wrote:
I love your photography! And I love your artistic touch as well!
And thank you for your comment about Adobe’s Photoshake Filter.
I had totally missed that one. So thanks to you (and a YouTube tutorial), I have another powerful tool!
Thank you commenting!
And thank you for your comment about Adobe’s Photoshake Filter.
I had totally missed that one. So thanks to you (and a YouTube tutorial), I have another powerful tool!
Thank you commenting!
Appreciate! The Anti Shake filter is a beast that often creates as many problems as it solves, but sometimes it does add some detail you may not realize is possible. The problems it creates seem more easily managed in creative processing than in straightforward photos, but it varies a lot image to image as to what it can do.
Mar 30, 2019 10:47:34 #

Linda From Maine wrote:
Here is one of those "delightful surprise" moments: my own de-saturated pic of clouds slapped onto Liam's bird via overlay blend mode. Bird is masked from the effect.
Anyone is welcome to use the cloud image or the swirly one below it (I can't recall what that was originally, lol, but I think doing extreme sharpening gave this effect), and remember: it's very easy to build up your own library!
Anyone is welcome to use the cloud image or the swirly one below it (I can't recall what that was originally, lol, but I think doing extreme sharpening gave this effect), and remember: it's very easy to build up your own library!
Linda,
Thanks so much for sharing the textures. I've been playing around with them and it's illuminating. Thanks also for working with the crane image--very instructive as well. Really appreciate this thread!
Mar 30, 2019 11:10:22 #
LiamRowan wrote:
All the best to you. Come back and visit us often Linda,
Thanks so much for sharing the textures. I've been playing around with them and it's illuminating. Thanks also for working with the crane image--very instructive as well. Really appreciate this thread!
Thanks so much for sharing the textures. I've been playing around with them and it's illuminating. Thanks also for working with the crane image--very instructive as well. Really appreciate this thread!

Mar 30, 2019 19:35:54 #
Linda,
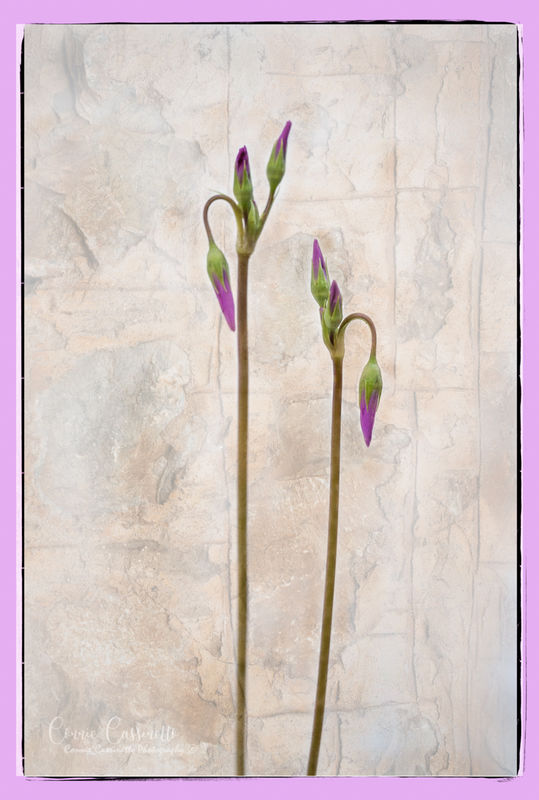
I revised the snowdrop flowers and experimented with brush opacity. I think this version looks a lot better than the one on p2 of the thread.
Also, I liked your results on the crane using the desaturated clouds. I had a few cloud images on hand and one pretty much looked desaturated naturally. Blending = soft light.
An important take away for me of this thread is to start experimenting with textures by themselves, without worrying about how an associated image looks. I think they will give me a better feel for stacking and working with textures.

Mar 30, 2019 19:58:04 #
LiamRowan wrote:
Comparing the two snowdrop pics, I agree 100%. The crisper whiteness and more subtle texture are very complimentary.Linda, br br I revised the snowdrop flowers and e... (show quote)
Your crane is dramatic, yet the clouds don't steal the show. Delighted we have another texture convert (I know you started out in main discussion with your topic of March 5). Thanks very much for your participation!
Mar 30, 2019 20:25:51 #

I'll readily admit I'm not big on this type of work. But I'll also admit that the flying crane image is superb.
Mar 30, 2019 20:37:24 #
AzPicLady wrote:
I'll readily admit I'm not big on this type of work. But I'll also admit that the flying crane image is superb.
I actually have hesitations myself. What I think is an interesting point, though, is that such an image is much more how we see a flying crane with our own eyes. Typically photographers are shooting wide open to get the fastest speed possible to stop the action (unless you're shooting in bright sunlight, but then yuck), so backgrounds are usually narrow in width and clouds blurry. Especially if the bird is close, as this crane was. That's not how we perceive the sky as we watch the birds with natural vision. We really do "see" the scene more like this image.
Mar 30, 2019 20:41:00 #
Linda From Maine wrote:
What are blend modes? See: br https://helpx.adobe.... (show quote)
I love playing with textures using Photoshop. Some of the textures I've purchased, from Flypaper, and some of them I've taken. I generally use a mask to block out the texture effect in some areas and I generally use the texture at a lowered opacity. I'll often use the Cloning tool, too, to clean up some lines once I've flattened the layers. I also like to put borders on images, generally using ON1 Effects. I'll always process the image first in LR, then open PS and pull in an image to work with as a layer. Wildflowers are great for putting textures in back of and even over in some cases. It all depends on the look you want. Here are some examples of wildflowers that I recently took.


If you want to reply, then register here. Registration is free and your account is created instantly, so you can post right away.