Scanning black and white and color negatives
Mar 13, 2019 22:11:46 #
Harry0
Loc: Gardena, Cal
1) Talk to this really smart Spanish guy I know. He's written many many books, and he's the smartest guy I know. He is "Manual". Read the book that came with the scanner, and the software that came with it.
2) Practice a for a few. There are dpi settings, brightness, contrast, etc. Getting them right *for you* first will help immensely. figure out a good naming method.
C) There is nothing automagic about this. It takes time. Accept it. Schedule it. Do it.
2) Practice a for a few. There are dpi settings, brightness, contrast, etc. Getting them right *for you* first will help immensely. figure out a good naming method.
C) There is nothing automagic about this. It takes time. Accept it. Schedule it. Do it.
Mar 13, 2019 22:25:34 #
therwol
Loc: USA
charlienow wrote:
If you do not find the film and slide holders I am sure you can purchase them from epson.
You can buy a complete set on Amazon for just over $100 or buy them individually. Just type Epson V750 film holder into the Amazon search.
Mar 13, 2019 22:30:55 #
therwol
Loc: USA
burkphoto wrote:
USE THE V750 PRO. It is an excellent flatbed scann... (show quote)
Everything you say in this long post is true and well thought out. I just want to comment that working with 16 bit color involves working with large files and having to convert them to 8 bit something in the end, and the OP is still at the "how to I scan my negatives?" stage. But I think that the advice here will get him started.
By the way, I do photograph some of my color negatives with my Nikon D810 with a 55mm F2.8 macro lens at 1:1. I use the Color Perfect photoshop plugin to invert them properly. Results are a bit better than I get with my Epson V800, especially in terms of captured detail, but I've decided that I'll only do that with "special" pictures because it turns out that doing it on a mass scale is tedious and time consuming. I'm doing hundreds of rolls of black and white and color myself.
Mar 13, 2019 22:44:35 #
I have just been looking through the Epson User manual for the V750 and I have yet to find where it states that a negative scan will result in a positive result.
I will keep trying but this seems to be a huge amount of time to do the scanning.
I know most of you have Photoshop, but I do not.
That program also seems to take a lot of time to learn to use it, from what I have heard.
At my advanced age, I may not live that long!
pg
I will keep trying but this seems to be a huge amount of time to do the scanning.
I know most of you have Photoshop, but I do not.
That program also seems to take a lot of time to learn to use it, from what I have heard.
At my advanced age, I may not live that long!
pg
Mar 13, 2019 23:12:52 #

therwol wrote:
Everything you say in this long post is true and w... (show quote)

I gave up scanning my best work in favor of macro duplication, too. I used a couple of advanced slide duplication systems back in the 1980s, so that was a no-brainer for me. Since you’re a Nikon guy, check out this video:
https://youtu.be/SNK24oQICUc
Mar 13, 2019 23:16:01 #
aellman wrote:
"What's in a name?" My Epson V500 PHOTO scanner does both.
Epson makes plenty that do... and don’t scan film.
Mar 13, 2019 23:22:47 #
piniongear wrote:
I have just been looking through the Epson User manual for the V750 and I have yet to find where it states that a negative scan will result in a positive result.
I will keep trying but this seems to be a huge amount of time to do the scanning.
I know most of you have Photoshop, but I do not.
That program also seems to take a lot of time to learn to use it, from what I have heard.
At my advanced age, I may not live that long!
pg
I will keep trying but this seems to be a huge amount of time to do the scanning.
I know most of you have Photoshop, but I do not.
That program also seems to take a lot of time to learn to use it, from what I have heard.
At my advanced age, I may not live that long!
pg
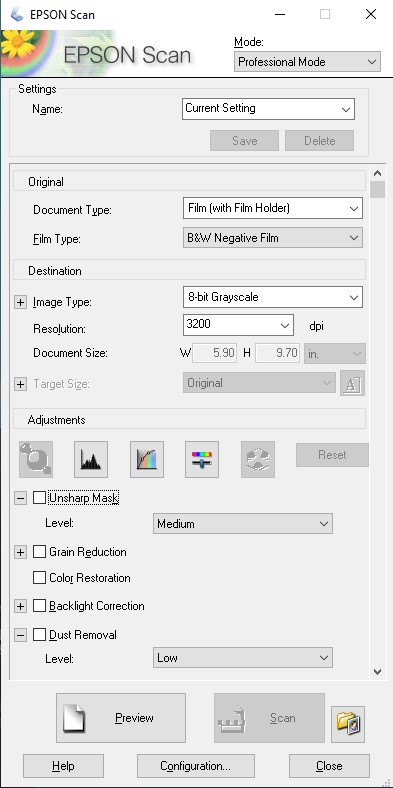
Professional mode... Page 53 in the PDF downloadable manual...
The driver is VERY powerful and full featured. It takes some reading and time and patience (and trial/error) to learn.
Do not read any printed docs that came with the scanner. Use the latest PDFs and the latest software downloads... together.
Mar 13, 2019 23:46:36 #
I have been reading page 53-54 of the Epson PDF manual from Epson website.
Step 5 tells me to select the type of item being scanned...… i.e. 'film'-- 'B&W negative'.
Step 6 tells me to select 'Color Photo', 'Color graphics with text', 'B&W photo' etc.
B&W negative is not listed as a choice.
If I select 'B&W photo', is this what gives me the positive image from the negative scan?
I am confused. I will have to get the V750 up and running and see what I can do.
Thank you!
pg
Mar 14, 2019 00:03:15 #
“Select Professional Mode in the Mode list. See Changing the Scan Mode for instructions.
Click the arrow to open the Document Type list and select Reflective (for scanning documents or photos) or Film (for scanning film or slides).
If you selected Reflective (for scanning documents or photos) as the Document Type setting, click the arrow in the Auto Exposure Type list and select Photo or Document.
If you selected Film (for scanning film or slides) as the Document Type, click the arrow in the Film Type list and select Positive Film, Color Negative Film, or B&W Negative Film.
Click the arrow to open the Image Type list and select the detailed image type you are scanning.”
Of course the text above was written by geeks too close to the software, and worse, translated from Japanese at some point by someone who speaks one or the other as a second language... So you have to follow along and actually do it to get the real sense of it.
Mar 14, 2019 02:04:59 #

piniongear wrote:
I have very many negatives I wish to scan and save... (show quote)
It's all in the settings. Mine is an Epson 550 Perfection scanner. Very versatile & does a great job. B&W, colour slides 35 mm film strips etc.
I scanned several hundred B & W negs from the early 1900s, I think 127 format, scanner width was slightly less than the film but I had to sacrifice some sky or fore ground, no problems.
Mar 14, 2019 02:42:53 #
therwol
Loc: USA
burkphoto wrote:
“Select Professional Mode in the Mode list. See Ch... (show quote)
If you are scanning film, make sure that you see glass on top and bottom if when you open the cover. There is a white backing that goes into the top for scanning photos and documents that MUST be removed for scanning film.
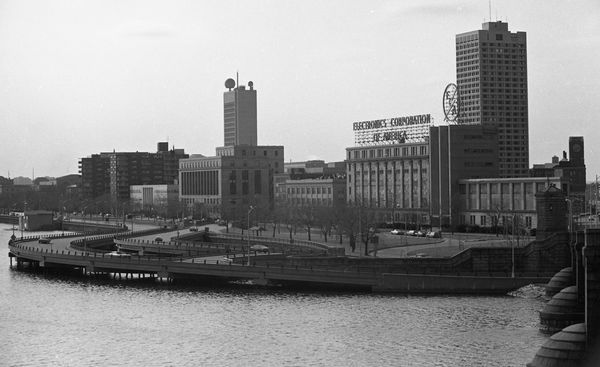
Look at these settings, making sure you're in the professional mode. (You can choose the dpi. I used 3200 for the accompanying photo. You can go higher, but I personally wouldn't go lower. ) It was scanned from a black and white negative taken in 1972. Download each if you want to see more detail or can't read the text on your screen. Black and white negatives should be scanned in 8 bit or 16 bit gray scale. If you don't know the difference, choose 8 bit for compatibility with photo viewers on all devices. You also get a choice of saving your photos as .tif or .jpeg. .tif files are larger but better for editing without loss of quality. .jpeg is the standard for most people who share photos.
Mar 14, 2019 11:29:09 #
therwol wrote:
If you are scanning film, make sure that you see g... (show quote)
Good points...
I would add that most of the power and convenience of the driver is in that lower section. (Note the scroll bar on the right, too!) Turn on Unsharp Mask, Grain Reduction, and Dust Removal, and see what happens. Also, the controls labeled with the graphic buttons allow plenty of tone bending and adjustment. You can tune the scanner to capture a really nice image BEFORE it gets to your post-processing software. Recording 16-bit TIFF files that are already well-adjusted gives you maximum latitude to be creative in post.
It really helps ALL your photography to work on a good, hardware-calibrated, and custom ICC-profiled monitor. I use an older Datacolor Spyder5Pro on my iMac, but there are better units available now from both Datacolor and X-Rite. Over 15 years ago, I used early ICC color management calibration and profiling tools to set up a color-managed workflow in a large portrait lab. It was probably the best thing we ever did to reduce our waste of photo paper and chemistry. Monitor calibration is dirt-simple these days, and WELL worth the $150 to $250 for a calibration kit.
The main, universal issue I see with using flatbed scanners to scan film is SHARPNESS. Those film holders place the film emulsion a bit higher off the scanner glass than the surface of a photo print would be. That avoids those funny, concentric Newton's rings that you would get from direct contact of the negative with the glass. But focus then becomes a factor. As I mentioned, you can apply Unsharp Masking to improve detail a bit, but it may not be enough to satisfy...
That's why I went to the copy method (camera with macro lens, film in an enlarger negative carrier, back-lit with a highly diffused, color-correct, 5000K light source). A rail system keeps it all square and plano-parallel. I trip the shutter with a WiFi enabled app on my phone, and use an electronic shutter of a mirrorless camera to avoid all traces of vibration. Recording raw images lets me pull all the details out of highlights and shadows and get better results than were possible to achieve in a wet darkroom.
The drawbacks of copying include having to invert the curves in Lightroom or Photoshop's ACR, dealing with flare, and a need to have spotless film to avoid spotting in post-production. Copying color negatives without the auto color correction of a decent scanner driver can be downright painful! But it can be done well, and you can always create a folder of presets in Lightroom to speed up the process.
Check out this video, especially if you use Nikon gear:
https://youtu.be/SNK24oQICUc
Even if you don't use Nikon, the principles outlined in the video are sound, and will work with a similar setup. There are MANY videos on YouTube illustrating how to assemble home-brew copy setups. The primary advantage of using a commercial solution similar to Nikon's ES-2 is the avoidance of flare. However, the system shown IS quite expensive, if you don't already own a Nikon body and a 40mm (DX) or 60mm (FX) Micro-Nikkor lens.
One of the things I have learned about 35mm film photography from working with digital cameras is that medium to high speed films of the 1970s lacked the ability to record detail and tonality as well as modern digital tools.
I have a portfolio of prints I made back in 1977. Copying some of the same images from the original negatives, then adjusting the images in Lightroom and making inkjet prints, I have achieved better tonality, and a *little* less grain (due to noise reduction), but essentially the same sharpness and definition.
ISO 400 on my Micro 4/3 camera looks cleaner than anything I ever recorded on ASA/ISO 400 35mm film. ISO 1280 on my Micro 4/3 camera looks WAY better than Tri-X pushed to an "exposure index" of 1280 in Acufine... something I did routinely for yearbook photos of night football and basketball games in dim gyms. A full frame, high resolution digital camera will blow 120 size 400-speed films out of the water. But there is still room in the universe for 4x5 and 8x10 films...
If you want to reply, then register here. Registration is free and your account is created instantly, so you can post right away.