Photo restoring
Mar 13, 2019 11:14:50 #

Thank you for your service. Hopefully someone will help you out with your project, I would if I had the ability. Perhaps if you were able to get quality scans and provided them digitally you may find several people willing to take on a dozen or so each and eventually get them all repaired.
Mar 14, 2019 12:13:19 #
I see allot of posts telling you to scan your images but I have found that for detailed work taking a RAW digital image with a good camera & lens, I use a Canon 5D III & 50mm prime, gives much more editing flexibility and better overall results. That being said it would be nice to see a few examples so we Hogger's can give you better advice.
Mar 14, 2019 17:07:51 #

DanielB wrote:
I see allot of posts telling you to scan your images but I have found that for detailed work taking a RAW digital image with a good camera & lens, I use a Canon 5D III & 50mm prime, gives much more editing flexibility and better overall results. That being said it would be nice to see a few examples so we Hogger's can give you better advice.
Basically, once the image is either PROPERLY copied or scanned, and placed in Photoshop or whatever software or retouching plug-in programmes are employed, all the tools and actions are at the disposal of the operator. After that, it is just a matter of skill and patience.
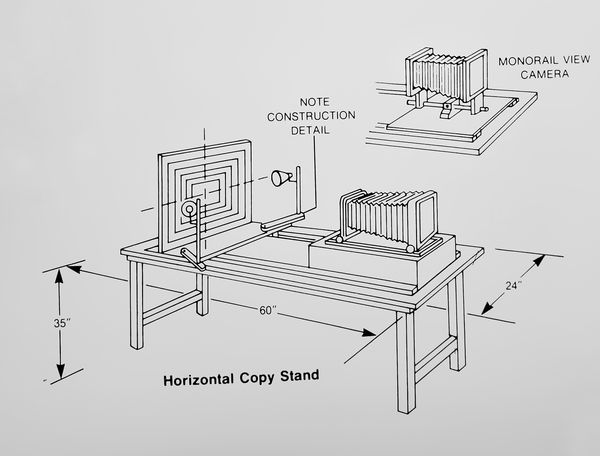
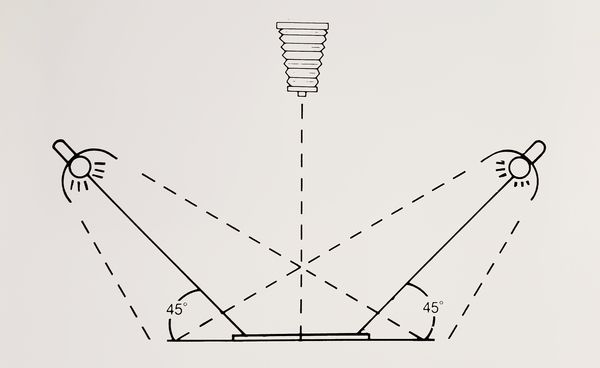
Back in the film days, my studio handled a good volume of copy and restoration work but the methodology, prior to digital photography, was different. All photographs for restoration were copied on large format film. We build a copy stand as shown in the attached illustration. There were 2 POLARIZED light sources, each at 45 degrees to the camera/subject axis. A CPL filter was used on the camera well. This negated any surface reflections and some damages such as some minor scratches, and other dichroic interference, contact ferrotyping that is sometimes found on old photographs.
We had special copy films enabled control contrast and the tonal scale. We use a colored filter to optically neutralize certain stains. Sometimes we used certain specialized lithographs film to restior badly faded images.
The method was to produce a negative that would yield a low contrast inter-positive work print on which we would do dye, pencil and airbrush retouching to restore detail fill in damaged areas and remove defects. Then we would copy the workprint to make a final negative for the finished restoration print. Sometimes some of the retouching or correction was done on the negatives as well.
This seems like a very painstaking process but there was a reason for this lengthy process. The major issue with copy work is that ordinary copy negatives would yield excessive contrast and by first reducing the contrast in the first work print would then build up upon the final print and arrive a very authentic copy. With color originals, we had special internegative films or would pre-soak and alter the process of our C-41 materials.
Once a goof final negative was obtained, we could print it on a variety of warm-tone papers that would somewhat replicate the original. We oftimes used tones to create the effect and add additional permanence.
Nowadays, I can accomplish most of this in post-processing from good files. We still use the original copy-board setup when we can't scan the original. Obviously, some originals are too big for the scanner. I won't put extremely fragile, brittle or badly beginning to come off, I don't want to put in contact with the glass. Also, some old images are stuck to the glass in badly damaged or stored picture frames.
What method the OP decides to use will depend on the equipment he has, the condition of the originals, and his skill level on post-processing. He might have some images that do not require manual artwork or the digital equivalent. Some issue can be solved by copying with polarized light, filtration or some simple cloning and healing applications.
If he posts a few examples everyone will be in a better position to advise him.
Mar 19, 2019 19:39:52 #
E.L.. Shapiro wrote:
Basically, once the image is either PROPERLY copie... (show quote)
That is some great & fascinating information and similar in camera setup as to what I do with digital now for restoration work. Thanks for sharing.
If you want to reply, then register here. Registration is free and your account is created instantly, so you can post right away.