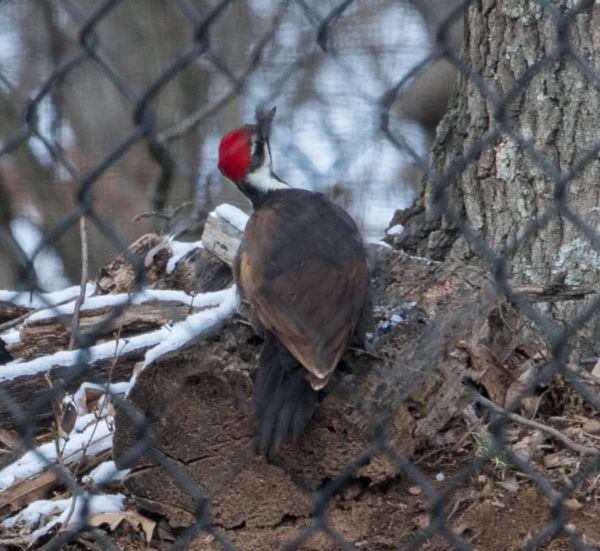
Fence removal - first attempt at anything
Mar 5, 2019 12:54:47 #
Linda From Maine wrote:
Were you using a different tool, then? Maybe some kind of content-aware move/remove? You may prefer videos, but here is an overview of the clone tool: https://digital-photography-school.com/12-tips-for-mastering-the-clone-stamp-tool-in-photoshop/
I have PS Elements, not photoshop, but same principles. Zooming way in is important when working on the smallest areas; I didn't mention that yesterday. All the best!
I have PS Elements, not photoshop, but same principles. Zooming way in is important when working on the smallest areas; I didn't mention that yesterday. All the best!
Thanks for this overview. I've read it all. Parts of it sound scary and parts I didn't quite understand from reading. But I will now read this again with photo shop in front of me and try to follow the steps. It should be fun!
Mar 5, 2019 12:55:36 #

Red Sky At Night wrote:
Thanks abc1234. I am aware that the original photo... (show quote)
I did catch that comment and that is fine. We all wish for such a program. I had a similar problem. I have bird feeders on my deck and would shoot through the sliding door. I covered it with a blank banner with a hole for lens. However, I did not like the background, angle and the glass which hurt the image quality. My solution was go shoot from a second floor bedroom. I took off the screen and opened the window. The angle and background were very much better. Perhaps you can think for alternatives too.
Mar 5, 2019 13:31:36 #
abc1234 wrote:
I did catch that comment and that is fine. We all... (show quote)
That is a great idea. I think once the weather warms up and the Spring birds return I will try that. Thank you.
Feb 25, 2020 12:59:18 #

Linda From Maine wrote:
Were you using a different tool, then? Maybe some kind of content-aware move/remove? You may prefer videos, but here is an overview of the clone tool: https://digital-photography-school.com/12-tips-for-mastering-the-clone-stamp-tool-in-photoshop/
I have PS Elements, not photoshop, but same principles. Zooming way in is important when working on the smallest areas; I didn't mention that yesterday. All the best!
I have PS Elements, not photoshop, but same principles. Zooming way in is important when working on the smallest areas; I didn't mention that yesterday. All the best!
I was drawn to this page from a post of mine. Thanks for the information on cloning that you have added. It will help me as I continue to learn about layers and improving various aspects of my photos.
Feb 25, 2020 13:03:34 #
Red Sky At Night wrote:
Okay, get ready to laugh but if you think back may... (show quote)
I was drawn to this post of yours from your comment you made on mine when I showed my first work of layers and cloning. I got many great hints from reading through your post and comments. It's always good to see there are people out there still learning about Photoshop and photography in general. Thank you.
Feb 25, 2020 14:08:16 #

Birdshooter wrote:
Great to have you! As I just wrote in your topic, please be sure to subscribe to PP Forum so that you can be alerted to new topics via the "newest topics" list at the top of any UHH page.I was drawn to this page from a post of mine. Thanks for the information on cloning that you have added. It will help me as I continue to learn about layers and improving various aspects of my photos.
A few tutorials by UHH members are included in the guidelines doc:
https://www.uglyhedgehog.com/t-184368-1.html
All the best in your journey!
Feb 26, 2020 15:54:15 #

Cheating quite a bit here...
To remove a chain link fence or just almost anything that is linear there is a simple albeit time consuming...
Content aware with a twist.
- Create an empty layer (I named it matrix)
- Select a hard brush that fits over the object to be replaced. Make sure you paint black (it does not really matter but this makes everything visible.
- Once you have created the (matrix) content by painting, uncheck it.
- Click on the lower layer
- Alt-click to create a selection from the (matrix)
- Use 'Content aware fill' (under file > edit)
- Make sure you select 'create a new layer'
- Click ok
You are almost done.
To adjust the imperfections
- Create a new empty layer
- Select the healing brush (soft edge). Make sure you select Sample All Layers
- Start a new non destructive edit of the image.
Notes: On my sample I did not play with the correction layer. I also did not select the whole fence (I do not have the patience)
----
Feb 26, 2020 20:33:18 #
Some tasks even with the best software are just impossible and I think you have come across one of these.
However I am sure it was good practice so it will not be time wasted.
However I am sure it was good practice so it will not be time wasted.
Mar 2, 2020 23:59:44 #
Rongnongno wrote:
Cheating quite a bit here... br br To remove a ch... (show quote)
Wow, this is so much better than where it started. Thanks for taking the time to offer suggestions and write it all out.
If you want to reply, then register here. Registration is free and your account is created instantly, so you can post right away.