Finally A Good Shot??
Dec 20, 2018 15:13:29 #
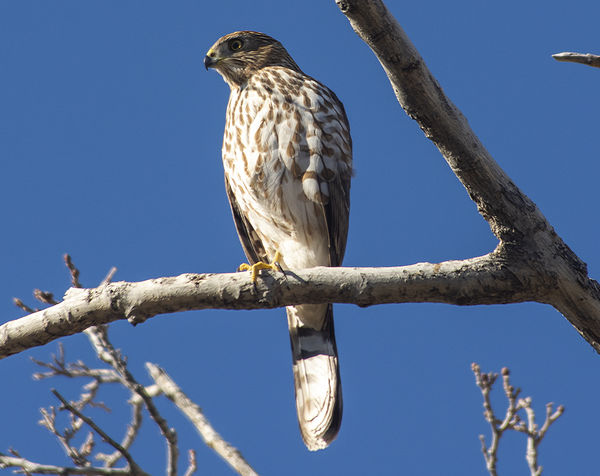
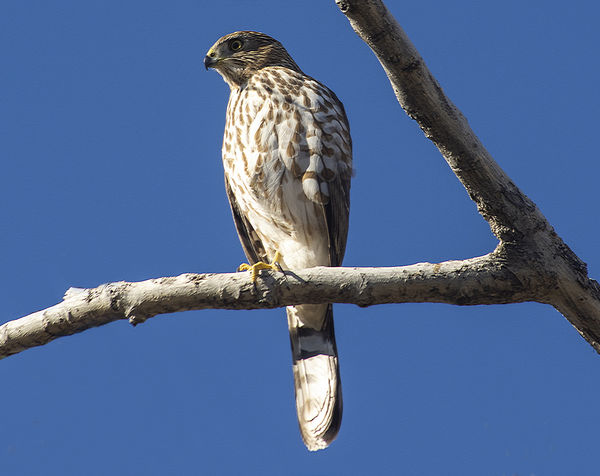
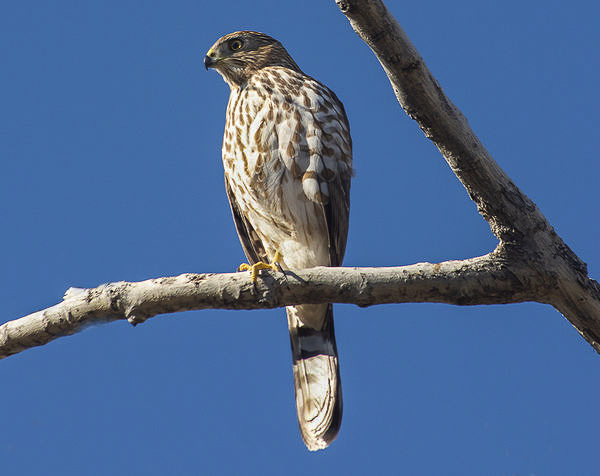
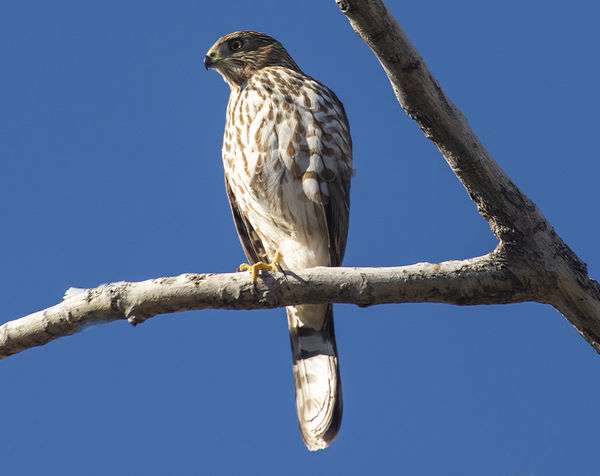
Yes it's heavily cropped. I got as close as I could before it flushed. Processed to my skill level in LR and PS. Anything else I can do? Feel free to do anything you want to but please tell me what you did and what software you used.

Dec 20, 2018 15:18:14 #

clone-out all the background branches and restore a little bit more sky above the head
Dec 20, 2018 15:18:57 #
Dec 21, 2018 08:35:51 #
Since you said Ok to play with photos if we wanted to. So I had to try a couple of things I have learned over the years to see if I could improve it. I opened in PS 2019 , Under filters , I clicked sharpen - shake reduction set to 30 .Then I made a selection around the blueish high light under the tree branch on the left side and removed with clone tool . Then I picked the paint brush , set mode to Darken , Opacity to 100% , then starting from the left side under the tree branch . I used the Eye Dropper Tool to pick the sky color about an 1/8 of a inch away from the branch . Then I started to paint the small glow on the bottom of the branch that I could see on my monitor that went a long the whole branch . About every inch I took a new sample of the sky color to be sure that it would overlap onto the sky with the correct blending color as you can see the sky darkness changes as you go from one side to the other . When I was done , I opened your copy and my redo in PS , zoomed in to compare sharpness etc. I could see the difference , so I posted it with what I did for you to judge to see if you would like to use these tips now or later on or not at all is fine . I would like to say you had a very nice photo even before I played around with it , and I wouldn't of done anything to it if you hadn't given the ok. I use to spend hrs out in the woods, fields , along lakes , driving a long highways and back roads etc . Waiting for that special shot . Haven't done any of that the last couple of years . After printing large copies of several photos , and donating them to the state park I live close to , I slowly stop going out to take photos . Tommy
Dec 21, 2018 08:51:18 #

kubota king wrote:
Since you said Ok to play with photos if we wanted... (show quote)
This edit shows how great the shake reduction filter is. Too bad LR does not have it. Almost all of my sharpening is with it. I use it on a layer so I can compare the result to the original.
As for fixing the bottom of the branch on the left, I would have first tried the healing brush and if that did not work, I would have cloned it. I would have cloned away that little protrusion on top of the branch.
I would also add a very slight negative vignette to make the bird pop more. -10 or -15 should do it.
This is a pretty good bird shot in the first place so that it required minimal editing. Removing the branches was a big help. My only quibble with the picture is that I would not have cropped it so tightly. Overall, you can be proud of this picture.
Dec 21, 2018 08:52:04 #
Curmudgeon wrote:
Yes it's heavily cropped. I got as close as I could before it flushed. Processed to my skill level in LR and PS. Anything else I can do? Feel free to do anything you want to but please tell me what you did and what software you used.
Please post the camera and lens. Thanks.
Dec 21, 2018 08:57:42 #
abc1234 wrote:
Please post the camera and lens. Thanks.
Is it too much trouble for you to read it for yourself from the EXIF data readily available in the attachment?
Dec 21, 2018 09:11:57 #
CHG_CANON wrote:
Is it too much trouble for you to read it for yourself from the EXIF data readily available in the attachment?
Yep.
Dec 21, 2018 12:15:54 #
abc1234 wrote:
This edit shows how great the shake reduction filt... (show quote)
I did try the healing brush first and the new content aware fill , They did not do the job correctly or even close . I only ever use the clone tool as a last resort .Tommy
Dec 21, 2018 14:38:02 #
abc1234 wrote:
Please post the camera and lens. Thanks.
Nikon D 7200, Sigma 28-300D
Dec 21, 2018 14:38:09 #

Dec 21, 2018 14:44:23 #
kubota king wrote:
Since you said Ok to play with photos if we wanted... (show quote)
Thank you Tommy. Most of those things I don't know how to do--yet. Going to learn now. I am still a hunter, I'm out blundering through the desert looking for shots.
Dec 22, 2018 09:32:07 #

My immediate reaction to this shot was that it was a great capture, but the highlights on his chest and tail feathers needed to be diminished a bit. I opened it in PS as a smart object, created a new copy of that smart object, and then went into camera raw, dropping the highlights and exposure a little until more color and definition popped on his chest. Going back into PS with that adjusted layer, i opened a layer mask on that and just brushed over the areas i wanted to drop the highlights on. I just think it gives him more color and definition without losing the effect of the sun shining on him. I used the same method to lighten up the shadow around his eye a little. Just my .02. It's a method i learned from Dave Morrow. I think it's too small to store original, so i can't seem to get the download version to work when i check that box. I've attached your original here for the comparison. Not sure why they skies look different - i didn't touch that at all.
Marylea
Marylea
Layers version
Original
Dec 22, 2018 17:26:19 #
Dec 22, 2018 17:42:26 #
melueth wrote:
My immediate reaction to this shot was that it was... (show quote)
You can get the same result with the radial filter in LR.
If you want to reply, then register here. Registration is free and your account is created instantly, so you can post right away.