How do I get rid of the blue tone using PSE9?
Jul 20, 2012 13:17:20 #

Victoria1233, in addition to all the good suggestions above, I will make one more. Open your images in Camera Raw (ACR). Do this by (in PSE 9) first click on "Open As" then move down to "camera raw" in open as screen, then click on the image and open. ACR will come up, choose auto first, then move sliders to your deisred result (if you want to). Then clikc on "open image" in the bottom right of the ACR screen and the image wil open in PSE with all the edits from ACR. Make other fine adjustements in PSE (if desired) and save. You can do this to jpegs, tiffs, and RAW files.
Jul 20, 2012 17:02:40 #

mremery wrote:
If you shoot in RAW, then use Camera RAW to "preprocess" the image, you may try to modify the white balance. You also can try changing the white balance on your camera and see what effect that has.
I Agree that if you are shooting RAW it is very easy to remove a color cast. That is one of the reasons that I shoot in RAW.
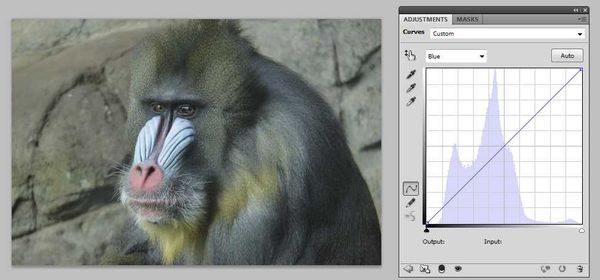
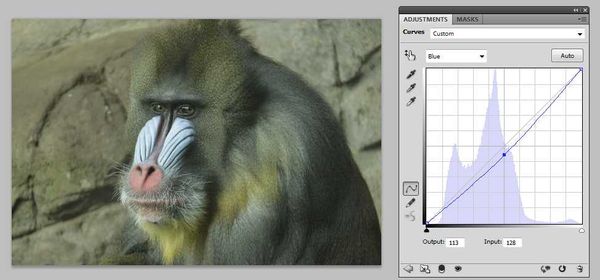
But if you are shooting Jpegs there is an easy way to remove a color cast if PSE has a curves tool. I used this process when I was scanning slides on the Nikon Super Coolscan 4000 because the scanner produced a slight blue cast.
Here is the process in PS5. (see the screen shots)
1. Open the curves tool
2. Click the down arrow next to RGB and Select "Blue"
3. Click on the center of the diagonal line and drag down slightly until the blue cast goes away.
Original Image with unedited blue channel
Original Image with edited blue channel
Jul 20, 2012 17:43:19 #

Victoria1233 wrote:
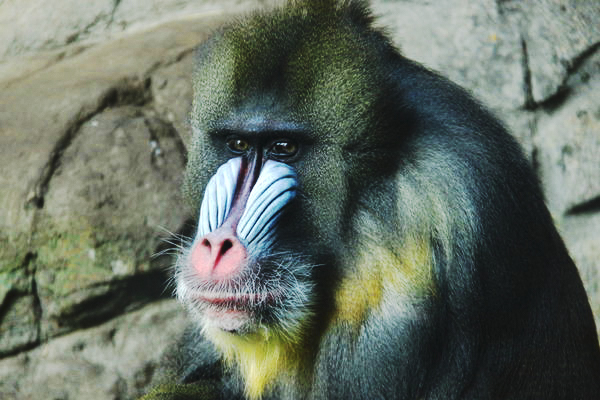
Whenever I take photos of the Mandrills at the zoo... (show quote)
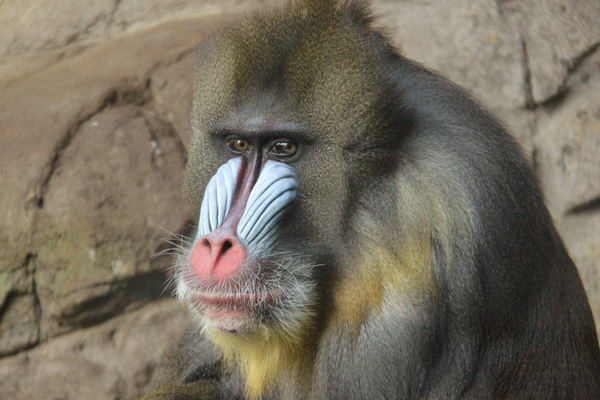
I'm taking you at your word. I don't use PSE, but I think you have the same tools as I do (Photoshop CS5) for this adjustment. I applied a Curves adjustment and used the midtone-gray eye dropper on the mandrill's fur where it looked a bit bluish. And then I bumped the exposure.
If you can adjust white balance on your camera, you'd probably get better results. While you can make corrections later, you're better off if you can correct in the camera before pressing the shutter.
Jul 20, 2012 20:14:41 #
Thanks Larry.
I used to have my new high resolution screen on 60% ? or something like that, as I can't tolerate a bright screen. I used to have the brightness of my computer in my working life the same.
Now I've got my home computer monitor at 50% in an effort to try & visualise what viewerrs of my Photoblog might be seeing.
I haven't touched any other of the factory settings on my screen as I would assume they were 'correctly calibrated' in the factory.
When I look back on my 2010 Point & Shoot images when I had the old small monitor, they look exceptionally bright and over colour-saturated on this new high resolution monitor to me.
Jul 20, 2012 20:23:19 #
RMM wrote:
.
I'm taking you at your word. I don't use PSE, but I think you have the same tools as I do (Photoshop CS5) for this adjustment. I applied a Curves adjustment and used the midtone-gray eye dropper on the mandrill's fur where it looked a bit bluish. And then I bumped the exposure.
If you can adjust white balance on your camera, you'd probably get better results. While you can make corrections later, you're better off if you can correct in the camera before pressing the shutter.
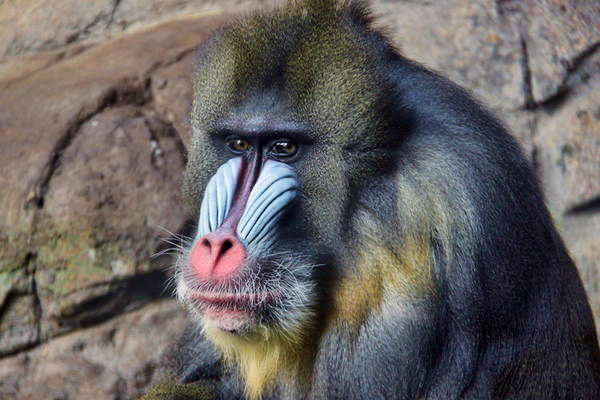
Thanks RMM. I think your example looks much, much better. It's far closer to the actual colour of the background rocks and the animal itself. I think it's far more natural looking than the Blue-black of the fur in my original photo.
I'll check out and see whether PSE9 has what you're describing. It should have as PSE9 is supposed to be the simplified version of Photoshop.
I'll also follow up with changing the white balance & shutterspeed on the next zoo excursion.
Everyone has given me something to work on, so thanks.
Jul 20, 2012 21:22:37 #
Victoria1233 wrote:
Whenever I take photos of the Mandrills at the zoo... (show quote)
The 'deep shade' is lit by the intensely BLUE of the open sky, with a color temp of perhaps 10,000K. Adjust your White Balance to a higher, maybe even the highest, setting that your camera has.
Don't forget to change it back to 'normal' when you're back in 'regular' sunlight.
Jul 21, 2012 00:40:52 #

neildon wrote:
quote=mremery If you shoot in RAW, then use Camer... (show quote)
Unfortunately PSE9 doesn't have curves. It has a thing called color curves but it won't separate RBG colors. Too bad. This is one reason why I upgraded to CS.
I do not know of a 2 step fix for your blue problem. You might try some different picture styles in your camera and also try a different white balance. You can set the temperature in calvin to 4500-5200 for shade and 5200-6500 for direct sun. This might have an effect on the blues. You can try Lightroom. Use it for 30 days by downloading it from Adobe. It is a non destructive post process software that does have a curves adjustment and HSL adjustments for hue/saturetion/lumination adjustments on 9 different colors individually.
The reason your image looks too dark on the UHH web site is because your image isn't saved in the sRGB color space which is best for internet viewing of images. It's saved in the AdobeRGB color space. But this is a whole new can of worms and if you have learning problems it will be difficult to explain what this is. You can google it, search UHH or post another question on UHH about what color space is. From now on try to remember to use 'File', "save for web" in the editor and it will convert the image to sRGB automatically when the image is saved. When you upload the image to UHH it will look the same as it did in PSE9.
Jul 21, 2012 01:12:22 #
I've already used up the 'free trial' version of Adobe Lightroom about 12 months ago. I realised that I couldn't get my brain around how it worked, so opted to actually spend a bit of money & buy PSE9. I found the GUIDED section as easy as the free Picasa 3 I downloaded a couple of years ago.
I have also tried a couple of different picture styles and when they weren't what I wanted I couldn't remember what I had the camera setting on that worked well for other subjects. (Big Grin).
Short term memory probs are a real hassle when you want to learn something new. But I'll get there in the end.
I've written down your instructions for saving future images so will see how that pans out.
Thanks for taking the time to comment. Jeep D.
Jul 21, 2012 09:38:12 #
Victoria1233 wrote:
I've already used up the 'free trial' version of A... (show quote)
Victoria, Is this what you are looking for???
Jul 21, 2012 20:11:12 #
[/quote]
Victoria, Is this what you are looking for???[/quote]
Thankyou for your example, but the Mandrill's fur is a little over-saturated with colour for me.
But yes, you have got rid of the blue tone in the background really well.
Next time I go to the zoo, I'm going to try changing the white balance, shutterspeed and colour style as other members have suggested in an effort to try & achieve the correct colour at time of shooting (if possible).
I'll be sure to post my results in this thread so we can all view what worked and what didn't.
Jul 21, 2012 20:50:20 #
ephraim Imperio wrote:
quote=Victoria1233 I've already used up the 'free... (show quote)
This example has more blue in it than any of them.
Jul 21, 2012 21:04:04 #

One PSE 9 - Click "enhance" tab, Auto Color Correction.
Two Addition of Topaz Adjust "Image Pop", plugin for PSE 9.
Two Addition of Topaz Adjust "Image Pop", plugin for PSE 9.

Jul 21, 2012 21:07:32 #
Jul 27, 2012 22:39:30 #
francesca3
Loc: Sausalito, CA
Dear Victoria,
I use photoshop elements too. Like you, I do not use the layers and the complicated part of the program. (Hope to learn it sometime perhaps.) I usually keep it simple with the "Guided" setup and it has worked very well for me.
Here is what I do to correct solve unwanted color hues:
Go to the "Remove a color cast" and use that tool to set the colors right. (If I forget to set the correct "white balance" setting on my camera, this program corrects the colors fairly well.)
Hope this helps.
Jul 28, 2012 08:10:04 #
francesca3 wrote:
Dear Victoria, br br I use photoshop elements to... (show quote)
Thanks Francesca3,
You sound like more my level of editing. 99% of the time, the Guided setup of PSE9 works for me too. I'll have a look at "Remove a colour cast".
I haven't been back to the zoo since posting this question as it's winter here & been raining a lot, so I haven't had a chance to try a different lot of settings on the camera yet.
thanks for replying
Victoria
If you want to reply, then register here. Registration is free and your account is created instantly, so you can post right away.