How do you guys change the sky in a complex photo
Dec 6, 2017 16:37:25 #
Using a Graduated Blue filter saves the post edit issue-but the filter holder etc. can be a pain-for the few shots that need it I just keep it handy and adjust the height by holding it with 1 hand-I also cut most of the sky out if it is really not needed anyway on bad days. Also darken the photo some to bring the sky up-depends on the type of shot.
Dec 6, 2017 16:41:49 #

If you have Photoshop or PSE there is an edit called Haze removal. That tends to find any differences in what appears to be a uniform overcast sky. It also will tend to correct the exposure somewhat. Try that. I've fixed some overcast skies with that.
Dec 6, 2017 17:19:28 #
tomad wrote:
Hey pp experts, I have a photo that has a white (... (show quote)
I usually use ON1 Photo RAW 2018 in Layers to do that type of complex masking job. I also have used Topaz ReMask which does a great job too. Once the mask is completed you can drop whatever new sky background you want in a layer below the mask and adjust it as needed to finish up.
Dec 6, 2017 17:47:12 #
There is a website www. photobacks.com that often has free webinars showing how to do this in photoshop or elements. The first 15 minutes and the last 30 of a 2 hour webinar is a commercial but I learned a lot
Dec 6, 2017 18:52:45 #
Dec 6, 2017 19:28:57 #
I am far from an expert in these matters, but I do understand what you are talking about when you say it would take forever to do a 'replace color.' I have had this problem before. While I cannot recommend a simple answer, I wonder, and I realize you may not want to do this, but it may be a very nice picture, (and it is a nice picture now), if you were to darken the picture just a little, and change the sky, not to blue, but to a very dark gray. In that case, the gray between the leaves would not be so noticeable as totally different from the rest of the sky. That may even give it a 'stormy' look. I always try to think of a way the picture would be different, (although for stock agencies, they often don't like pictures that are over processed) but just to think of ways that you can get a twist that most people don't think about. That sets your photography apart, at least a little bit. Unfortunately, I haven't been able to think of a lot of 'different' ways, as whenever I do, I find someone has already thought of that.
I know that is not what you wanted to do, so I hope I haven't wasted your time, but maybe something to think about, anyway, good luck.
I know that is not what you wanted to do, so I hope I haven't wasted your time, but maybe something to think about, anyway, good luck.
Dec 6, 2017 20:02:29 #
Dec 7, 2017 00:41:46 #

Sorry for the late post but earlier today I saw an online demo for aurora hdr that made it look easy
Dec 7, 2017 05:57:53 #
mborn wrote:
I use landscape pro to edit complex skies
I will second that. Landscape Pro is a very intuitive program and does a great job on the sky between branches. Affordable also.
Dec 7, 2017 12:07:16 #

Using Photoshop CC here's one way. I'm sure there are many others.
The gist of the process is to make all areas of the sky in your photo transparent and place it as a layer on top
of a new sky background. The magic trick is called COLOR RANGE in Photoshop. This works fairly well if the sky
in your photograph is of uniform color. Otherwise you may have to repeat the process for areas of different shades.
1. Create or use a stock image of the desired sky background. A solid color or something with clouds.
2. Open both your photo and the new created sky background in Photoshop.
3. Re-size (if necessary) the new sky background to the same dimension as you r photograph.
4. Select your photo as the active image.
5. In the SELECT menu, select ALL
In the EDIT menu, select COPY
6. Select the new sky background as the active image.
7. In the LAYER menu, select NEW then LAYER
8. In the EDIT menu, select PASTE
You now have a background sky image and a layer of you photo. ( I'm sure there is a more elegant
way to get a your photo into a layer with the background image.)
Be sure the layer is selected
9. Use the QUICK SELECTION TOOL to select the area of the sky to be changed
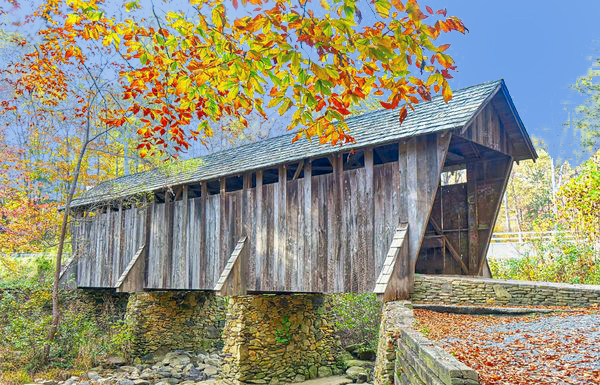
In the case of the covered bridge, select the top part of the photograph, masking out the bridge and lower
part. Include all areas that have sky including the trees.
10. In the SELECT menu, select COLOR RANGE.
Use the EYE DROPPER TOOL to select the color of the existing sky.
Select OK
11. Press the DELETE key
Only areas of the sky will be effected and not the leaves.
Now all areas that are the color of the sky are transparent and the background image shows through it. Save it!
The gist of the process is to make all areas of the sky in your photo transparent and place it as a layer on top
of a new sky background. The magic trick is called COLOR RANGE in Photoshop. This works fairly well if the sky
in your photograph is of uniform color. Otherwise you may have to repeat the process for areas of different shades.
1. Create or use a stock image of the desired sky background. A solid color or something with clouds.
2. Open both your photo and the new created sky background in Photoshop.
3. Re-size (if necessary) the new sky background to the same dimension as you r photograph.
4. Select your photo as the active image.
5. In the SELECT menu, select ALL
In the EDIT menu, select COPY
6. Select the new sky background as the active image.
7. In the LAYER menu, select NEW then LAYER
8. In the EDIT menu, select PASTE
You now have a background sky image and a layer of you photo. ( I'm sure there is a more elegant
way to get a your photo into a layer with the background image.)
Be sure the layer is selected
9. Use the QUICK SELECTION TOOL to select the area of the sky to be changed
In the case of the covered bridge, select the top part of the photograph, masking out the bridge and lower
part. Include all areas that have sky including the trees.
10. In the SELECT menu, select COLOR RANGE.
Use the EYE DROPPER TOOL to select the color of the existing sky.
Select OK
11. Press the DELETE key
Only areas of the sky will be effected and not the leaves.
Now all areas that are the color of the sky are transparent and the background image shows through it. Save it!
Dec 7, 2017 14:22:40 #
tomad
Loc: North Carolina
Jack T wrote:
Using Photoshop CC here's one way. I'm sure the... (show quote)
Thats great! Process looks quick with no painting between leaves. I don't have photoshop but I'll try to translate that into Luminar or Gimp
Thanks!
If you want to reply, then register here. Registration is free and your account is created instantly, so you can post right away.