Color correction
Oct 27, 2017 14:39:42 #

jeep_daddy wrote:
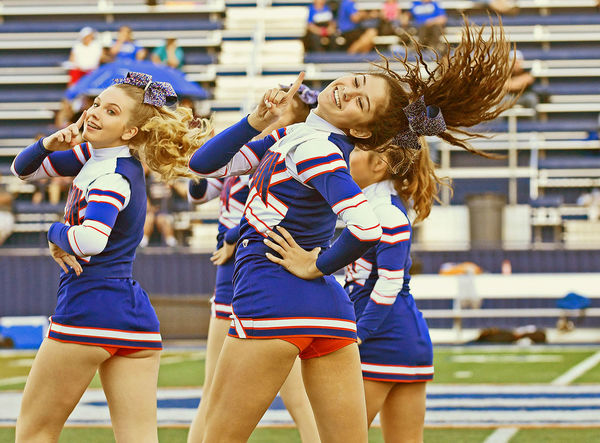
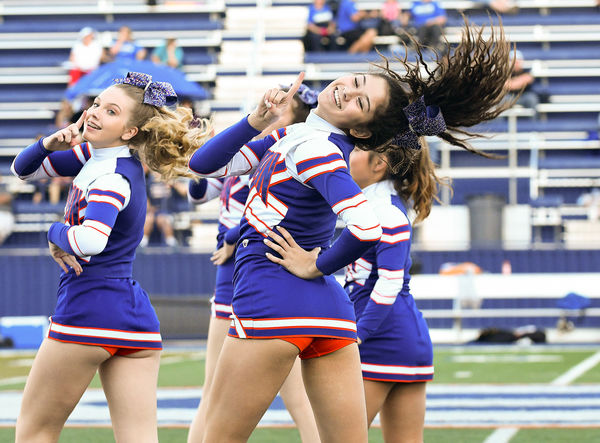
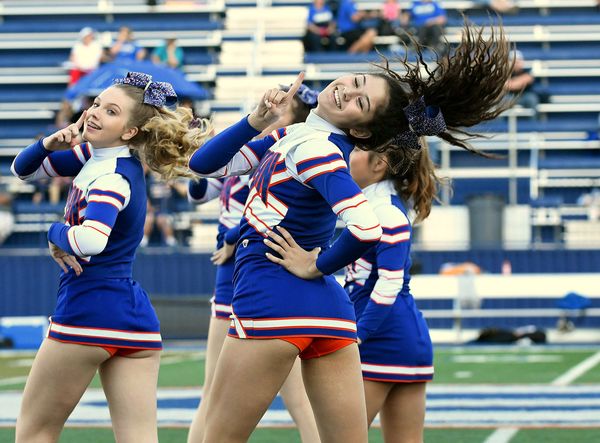
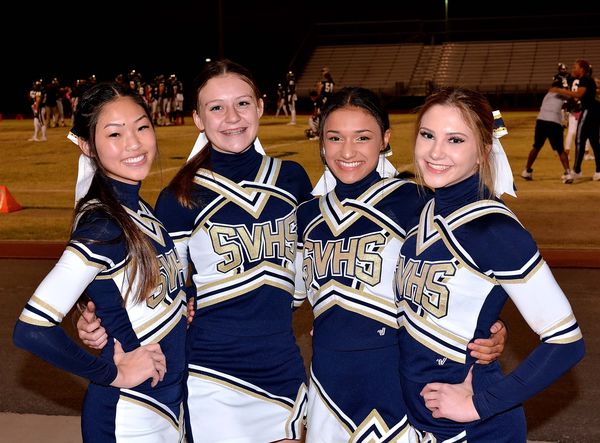
Sorry Rich, but your try isn't that good. See all the blue color cast on all the white parts of the girls outfits? Very over saturated too. This may be to your taste, but it's not likely to be to most other peoples tastes.
I see what you mean and of course you are right. I was looking more at the skin tones but I over saturated that also. In short it's bad all around. Next time I will take my time instead of rushing. Sorry about that....Rich
Oct 27, 2017 15:26:30 #

Jules Karney wrote:
i have photoshop cs6.
This photo is not the correct color. What can I do in Photoshop to correct this?
Thank you in advance for your advice and comments.
Jules
This photo is not the correct color. What can I do in Photoshop to correct this?
Thank you in advance for your advice and comments.
Jules
My take FWIW ........Elements 9......mostly minus blue, plus red, reduce highlights, open shadows ....
Oct 27, 2017 15:46:04 #
Jules Karney wrote:
i have photoshop cs6.
This photo is not the correct color. What can I do in Photoshop to correct this?
Thank you in advance for your advice and comments.
Jules
This photo is not the correct color. What can I do in Photoshop to correct this?
Thank you in advance for your advice and comments.
Jules
I do not have any of the photoshop products so please forgive me for not answering the question directly. Does that program have something like a color balance tool. Typically it looks like a circle with all the colors around it and white in the middle. I use LightZone (a free program) which does have that tool. The first step in these images is use color balance tool, click the eye-dropper, and select any neutral tone (white, grey, black, but white works well here), and the image is balanced correctly. No need to try to figure which colors to raise or lower. After the image is color balanced, then any other adjustments are much easier.
Jerry
Oct 27, 2017 17:11:48 #

gmcase wrote:
A quick way would be to use a curves adjustment layer. Choose blue in the pull down then pull the middle down to add yellow which will remove the strong blue cast. Adjust down until blue cast is neutralized. (Yellow is the opposite of blue). If you move the middle up it will add blue.
This is a good answer, but when I first read it and considering the subject matter, my mind went in a different and inappropriate direction. LOL
Oct 27, 2017 17:48:11 #

Jules, I imported your image into Lightroom and then used the eyedrop sampler for White Balance. I pulled my sample from the gray item in the background to the right of the rightmost cheerleader. That seemed to pull everything into reasonable balance. I would assume that PS would have the same capability in the ACR module.
Oct 27, 2017 23:14:21 #

Microsoft Digital Image Pro 10 one click color auto fix. I know this is really old software (13 years old) but it still works pretty good sometimes.
Oct 28, 2017 00:21:12 #

Oct 28, 2017 11:40:56 #

Oct 30, 2017 10:17:01 #
SalvageDiver speaks with tenured wisdom here... That said unless you deploy a fully color balanced workflow you may never be able to appreciate the results... Is your monitor calibrated? This can be and oft is the major detractor in the mix Jules... Also you eyes will lie to you in as they are superb about adjusting to whatever you're viewing and setting their own white balance...
For catalog sessions it is pretty much mandatory to shoot a "color target" or neutral gray card with each and every change of illumination. However for location work this presents a serious challenge in as one has little or no control over the ever changing illumination values. As SalvageDiver mentions there are no "correct" methodologies here... Instead a myriad of workable techniques each of which can be valid in any given scenario.
Jules in your posted examples what was the WB set on your D500? Did you use Kelvin? or a Nikon preset?
The real challenge comes when there are multiple light sources at widely differing color temperatures illuminating the scene. Which is a total nightmare to correct... enough said.
Bottom Line? Never rely on your eye to correct in post... This will never end well... The Info tab in PS will give you a readout of each channel... those who retouch for a living typically sample the shadows and balance by the numbers...
btw, Totally love the motion dynamics latent within those two captures Jules! I'm certain the talent will appreciate your efforts... Only suggestion would be to have used f/2.8 on your 70-200 rather than f/4.5 and shoot at 200mm rather than 120mm to achieve more effective isolation via DOF to eliminate the background distraction which is very difficult to do in post processing...
Note: Nikon's AF-S 70-200mm f/2.8 seriously suffers from "lens breathing" and is only a 135mm +/- when set at 200mm for normal portraiture distances... Which is why I use the iconic 180mm f/2.8 which is vastly superior in IQ, is feather light and cost but a fraction of the bloated 70-200mm... Just a thought
Thanks again for sharing Jules... I always enjoy viewing your endeavors...
Oct 30, 2017 11:02:27 #

jcdonelson wrote:
This is my take, and I have up loaded the XMP file to you can see exactly what I did in ACR. Look under the brush tool as well, as I felt the back ground was too busy and distracting from the subject. You could refine the brushing a bit.
Nice correction... the background is great too!
Oct 30, 2017 11:13:05 #

Thomas902 wrote:
SalvageDiver speaks with tenured wisdom here... Th... (show quote)
Hello Thomas: White Balance was set to auto. I was not even thinking about wb when I shot these. Figured I could correct anything wrong in Photoshop. I was so wrong.
Thanks for all your info. I will know better next time and switch cameras instead of trying to do everything in one.
Oct 30, 2017 11:13:59 #
lsimpkins wrote:
Jules, I imported your image into Lightroom and then used the eyedrop sampler for White Balance. I pulled my sample from the gray item in the background to the right of the rightmost cheerleader. That seemed to pull everything into reasonable balance. I would assume that PS would have the same capability in the ACR module.
Much better for sure, thanks for working on this.
Oct 30, 2017 11:15:09 #
Erdos2 wrote:
I do not have any of the photoshop products so ple... (show quote)
Jerry:
Thanks for chiming in on this, appreciate your time and patience.
Oct 30, 2017 11:33:46 #
Jules,
First of all the D500 should do a good job of WB in auto. Certainly good enough for what you are doing.
Are you certain that you were using AUTO1 (Normal) because it looks like you were on "AUTO0 Keep white (reduce warm colors)"
that adds a touch of blue. You should be on AUTO1.
Have a look here:
http://nps.nikonimaging.com/technical_solutions/d500_tips/useful/white_balance/#mod-headingV3-title-anchor1
Take some test shots until you are blue in the face (pun intended). Set the WB to different settings and see what you get.
Oct 30, 2017 11:43:40 #
jcdonelson wrote:
Jules, br First of all the D500 should do a good j... (show quote)
Thanks for the information. I will do this and see what happens.
If you want to reply, then register here. Registration is free and your account is created instantly, so you can post right away.