Help with 2 fifty year old B/W photos
Aug 1, 2016 14:35:39 #

kubota king wrote:
Thought I would a different view from the rest . It's ok if no one likes it .Tommy
Very cool! Now, can you turn the fire engine red? 😀
Aug 1, 2016 15:36:00 #

MMC wrote:
This is my attempt.
Another fantastic photo repair. Would you share what you used or did?
Aug 1, 2016 15:37:45 #
ncshutterbug wrote:
Here's my efforts. I used an obsolete processing program to remove lines, sharpen and levels. Will try the firetruck next.
Thank you for your efforts, good so far.
Aug 1, 2016 15:39:46 #
kubota king wrote:
Thought I would a different view from the rest . It's ok if no one likes it .Tommy
Wow, I do like it. I wouldn't even know where to begin to colorize the photo.
Aug 1, 2016 15:40:52 #
ncshutterbug wrote:
Here's the truck. Unfortunately, when removing the lines, it also removes some detail so I used it sparingly on both photos. The truck is a little harder to fix.
Thanks, looks great.
Aug 1, 2016 15:42:35 #
geolaval wrote:
I just modified the first photo for lack of time. Hope you like it.
Adjusted in NIK COLLECTION with NIK SILVER EFEX PRO 2
PSE 14 UNSHARP and SHARPEN
Removed some of the horizontal lines with healing tool and clone stamp.
George
edit 2: It's much better if you view in download
Adjusted in NIK COLLECTION with NIK SILVER EFEX PRO 2
PSE 14 UNSHARP and SHARPEN
Removed some of the horizontal lines with healing tool and clone stamp.
George
edit 2: It's much better if you view in download
Good job, looks really good
Aug 1, 2016 15:46:33 #
kubota king wrote:
Thought I would a different view from the rest . It's ok if no one likes it .Tommy
What did you use to add color to the people in the photo. I would like to try something like that in the future. Did you create a mask and then add color?
Aug 1, 2016 17:59:00 #
First I would like to give thanks to all the other UHH members who put there time and effort into restoring these two photos for Ron 717 . I have been asked , how did you color these men . I started out a long time ago doing hand colored portraits . When I discovered Photoshop about 15 years ago , I became addicted how easier it was to do any thing I wanted with photos . I have been adding color to B&W photos since then . Most of the time just for fun or practice . I have restored or colored photos as old as metal plate photos in the 1700's . Learning light and shade doing hand drawn colored portraits is what helps me to color photos today . It takes a good eye and a lot of practice knowing how to add different colors to skin and adding light and dark to the right places just like you see when you take a photo . I was asked , did you create a mask . The answer is no , I seldom use a mask . I first enhanced the B&W photo , then I removed all the black lines . I then used the lasso tool to outline all the skin areas ( I always zoom into the photo so I can see the exact areas I want to outline with the lasso tool ) Then from years of experience coloring photos , I pick a color to start with ( the same color doesn't work for every B&W to start with ) . I try to use the color mode or overlay mode when painting any colors and turn opacity down . When I am happy with the first color , I change it some and add another layer of paint in the areas of the skin that would be darker or the color is stronger . Then I make my adjustments with the dodge or burn tool to finish the effects. I have done hundreds of photos that were B&W and made into colored photos , not just the skin , but the whole photo . Trees , clothes , vehicles , etc. I still feel that I can learn something everytime I do another photo . I am humbled by all who like my rendition , and I also know that there are much better people than me doing this . If you were hoping there was a easy way of doing what I did , I'm sorry to say there is no easy way to tell you . It takes a good eye to see the different colors of the skin , time to learn how to make the final results look real . A lot of trial and error . I know this a long winded answer , but I wanted you to know how I got started and how long I have been at it .Thank you all for asking and may you have good luck at trying to color things in the future . If you really want to learn . Start with a good quality colored photo .Open it in your program , duplicate it . Now use the desaturate tool on the one copy . Now you have a B&W copy to practice on .Try your skills at adding color to the different areas of the photo until you get it to look like the original colored photo you started with . Hope this helps , and remember , practice , practice , practice . Tommy
Aug 1, 2016 18:04:51 #
TriX wrote:
Very cool! Now, can you turn the fire engine red? 😀
I could turn the fire truck red , but it would take a lot of time because of the quality of the photo . I may try
Aug 2, 2016 04:36:40 #

Aug 2, 2016 05:52:09 #
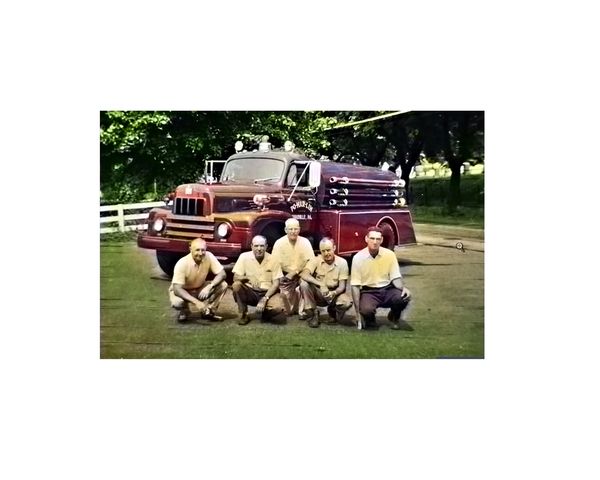
I was asked if I could make the truck red too. I left the rest black to zero in on what the main theme is , the men and their trusty fire truck .Hope it meets your satisfaction .Tommy


Aug 2, 2016 07:21:39 #
kubota king wrote:
I was asked if I could make the truck red too. I left the rest black to zero in on what the main theme is , the men and their trusty fire truck .Hope it meets your satisfaction .Tommy
Kabota King, I am totally amazed at your work. Your description of the work flow is very detailed, but I cannot imagine being able to duplicate your results. There must be a artist gene in your background.
Ron
Aug 2, 2016 07:23:08 #
Chalybeateman wrote:
Try mine
Great work, I cannot thank you enough for what you have done. I never even thought that this was possible
Ron
Aug 2, 2016 08:15:59 #
kubota king wrote:
First I would like to give thanks to all the other... (show quote)
Do you use a Wacom type tablet or are you using the mouse to accomplish this feat?
Aug 2, 2016 08:43:31 #
kubota king wrote:
I was asked if I could make the truck red too. I left the rest black to zero in on what the main theme is , the men and their trusty fire truck .Hope it meets your satisfaction .Tommy
Wow. That is impressive!
If you want to reply, then register here. Registration is free and your account is created instantly, so you can post right away.