Portraits
Jan 23, 2016 22:19:01 #

Jan 23, 2016 22:21:34 #

Rongnongno wrote:
You call that a 'correction'?
Man you are lucky this is a beheaded dummy!!!
Man you are lucky this is a beheaded dummy!!!
Ron you are always so full of it but conflict is what you exist on.
Craig
Jan 23, 2016 22:24:25 #
CraigFair wrote:
Ron you are always so full of it but conflict is what you exist on.
Craig
Craig
Look at the colors, everything is gone. Sorry but that is not good at all. The burnt area is still there too. You cannot tell me that this is the best you can do.
Jan 24, 2016 11:24:54 #
Jan 24, 2016 22:20:38 #

dnathan wrote:
Is she single? Please contact me. Pinochio.
LOL !
:XD: :thumbup:
Jan 25, 2016 15:21:42 #

Jan 25, 2016 15:53:49 #
wayne-03 wrote:
Still working on portrait lighting, practicing with my mannequin. Any thoughts?
I have never use the hair light as the Key light and use reflectors as Fill? Keep it simple! Use the Key light/umbrella on the ( camera) right side of face as the Key light. Set height just above eye level. Use the foam core reflectors as "Fill light", opposite the Key light. Hair light (head light) above head facing down. http://photo.stackexchange.com/questions/6601/what-is-rembrandt-lighting-and-when-do-i-use-it Simple is best!
Jan 25, 2016 16:04:05 #
canon Lee wrote:
I have never use the hair light as the Key light and use reflectors as Fill? Keep it simple! Use the Key light/umbrella on the ( camera) right side of face as the Key light. Set height just above eye level. Use the foam core reflectors as "Fill light", opposite the Key light. Hair light (head light) above head facing down. http://photo.stackexchange.com/questions/6601/what-is-rembrandt-lighting-and-when-do-i-use-it Simple is best!
Actually when one has only one light this is a great setting.
All solutions offered are assuming more than one light.
With using one light to get a hair light is impossible with a reflector unless this is used so....
Yeah, there is a burnt area that is impossible to correct but that as mentioned can be modified using s shaped/cut gel filter to modulate the light output in a specific setup (forget a moving model)...
To me the op did a great job with limited resources.
Jan 26, 2016 16:59:37 #

Wane!
I am always pleased when I see photographers honing their portrait skills, especially in the area of classical portrait lighting and posing. Perhaps, nowadays it's becoming a lost art because many photographers find that some of the basic rules and guidelines and too complex, perhaps too old school, a bit creatively restrictive and a boring practice that is practiced by a bunch of old stodgy photographers. I feel this is an unfortunate misconception in that contemporary classic portrait photography can be dynamic, impressive, innovative and highly creative.
Yes, to start things off in learning this, there are definite rules, guidelines, technical and scientific formulas as well as rudimentary artistic principles that must be learned, studied, practiced and mastered. None of theses components are designed or intended to restrict anyone's creativity, flexibility or artistry, they are merely the basic tools to enable creativity and artistry. My favorite motto is the rules are the tools. A beginning photographer can have the most creative, innovative and even the most out of the box ideas in the world in his or her mind's eye but realizing theses images on a sheet of photographic paper or even on a computer monitor requires certain technical skills and standards as a basis. If you want to purposely and successfully break the rules, you have to understated them first. If you prefer the classical approaches, well- you need to know the basics all the more.
So...Using a mannequin head to learn the basics of portrait lighting is not a bad starting method but once you get the hang of it, it is bet to practice with live models, volunteers, family members or, whoever you can convince to help you. The hairdresser head that you are presently using has painted in catch-light in the eyes and the painted in eyes themselves, even with no simulated catch-lights, do not have enough reflectance to render real reflections from your lights. The reason I mention this is because one of the important indicators of good portrait lighting patterns is the position of theses reflections in the eyes.
Live subjects also help you deal with skin tones, textures, different facial structure and the principles of creating good likeness and flattering interpretations in your portraits.
The main or key light in a portrait lighting scheme is the most important light in the game because it's position as to angle (from the camera/subject axis), it's height and distance from the subject and the nature of its hardness or softness, determines all of the light and shadow relationships, the mood of the image, the key and the cosmetic and aesthetic aspects of any final portrait. That's why a simple one or two light system with the use of reflectors is a great way of learning to master your main light and coming up with great results as well. It's a what you see is what you get method.
There are lots of ways to skin a cat but really- who wants to skin a cat? Well, perhaps one way of shooting portraits may be using a hair light as a main source and using a reflector as a main light, might work, in a manner of speaking, but in doing that you will limit the fine control you must have to use you main light precisely and attain the exact results you want. Any conventional portrait light source can be used as the main light; an electronic flash powered flood light
(a direct light in a standard reflector), a similar unit fitted with a so-called beauty dish, an umbrella or a softbox- even a spotlight for very dramatic effects!
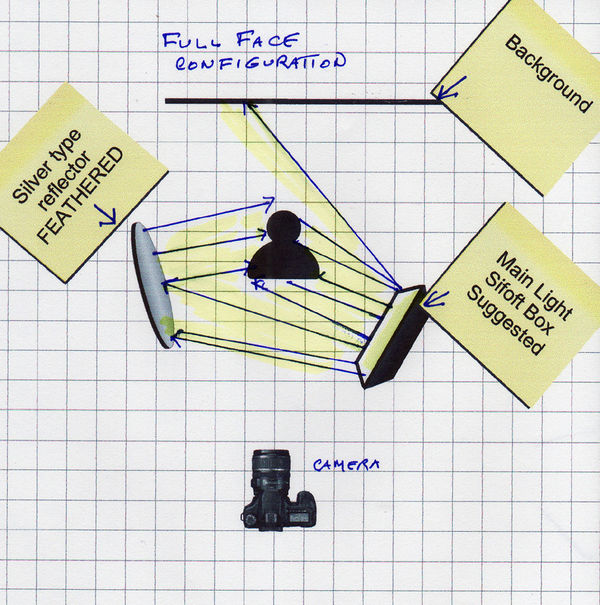
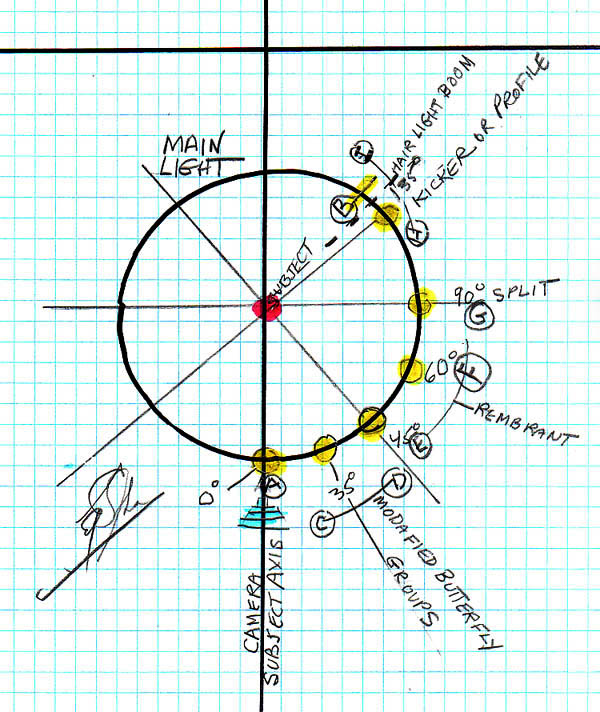
The diagram I have attached represents the use of a medium sized (24) softbox, and a reflector. If you want to add a hair light, that is a separate and subsidiary light that will be aimed specifically at the subjects hair. This light comes under the category of an accent light or kicker and that kinda light has special exposure issues to consider- more about that later.
The method in the diagram requires a technique called feathering that means using the edge of the light beam rather that the center pf it. This technique gives you better skin texture and specular highlights and in this case, allows some of the light to strike the reflector and be redirected at the subject for a very controllable fill light source. It's just a matter of rotating the light carefully toward the camera- check out the light direction arrows in the diagram.
Using an incident light flash meter is a good idea to determine you basic starting exposure for you main light and any subsequent fill lights you may eventually add to your system. But when it comes to those accent and kicker lights there is a problem that can fool you flash meter and burn out highlight detail in the hair or the sides of the face when other kinds of kicker light are employed.
This has to do with the angle of incidence theory- something that you should look up, study, experiment with and master. The math of geometry is. The angle of incidence is equal to the angle of reflection.
For now, suffice it ti sat that any light that is striking the subject from more than 90 degrees to the camera/subject axis will appear brighter that any light striking the subject from less than 90 degrees even of both lights are of the same type, at the same power output and equidistant from the subject. So even if your meter tells you that your hair light is at the same exposure level and even significantly lower than your main light you may have to power it down more, pull it further away or diffuse it. That is why it needs to be an independently controllable light that is not used for illuminating a distant reflector.
As far as washing out the hair detail- sometimes I purposely do that to create a retro kind glamor lighting in the hair. Most of the time I keep it subtle, just enough to continue to glow of the main light into the hair and a bit more separation from the background!
Try this out on your head if you like and post the results- I think you're gonna like it!
Good luck. Ed
I am always pleased when I see photographers honing their portrait skills, especially in the area of classical portrait lighting and posing. Perhaps, nowadays it's becoming a lost art because many photographers find that some of the basic rules and guidelines and too complex, perhaps too old school, a bit creatively restrictive and a boring practice that is practiced by a bunch of old stodgy photographers. I feel this is an unfortunate misconception in that contemporary classic portrait photography can be dynamic, impressive, innovative and highly creative.
Yes, to start things off in learning this, there are definite rules, guidelines, technical and scientific formulas as well as rudimentary artistic principles that must be learned, studied, practiced and mastered. None of theses components are designed or intended to restrict anyone's creativity, flexibility or artistry, they are merely the basic tools to enable creativity and artistry. My favorite motto is the rules are the tools. A beginning photographer can have the most creative, innovative and even the most out of the box ideas in the world in his or her mind's eye but realizing theses images on a sheet of photographic paper or even on a computer monitor requires certain technical skills and standards as a basis. If you want to purposely and successfully break the rules, you have to understated them first. If you prefer the classical approaches, well- you need to know the basics all the more.
So...Using a mannequin head to learn the basics of portrait lighting is not a bad starting method but once you get the hang of it, it is bet to practice with live models, volunteers, family members or, whoever you can convince to help you. The hairdresser head that you are presently using has painted in catch-light in the eyes and the painted in eyes themselves, even with no simulated catch-lights, do not have enough reflectance to render real reflections from your lights. The reason I mention this is because one of the important indicators of good portrait lighting patterns is the position of theses reflections in the eyes.
Live subjects also help you deal with skin tones, textures, different facial structure and the principles of creating good likeness and flattering interpretations in your portraits.
The main or key light in a portrait lighting scheme is the most important light in the game because it's position as to angle (from the camera/subject axis), it's height and distance from the subject and the nature of its hardness or softness, determines all of the light and shadow relationships, the mood of the image, the key and the cosmetic and aesthetic aspects of any final portrait. That's why a simple one or two light system with the use of reflectors is a great way of learning to master your main light and coming up with great results as well. It's a what you see is what you get method.
There are lots of ways to skin a cat but really- who wants to skin a cat? Well, perhaps one way of shooting portraits may be using a hair light as a main source and using a reflector as a main light, might work, in a manner of speaking, but in doing that you will limit the fine control you must have to use you main light precisely and attain the exact results you want. Any conventional portrait light source can be used as the main light; an electronic flash powered flood light
(a direct light in a standard reflector), a similar unit fitted with a so-called beauty dish, an umbrella or a softbox- even a spotlight for very dramatic effects!
The diagram I have attached represents the use of a medium sized (24) softbox, and a reflector. If you want to add a hair light, that is a separate and subsidiary light that will be aimed specifically at the subjects hair. This light comes under the category of an accent light or kicker and that kinda light has special exposure issues to consider- more about that later.
The method in the diagram requires a technique called feathering that means using the edge of the light beam rather that the center pf it. This technique gives you better skin texture and specular highlights and in this case, allows some of the light to strike the reflector and be redirected at the subject for a very controllable fill light source. It's just a matter of rotating the light carefully toward the camera- check out the light direction arrows in the diagram.
Using an incident light flash meter is a good idea to determine you basic starting exposure for you main light and any subsequent fill lights you may eventually add to your system. But when it comes to those accent and kicker lights there is a problem that can fool you flash meter and burn out highlight detail in the hair or the sides of the face when other kinds of kicker light are employed.
This has to do with the angle of incidence theory- something that you should look up, study, experiment with and master. The math of geometry is. The angle of incidence is equal to the angle of reflection.
For now, suffice it ti sat that any light that is striking the subject from more than 90 degrees to the camera/subject axis will appear brighter that any light striking the subject from less than 90 degrees even of both lights are of the same type, at the same power output and equidistant from the subject. So even if your meter tells you that your hair light is at the same exposure level and even significantly lower than your main light you may have to power it down more, pull it further away or diffuse it. That is why it needs to be an independently controllable light that is not used for illuminating a distant reflector.
As far as washing out the hair detail- sometimes I purposely do that to create a retro kind glamor lighting in the hair. Most of the time I keep it subtle, just enough to continue to glow of the main light into the hair and a bit more separation from the background!
Try this out on your head if you like and post the results- I think you're gonna like it!
Good luck. Ed
Jan 28, 2016 12:39:49 #
Rongnongno wrote:
Actually when one has only one light this is a great setting.
All solutions offered are assuming more than one light.
With using one light to get a hair light is impossible with a reflector unless this is used so....
Yeah, there is a burnt area that is impossible to correct but that as mentioned can be modified using s shaped/cut gel filter to modulate the light output in a specific setup (forget a moving model)...
To me the op did a great job with limited resources.
The OP is asking for "suggestions"! No mention that he has only one light! He is showing his "experimenting", and frankly it is not a good set up at all! We hogs are trying to suggest alternatives! My suggestion was simple and works! I would never encourage continuing with a set up that is bad from the start! I am not certain that using a plastic highly reflective mannequin is what should be used, instead using a live subject would, since the eyes are most important. Does it appear to you that the eyes have a glare? Catch lights?. Natural look? No need to experiment, since decades ago portrait photographers have it down to a simple set up "that works"! Knowing the set up leaves time to concentrate on creativity!
As to a 1 light set up; start by positioning the subject under an overhead light if possible. Strobe/umbrella set to one side of the face, reflector board opposite side of face. Simple? Using a hair light as a key is totally wrong. Ron, I say with all respect that you should give your expertise not encouraging wrong set ups!
Jan 28, 2016 13:24:11 #
canon Lee wrote:
The OP is asking for "suggestions"! No ... (show quote)
I apologize to all you great photographers. I was totally wrong posting the picture of a mannequin done with only one light. What was I thinking? I should've waited until I could afford a full set of studio lights, lots of space, professionally painted backdrops, professional models, hair and makeup people. What was I thinking? What was I thinking?
Jan 28, 2016 16:21:54 #
wayne-03 wrote:
I apologize to all you great photographers. I was totally wrong posting the picture of a mannequin done with only one light. What was I thinking? I should've waited until I could afford a full set of studio lights, lots of space, professionally painted backdrops, professional models, hair, and makeup people. What was I thinking? What was I thinking?
Wayne! There is not need to apologize! Why on earth should you apologize? Your question and post are perfectly legitimate and there is absolutely nothing wrong with using that "head, just to experiment with various lighting forms. Of course, it does not have the quality of human skin and eyes but it can still give you an idea of the Churracrisso effect, a time-honored analysis of light, shadow and dimensionality that goes back to the old masters painters and even further back in art history.
Another point! Of course, again, it's always best to work with actual portrait subjects but when you are first learning the rudiments of lighting, it is oftentimes a long process to try to achieve certain lighting patterns and styles and a live model, especially a volunteer family member or friend might not want to sit still for hours at a time, especially of you use high output continuous light sources- the poor mode can just about melt of faint under the lights.
I have given a great deal of seminars and training courses in portraiture, and on the first day, I use hairdresser's practice heads for teaching some of the basic lighting positions and bring in the actual subjects in the following days. Some of my courses were in photographing babies and children- Imaging getting a 2-year-old to sit still when you are trying to illustrate a lighting pattern!
I don't think anyone should expect you to have a complete array of lighting gear while you are trying to learn the basics- that includes you! Believe me, I can teach you to make an outstanding portrait with a north-lighted window or a candle and a length of aluminum foil stretched over a sheet of cardboard! If you have the money, you can BUY all the fancy equipment in the world and still do mediocre work. The "equipment" you can not BUY is sticktoitiveness, a will to develop your talent and a good set of eyes in your head.
Hair and makeup??? You don't need an entire production to post a picture on the hog! Painted background? Sure they are nice but I can show you how to create an effective background with an old fake Oriental rug or even just about anywhere on location. BIG studio- I have over 50 years in the wedding photography business and have made award winning images in a tiny apartment, a church antiroom or a cramped backyard!
What's the sense of investing in all kinds of elaborate equipment before your learn the basics with a few pieces of simple but decent gear? At this point, you probably don't know exactly what kind of gear to purchase until you learn about the light quality and power levels that you need for the type of work you want to produce.
I really hate to rant but I really don't care if your are trying to shoot portraits with a cigarette lighter and a shaving mirror- now is the time to show the more experienced what you are doing, right or wrong, and learn from the experience. If anyone gives you flack, makes fun of you or talks down to you- well I'll stop here because I don't like to use foul language on the Internet- I cuss too much, a bad habit I picked up in the army!
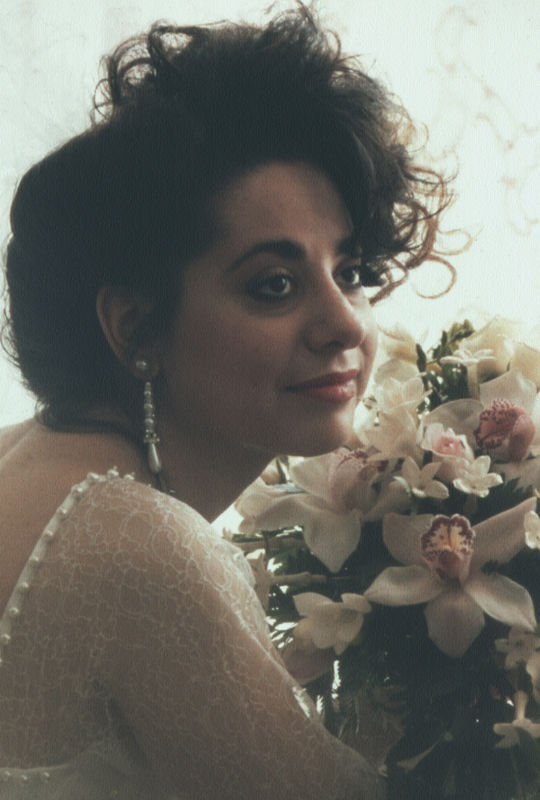
Somewhere in my archives, I actually have a bridal portrait where I used window light coming in from a 135-degree angle and used a silver flat reflector as the main light- I'll dig it up and post in soon!
Ed
PS Sorry about the black spots- old print- quick shot of canvas sample.
Jan 30, 2016 00:08:21 #
wayne-03 wrote:
I apologize to all you great photographers. I was totally wrong posting the picture of a mannequin done with only one light. What was I thinking? I should've waited until I could afford a full set of studio lights, lots of space, professionally painted backdrops, professional models, hair and makeup people. What was I thinking? What was I thinking?
Another suggestion. Use the "modeling lights" on your head, in a dark room, this way you can adjust the shadows on the subject. A studio should be as dark as possible so that you can adjust the lights and see the shadows before you take the shots.
It doesn't cost a fortune to take portraits. One mono light,( check out http://www.paulcbuff.com/b800.php $279.00 )Umbrella( http://www.bhphotovideo.com/c/product/423625-REG/Impact_UBBW45_45_Convertible_Umbrella.html $15.00) Light stand( (http://www.bhphotovideo.com/c/product/262758-REG/Impact_LS_6B_Light_Stand_Black.html $20.00) reflector (http://www.staples.com/Elmer-s-White-Pre-Cut-Foam-Board-Multi-Packs-18-x-24-950023-/product_EPI950023 $8.50) Hair light( http://www.homedepot.com/p/150-Watt-Incandescent-Clamp-Light-HD-300PDQ/205031467 $9.00) backdrop (Wal-mart bed sheet) backdrop support system (http://www.bhphotovideo.com/c/product/125996-REG/General_Brand_3046_Portable_Background_System.html/prm/alsVwDtl $99.00) Your set up $430.00. It's not the equipment but the photographer! You don't need professional models but clients! You don't need makeup people (especially if you are doing lots of corporate head shots). I have been shooting for decades and never had to hire a makeup/hair person! I don't know what you were thinking but do think about a simple set up like I suggested and practice practice practice.
Jan 30, 2016 00:08:45 #
wayne-03 wrote:
I apologize to all you great photographers. I was totally wrong posting the picture of a mannequin done with only one light. What was I thinking? I should've waited until I could afford a full set of studio lights, lots of space, professionally painted backdrops, professional models, hair and makeup people. What was I thinking? What was I thinking?
Another suggestion. Use the "modeling lights", in a dark room, this way you can adjust the shadows on the subject. A studio should be as dark as possible so that you can adjust the lights and see the shadows before you take the shots.
It doesn't cost a fortune to take portraits. One mono light,( check out http://www.paulcbuff.com/b800.php $279.00 )Umbrella( http://www.bhphotovideo.com/c/product/423625-REG/Impact_UBBW45_45_Convertible_Umbrella.html $15.00) Light stand( (http://www.bhphotovideo.com/c/product/262758-REG/Impact_LS_6B_Light_Stand_Black.html $20.00) reflector (http://www.staples.com/Elmer-s-White-Pre-Cut-Foam-Board-Multi-Packs-18-x-24-950023-/product_EPI950023 $8.50) Hair light( http://www.homedepot.com/p/150-Watt-Incandescent-Clamp-Light-HD-300PDQ/205031467 $9.00) backdrop (Wal-mart bed sheet) backdrop support system (http://www.bhphotovideo.com/c/product/125996-REG/General_Brand_3046_Portable_Background_System.html/prm/alsVwDtl $99.00) Your set up $430.00. It's not the equipment but the photographer! You don't need professional models but clients! You don't need makeup people (especially if you are doing lots of corporate head shots). I have been shooting for decades and never had to hire a makeup/hair person! You don't need a studio or large space, a living room would do! I don't know what you were thinking but do think about a simple set up like I suggested and practice practice practice. You can get $200.00 for one head shot, and much more for family, communions, holidays,etc. A couple of jobs and your set up is paid for!
Jan 31, 2016 17:11:47 #
E.L.. Shapiro wrote:
Wane! br br I am always pleased when I see photog... (show quote)
Hi Wane. It is evident you are an experienced portrait photographer, & a good teacher as well. If I may add to your comments, how important it is to pose the subject. I pose with the subject at an angle, either leaning in or shoulders at an angle to the camera. I never pose straight on as it lacks creative posing techniques.
If you want to reply, then register here. Registration is free and your account is created instantly, so you can post right away.